Pedal Pusher!!!

Posted on


Pedal Pusher, www.LaurasStampPad.com

I can’t believe Sale-A-Bration is almost over!!!! Be sure to stock up on supplies and goodies now so you can earn FREE Sale-A-Bration items. This promotion ends on March 31st! Today I’m showcasing the Pedal Pusher Sale-A-Bration Stamp Set! It has this cute bike in it and it is super fun!!!!

I started with a Whisper White card base and added a piece of Love Blossoms Designer Series Paper measuring 4″ x 5-1/4″! Then I placed a White Tea Lace Doily on the front of the card with the edge of it on the right hand side of the card! If you would like more or less doily, you can always cut it and add as much as you wish! For the focal point, I cut out a piece of Whisper White measuring 4″ x 3″. I stamped the bicycle and greeting in Basic Black Archival Ink from the Pedal Pusher Stamp Set! I colored it in with a Blender Pen using Bermuda Bay, Tip Top Taupe, Pear Pizzazz and Rose Red Ink. Once I was done coloring, I used the Corner Punch to round the 2 left side corners. I added this piece to my card front with Stampin’ Dimensionals for a little texture!

Tandem Bike, www.LaurasStampPad.com

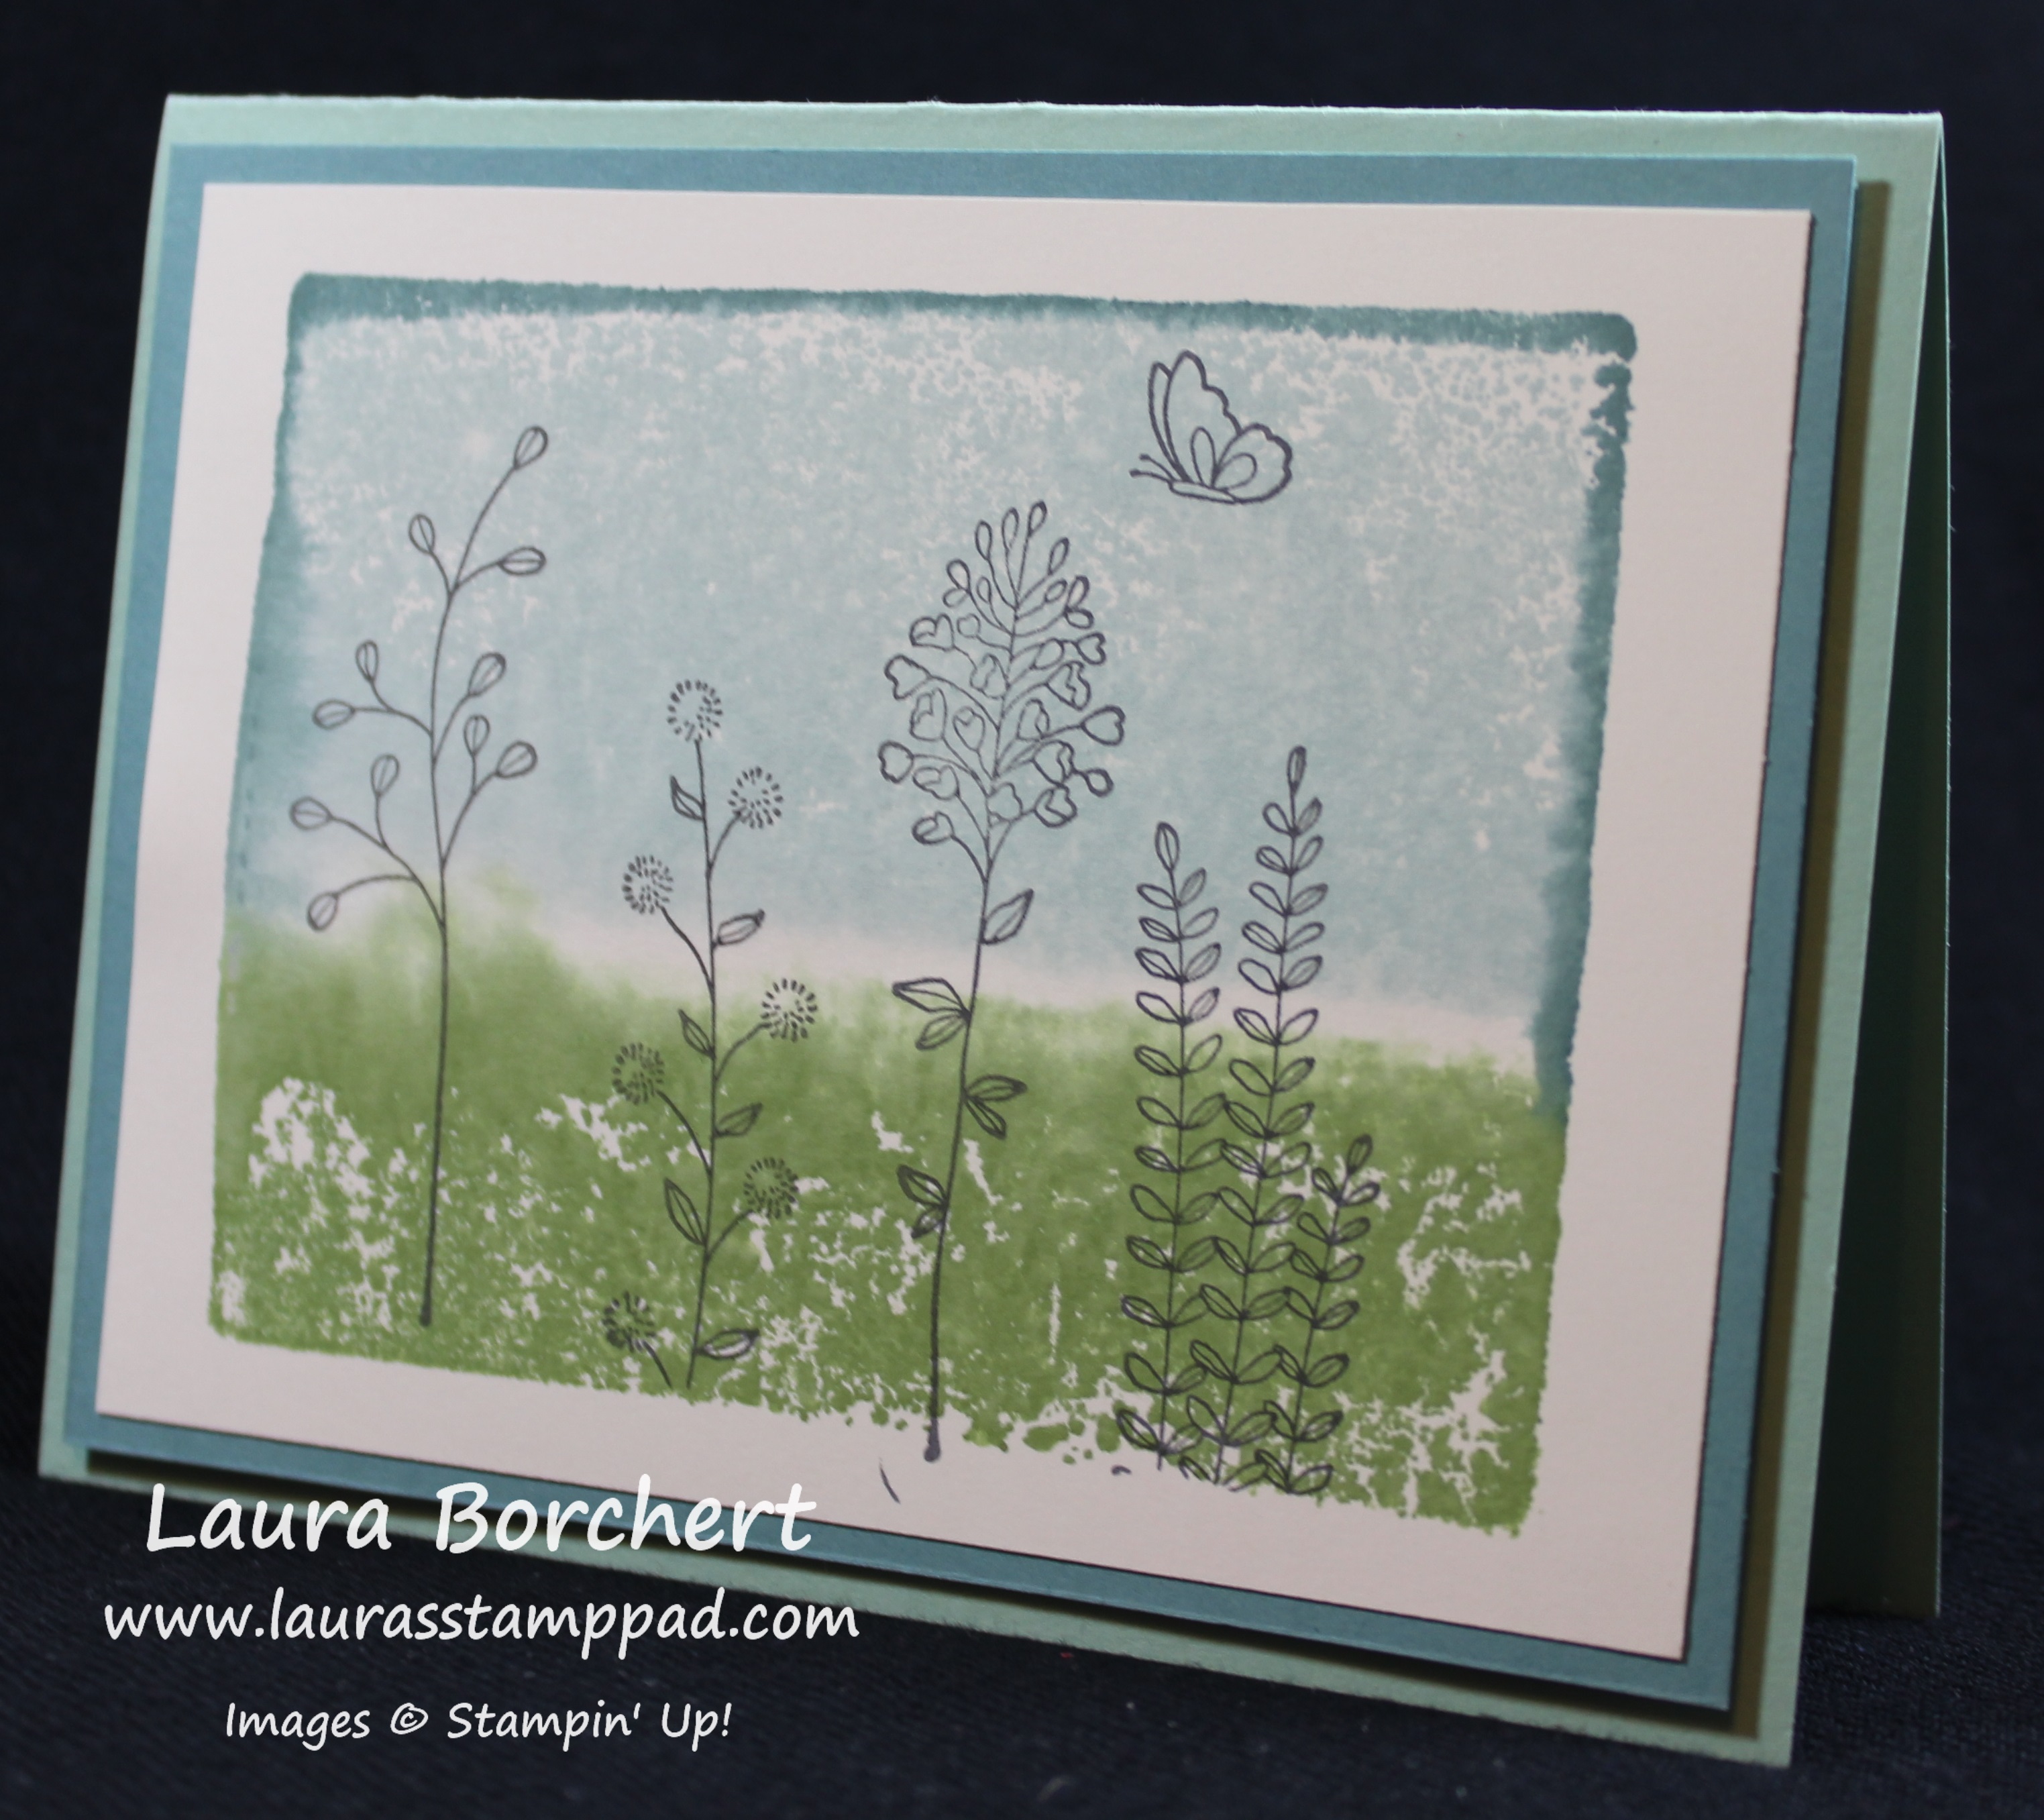
I think it is super cute and would make a great Anniversary card! Here is another sample I created using Pacific Point, Real Red and Basic Gray!

Here for You, www.LaurasStampPad.com

If you would like to see this technique in action, check out the video tutorial below or click here! Don’t forget to give it a thumbs up if you liked it and be sure to subscribe!

Happy Stampin’

~Laura


Technique Tuesday – Vine Cut Out!!!

Posted on

Happy Tuesday everyone! You all know what that means….I have a fabulous technique to share with you today!!! We are playing with the Botanical Bundle and creating a fabulous cut-out!!! Check this out!!!
Vine Pop Out, www.LaurasStampPad.com

Isn’t this card just beautiful??? I love it!!! I can not take credit for this idea though. I got it from another fabulous demonstrator – Wendy Weixler. Thanks Wendy for the amazing idea!!! Let’s get started!

For this card, I used all 3 products from the Botanical BundleBotanical Blooms Stamp Set, Botanical Garden Designer Series Paper, and Botanical Builder Framelits. I started with a piece of Whisper White cardstock measuring 4-1/4″ x 11″ and I folded it in half for my card base! I laid this piece of cardstock onto the Precision Base Plate on my Big Shot and placed the vine framelit from the Botanical Builder Set on the left hand side, solid leaves on the outside, and a little diagonal. You will want to place it falling off your cardstock in the top left corner near your fold. Run it through the Big Shot and there you have that fabulous vine cut-out. I love using the Big Shot Die Brush to pop out the cardstock from the Framelit and get rid of all of those little paper hairs. Now you can decorate as you wish. I used a piece of the Botanical Garden Designer Series Paper measuring 2″ x 5-1/2″. You can make your piece smaller or larger, just make sure it is enough to back the vine cut-out. This piece of DSP will go on the inside left of your card. On the front, I used the little flowers stamp and stamped all up and down the card in Blackberry Bliss. For the other flowers, I used the Botanical Builder Framelits and 3 shades of Purple – Blackberry Bliss, Perfect Plum, and Wisteria Wonder! I added some Crushed Curry Candy Dots to the center of the flowers for a little POP! The greeting is from the Botanicals For You Sale-A-Bration Stamp Set. I used my markers to only ink up the “You’re Awesome” and omit the “…because”. I love this card!!!

If you would like to see this in action, check out my Video Tutorial below or by clicking here! Don’t forget to give it a thumbs up if you liked it!! Also, be sure to subscribe so you don’t miss out on future videos. I post every Tuesday and Thursday!

Happy Stampin’

~Laura


Balloon Bouquet!!!

Posted on

Pink Balloon Bouquet, www.LaurasStampPad.com

Eeeeee! This card just makes me so excited I have to scream! PINK! BLING! RIBBON! SPONGE DAUBERS!!! I love it!!! You could always change up the color to your favorite color/s or even for a more masculine card! I’m super excited about the Balloon Celebration Stamp Set and coordinating Balloon Bouquet Punch (Bundle and Save 15%)!

I started with a Melon Mambo card base. Then I took a piece of Whisper White measuring 4″ x 5-1/4″. I stamped the balloon strings and greeting in Basic Black. Then I stamped one large and one small balloon outline onto Melon Mambo cardstock and punched them out. I also punched out one large and one small balloon in Blushing Bride Glimmer Paper and Dazzling Diamonds Glimmer Paper. You will want to adhere the balloons from the bottom up (shortest strings first)! I did half of them directly to the cardstock and the other half with Stampin’ Dimensionals! Then I brushed the edges of the cardstock with Melon Mambo and a Sponge Dauber and added it to the card base. For the bow, I used Melon Mambo Cotton Ribbon and used the Fork Bow Technique! You can check out the video tutorial on that here! I adhered the bow to the card with a Mini Glue Dot! Perfect!!!

Balloon Celebration, www.LaurasStampPad.com

TIP: So you might notice a bit of an outline of a balloon on the glimmer paper….DON’T DO IT! I added the balloon border to the Melon Mambo balloons and I liked how it really defined the balloon so I thought I would do the same with the Glimmer Paper. It didn’t dry and then smeared and got all over my fingers/project. I guess it eventually dried but I wouldn’t recommend doing it. 🙂 That’s what I’m here for….to make the mistakes and pass along the tips!

If you would like to see more samples and some basics on the Balloon Celebration Bundle, check out my video tutorial here or by clicking below! Don’t forget to give it a thumbs up if you enjoyed it!!!

Happy Stampin’

~Laura


Technique Tuesday – Botanical Gardens!!!

Posted on

Happy Tuesday!!! You all know that means I have a fabulous technique to share with you today! This one is super simple and yet super fabulous!!! Check this out!!!

Botanical Blooms, www.LaurasStampPad.com

Isn’t this card fabulous? You are probably looking at it thinking what’s the technique! It’s the Designer Series Paper! I used the Botanical Gardens Designer Series Paper and Botanical Blooms Stamp Set but you are going to want the entire Bundle and Save 15% which includes the Botanical Builder Framelits as well! Love all of these products! Plus if you order it before the end of the month you will get a Sale-A-Bration item for FREE! Let’s get started!

The Botanical Blooms Stamp Set coordinates with the Designer Series Paper so you can stamp the leaf veins and centers of the flowers to add more texture and interest to the flowers. It really makes the paper POP! I love it! It goes from cute to WOWZA!!!

Stamping on Paper, www.LaurasStampPad.com

For the card above, I added the Designer Series Paper to a Hello Honey card base. Then I wrapped some Linen Thread around the card a few times and tied it in a knot! I like the jungle look that the thread gives! For the greeting, I used the Rose Wonder Stamp Set and stamped it in Cajun Craze. I punched out the Whisper White with the 2″ Circle Punch and layered it onto Mint Macaron punched out with the 2-3/8″ Scallop Circle Punch. I added the greeting to the card with Stampin’ Dimensionals.

If you would like to see this in action, check out my Video Tutorial below or by clicking here! Don’t forget to give it a thumbs up if you liked it and subscribe to my channel – Laura’s Stamp Pad so you don’t miss out when future videos are posted!

Stay tuned for a lot more samples using the Botanicals Bundle!!!

Happy Stampin’

~Laura


Owl Punch Art – Zebra, Devil, & Cow!!!

Posted on

Owl Punch Art - Zebra, Devil, Cow, www.LaurasStampPad.com

Punch Art is so much fun and the Owl Builder Punch is the most versatile punch I know of! Today I’m going to show you how to create the Devil, Cow, and Zebra! Let’s get started!

Devil, www.LaurasStampPad.com

For the Devil, I used Real Red, Basic Black and Whisper White cardstock scraps. I punched a full Owl Body, heart, and sliver of the body for the tail in Real Red. The eyes were punched out with the two sizes of circles. I used a Basic Black Marker for the dots in the eyes and the little mouth. To assemble, I used the Fine Tip Glue Pen!

Cow, www.LaurasStampPad.com

For the Cow, I used Blushing Bride, Basic Black and Whisper White cardstock scraps. I punched a two full Owl Body pieces in whisper white and a sliver of the body for the tail. I punched one owl body in Basic Black and four skinny rectangles for the legs. I used the 1″ Circle Punch to punch out the nose in Blushing Bride. First, I cut off the feet from both of the white owl bodies. I added the pink nose and used a Basic Black Marker for the dots in the eyes and the little nose holes. I cut off one of the little feet from the black owl body and added it to the cow face for a little hair. I used the Fine Tip Glue Pen for all of the little pieces. I cut off the other little black foot and added it to the white tail and connected it to the cow. I added the four legs in various lengths so it looked more 3D. I took the black owl body and cut odd shapes out of it to create the spots on the cow!

Zebra, www.LaurasStampPad.com

For the Zebra, I used Blushing Bride, Basic Black, Basic Gray, and Whisper White cardstock scraps. I punched a full Owl Body piece in Whisper White and Basic Gray. I took the white owl and cut off the ears and rounded off the head. I also slide the bottom portion into the 1″ Circle Punch to cut out the nose and cut off the feet. Then I attached this to the Basic Gray owl body. I cut off the gray feet as well. I punched out a 1-1/4″ Scallop Circle Punch in Basic Black and attached it to the back of the head! I punched out lots of slivers of the owl body in black to create the stripes. I used the Fine Tip Glue Pen for all of the little pieces. I used a Basic Black Marker for the nose holes and eyes. To finish it off as a girl Zebra, I punched out two hearts from the Owl Builder Punch in Blushing Bride. I overlapped the hearts to create the bow!

If you would like to see all of these in action, check out my Video Tutorial below or click here. I show you how to create those little slivers to use for the tails and zebra stripes as well! Be sure to give it a thumbs up if you liked it and check out all the other Owl Punch Art Creations!

Let me know which one your favorite is in the comments below!!!

Happy Punchin’

~Laura


Tempting Techniques – Sponged Roses!!!

Posted on

Happy Tuesday!!! You know what that means! I have a fabulous technique to share with you today! It is super fabulous because it combines lots of things I love – flowers, bling, and sponge daubers!!! Woot Woot!

Sponged Rose, www.LaurasStampPad.com

Look at this beauty!!! You can do this technique in any color you wish for that stunning look! Let’s get started!

SUPPLIES NEEDED: Sponge Dauber, Rose Garden Framelits, Big Shot, Die Brush, Fine Tip Glue Pen, Rose Wonder Stamp Set

To get started, you will need to take a piece of scrap Whisper White cardstock and run it through the Big Shot with the rose image from the Rose Garden Framelits. Once that is die cut, you can use the Die Brush to pop it out of the framelit, pop out all the little pieces and get all the little “hairs” off. Now using the leftover outline of the image as a template, place it on a piece of Whisper White measuring 4″ x 5-1/4″. You can place it on there half off or in any corner. It is all up to you. Then with a Sponge Dauber and your color choice, POUNCE the ink onto your card. You won’t want to rub or brush because it could make your template move. For this sample, I used Wild Wasabi for the leaves and Rose Red for the flower. Just add the color all around and stop at the breaking point of the leaves and flower. It is okay if some spots look darker than others. The variation in color really looks fabulous once it is all complete. Now that you are done adding color to the cardstock, I then took the Wink of Stella Brush and added glitter to the entire rose.

Wink of Stella Rose, www.LaurasStampPad.com

Then you can add the die cut rose. I used the Fine Tip Glue Pen to adhere the rose on. This is the perfect glue!! Now you can add any greeting that you would like. I really think this card is perfect for all occasions! I used the Rose Wonder Stamp Set (Bundle & Save 15%). I stamped the frame and greeting in Basic Black and die cut it with the Rose Garden Framelits! I added it to the card front with Stampin’ Dimensionals. Love it!!!

If you would like to see this in action, check out my Video Tutorial below or click here! Don’t forget to give it a thumbs up if you liked it!!!

What color would you make your rose??? I think I want to do a Melon Mambo one next or maybe Elegant Eggplant!!!

Happy Stampin’

~Laura


Fabulous Flowers!!!

Posted on

Wildflower Fields, www.LaurasStampPad.com

I am LOVING the Wildflower Fields Designer Series Paper and coordinating Flowering Fields Stamp Set. Both of these items are Sale-A-Bration items that you can earn for FREE with every $50 US order. You all know I love flowers and these items are just perfect!!!

I cut the Designer Series Paper into 4-1/4″ x 5-1/2″ pieces which leaves a 1″ piece leftover. I adhered the big piece directly to the a Whisper White card base which fits perfectly. The left over 1″ piece I flipped over and created banner tips on the end. You can use your Paper Snips or the Banner Triple Punch! Then I used a small scrap piece of Whisper White cardstock and stamped the flowers from the Flowering Fields Stamp Set in Basic Black Archival Ink. I used Blender Pens to color in the flowers and then stamped the greeting from the Crazy About You Stamp Set! For the card above, I used Blackberry Bliss and Old Olive on the flowers. Also, I added a little bow of Whisper White Baker’s Twine!

Flowering Fields, www.LaurasStampPad.com

For this card, I used Calypso Coral and Old Olive on the flowers. I added some Old Olive Baker’s Twine around the entire card for a little texture!

Thanks, www.LaurasStampPad.com

For this card I used Old Olive and Lost Lagoon for the flowers. I added some Gold Baker’s Twine in a bow around the card for a little texture and bling.

I had so much fun making these cards and I love them! It is a great way to use scraps of cardstock and all of your Designer Series Paper. If you would like to see the coloring of the flowers and cutting the Designer Series Paper, check out my Video Tutorial below or click here! Don’t forget to give it a thumbs up if you liked it!

Let me know in the comment below which one your favorite is! I think mine is the second card with the coral flowers!

Happy Stampin’

~Laura


February 2016 Paper Pumpkin – Hello Sunshine!!!

Posted on

February Paper Pumpkin, www.LaurasStampPad.com

I love Paper Pumpkin for so many reasons – the excitement and surprise, the put together kit that I don’t have to plan to create, and the simple and fabulous projects!!! You all know I LOVE flowers so I was super pumped when I opened this. (I even have a tag for Flowers here on my blog!) You can see all of my excitement about this kit in this video!

Flower Cards, www.LaurasStampPad.com

These cards were probably my favorite because I love all of the purple flowers. I did mix up the items a bit and added one of the orange flowers and one of the gold squiggles to this style. Simple and amazing!!!

Splatter Background, www.LaurasStampPad.com

These were super fun and I mix and matched the items for these cards with the splatter background and the triangle background. You can’t really see the backgrounds very much in these photos though.

Triangle Background, www.LaurasStampPad.com

All of the flowers has adhesive on the back so it was really simple to create these cards. The kit came with a HUGE sheet of adhesive dots that I used for the sequins. I actually added the greeting banners to the cards with Stampin’ Dimensionals. I couldn’t help myself.

Hello Sunshine Craft Kit, www.LaurasStampPad.com

Here is another angle so you can see the gold bling!

Craft Kit, www.LaurasStampPad.com

Of course the kits always has tons of extra goodies so I created these 3 cards with my own cardstock. You can see there are still tons of greeting banners, adhesive dots and sequins left. Some of the flowers on these cards I punched out from the flower sheets in the leftover corners. Twelve cards from one kit is super fabulous!!!

PP Turns 3, www.LaurasStampPad.com

Paper Pumpkin turns 3 years old in March and Stampin’ Up! is celebrating! Be sure to get signed up before March 10th to get your Birthday Celebration March Paper Pumpkin Kit! Click here to sign up! Don’t forget about the Pre-Paid Subscriptions as well. Starting at the 3 month, you will earn Sale-A-Bration items!!! WOOT WOOT!

Happy Stampin’

~Laura


Technique Tuesday – Color Blocking!!!

Posted on

Happy Tuesday everyone!!! I have a fabulous technique to share with you today and it’s as simple as ink and clear blocks!!! You can use this technique with lots of different stamp sets and occasions! Let’s get started!!!

Color Blocking, www.LaurasStampPad.com

How amazing is this card? It is perfect for any occasions which is why I didn’t want to put a greeting on it. I love it! I got the idea from Rachel Palmieri. I tried to modify it a little to add my own flare and I didn’t like any of them. Rachel did it wonderfully and I went with it!!

SUPPLIES:  Clear Block E, Ink Pads, Spritzer

You can really use any size of Clear Block that you wish but I went with Block E because I thought it was a great size for a scene. I pressed the Wild Wasabi Ink Pad onto the bottom 1/3 of the clear block. Then I took the Soft Sky Ink Pad and pressed it onto the top 2/3 of the clear block. You will want to get close to the green but you don’t need to touch. Then taking the Lost Lagoon Ink Pad, you will press it along the edges of the blue. Be sure that you are angling the ink pad a little and not just inking the side of the clear block. Then with a Spritzer filled with water, you will want to spritz the clear block. Don’t spritz directly at it but instead a few inches away and allow the mist to fall onto the block. Then you will flip the clear block over and stamp it onto a piece of Very Vanilla cardstock (3-3/4″ x 5″). Hold for a few seconds to allow the ink to soak in. Your paper may curl a bit because of the water and that’s okay. Once it has dried, you can stamp onto your cardstock. I stamped the flowers from the Flowering Fields Sale-A-Bration Stamp Set in Basic Gray for a softer look. I layered this piece onto Lost Lagoon measuring 4″ x 5-1/4″ and then onto a Mint Macaron card base with Stampin’ Dimensionals! I love it!!!

Watercolor - Close Up, www.LaurasStampPad.com

Here are a few tips and tricks that I wanted to share with you.

  1. You will want to spritz with water as it achieves the best look. I tried with no water and it looked very light and small dots.
  2. I tried with Alcohol in hopes it would dry faster (you all know I don’t have patience). It didn’t work. It dried too fast and the colors did fill in like they do with water.
  3. Be sure to flip the clear block over and hang it directly upside down while you determine the center of the cardstock or something else. You don’t want to hold the clear block on it’s side or tilted because then the colors will drip/run into each other.

If you would like to see this technique in action, check out my Video Tutorial below or by clicking here! I show all of the samples that didn’t work as well! 🙂 Be sure to give it a thumbs up if you liked it!

Happy Stampin’

~Laura


Pop of Color!!!

Posted on

B&W with Pink, www.LaurasStampPad.com

You know how I love me some Black and White with a pop of color…..especially when it’s PINK! Check out this beauty using the Botanical Builder Framelits!!! I love it and it’s really simple. You could always change the color to be your favorite color as well!

I started with a Whisper White card base. Then I used 3 pieces of cards – Basic Black (3″ x 4″), Melon Mambo (4″ x 2″), and Whisper White (3″ x 4″). I ran the Whisper White piece through the Big Shot with the Botanical Builder Framelit. You will place the framelit along the 4″ side and make sure that the solid leaves are on the outside. Once you have cranked it through, you can use the Big Shot Die Brush to help pop out the cardstock and brush away all of the little pieces of cardstock. Now is the when you will want to stamp your greeting on. I used the Happy Birthday Everyone Hostess Stamp Set with Melon Mambo Ink. Then you will place your Melon Mambo cardstock behind the Whisper White, popping through on those leaves. You will notice that the die is curvy and not straight across so your Melon Mambo pops out in spots that it shouldn’t. I just held the Melon Mambo behind my Whisper White and trimmed those spots showing with my Paper Snips! Then add adhesive to the back of your greeting piece and attach the Melon Mambo. Now you can adhere your black and white pieces to your card base. I used Stampin’ Dimensionals…of course! 🙂 First place your black piece down and then your white since the white can overlap. Also, be sure to not place any dimensionals real close the lower edge of the white piece so that it lays flat on top of the black. You are all done now!!!

Purple Botanical, www.LaurasStampPad.com

Here I did another sample using Elegant Eggplant! It doesn’t POP as much but I do love it! If you would like to see this in action, check out my Video Tutorial below or click here! Don’t forget to subscribe because I will be posting a lot more videos using the Botanical Builder Framelits soon!

Happy Stampin’

~Laura