This quick and simple card is just adorable! The perfect little note card to give to someone randomly as soon as they make you smile!!! I used one of the Note Cards & Envelopes and stamped the background with the 5 dots from the Best Day Ever Stamp Set in Coastal Cabana! Then I took a piece of Whisper White and stamped the greeting in Calypso Coral! You could use Best Day Ever or You Made My Day! I brushed the edges with my Sponge Dauber for some added color and adhered this to the card front with some Stampin Dimensionals. Then I added some Ribbon and a Button from the Best Year Ever Accessory Pack! I love using my Sale-A-Bration items on adorable simple cards! You can earn Sale-A-Bration items with every $50 (US) you spend from now till March 31st!!!
Who wouldn’t love this adorable gift??? It is fabulous, useful, and simple to make!!!! I grabbed some Note Cards & Envelopes, Lotus Flower Stamp Set which is a Sale-A-Bration item and some ink pads!!!! I stamped the flowers and greeting in Elegant Eggplant, Melon Mambo, Crushed Curry, and Tangerine Tango! My stem was done in Mossy Meadow! You can see a tutorial on stamping with this stamp set here!
Aren’t they gorgeous? After stamping them all, I put them in a Gusseted Cellophane Bag and tied it shut with some Whisper White Organza Ribbon. I looped a little bit of Gold Sequin Trim in there as well for a little bling! 🙂 I love it! I have been using these as Thank You Gifts to my Hostesses and Bridal Fair Give-Aways! These would be perfect for a friend’s birthday, a thank you gift to someone who you wish to thank, or a gift at your next Bridal or Baby Shower! You can match the flower color to the recipient’s favorite color or Bride’s wedding colors! So much fun!
So who would love to receive some of these??? Subscribe to my blog (in the upper right corner) and leave me a comment below with your favorite color of flower!!!! I will be picking a random winner!!!!
I am loving the Birthday Bash Designer Series Paper in the Occasions Mini Catalog! Remember my love for the Birthday Basics Designer Series Paper and how sad I was when it retired…..well Stampin’ Up has brought back it’s cousin!!!! WOOT WOOT!
How fabulous is this quick and simple card? I used Bermuda Bay as the card base and added a piece of the Birthday Bash Designer Series Paper (DSP) measuring 4″ x 5-1/4″! For the greeting, I used two images from the Big Day Sale-A-Bration Stamp Set! I colored in the letters with my Blendabilities!!!! A stamper friend of mine said this paper looks like books and it would be fabulous to write book titles on the books! Isn’t that a great idea?!?!?!
I “think” this one is my favorite but it is so hard to pick! I just love the stripes and color combination. I used Tangelo Twist for the card base here! LOVE IT!
This one is fabulous too! It was the favorite at my Girls Night Out Stamp Event! I think more people picked this one than any other design! This one uses a Crushed Curry card base! So many fabulous options and each one looking amazing as ever!!!!
You can make these cards with the following items:
When you order all of these items you get the Big Day Stamp Set for FREE with Sale-A-Bration!!!!! You can make 40 cards and have lots of supplies leftover to use on other projects!!!! Get your’s today!!!
This card screams SPRING and when that day comes it will be the Best. Day. Ever.! If you haven’t figured it out yet, I LOVE Spring! New life with budding trees and flowers, fresh warm breezes, bright colors! I love it! This card is all of that – flowers, colors, and new product!
I started with a Pool Party card base and added a piece of the Best Year Ever Designer Series Paper (4″ x 5-1/4″) which is one of the Sale-A-Bration items that you can earn for free with a $50 (US) order! Then I added my greeting which is on a piece of the new Chalkboard (2″ x 3″) Paper from the Occasions Mini Catalog! I punched the top with my Scallop Tag Topper Punch and stamped the greeting from the Best Day Ever Stamp Set in Rose Coral Chalk Ink! The Rose Coral comes out much brighter than the Aquamarine which is used here! I looped a piece of Pool Party Cotton Ribbon through the tag and attached it to my card with some Stampin’ Dimensionals! For a little bit of flare and fun, I added the three little flowers – Calypso Coral, Pool Party, and Crushed Curry! I made these flowers by taking a scrap piece of Whisper White cardstock and stamping the little 4 petal flower from the Best Day Ever Stamp Set twice; giving the flower 8 petals! Then I cut them out…by hand….oh how I wish there was a punch for that so I didn’t have to fussy cut!! 🙂 I added those to the card with Stampin’ Dimensionals and put a Rhinestone in the center! Bright, Fresh and Fabulous! I love it!!!!
How adorable is this card and it has polka dots!?!?!?!?! Loving it!!! I created this card with the fabulous Irresistibly Yours Designer Series Paper in the Sale-A-Bration Brochure which means you can get it for FREE with a $50 (US) purchase! Last week I showed you how to use this paper with your Sponge Daubers here and your Spritzers here! Today I’m going to show you how to create this card with your Sponge Daubers and Decorative Masks!
I started off with a Hello Honey card base and then cut my star piece from the Irresistibly Yours DSP (4″ x 5-1/4″). Using my Sponge Daubers and Stripes and Dots Decorative Mask (or Simply Created Build A Banner Template), you will add ink (Bermuda Bay) in the dots over your paper! It is so fun because it reveals these adorable little stars! I love it. NOTE: You will want to take a paper towel and wipe each little dot to get the excess ink off the embossed stars before removing the template. If you remove the template and start rubbing all over to get the excess off, you will get streaks in between your dots!!! That’s what I’m here for….to make the mistakes for you and let you know the tips and trick! hehe! Once that is complete, you can adhere that to your card and start on your greeting. I stamped the greeting from the Big News Stamp Set in Memento Ink so I could color in the words with my darkest marker in the Coastal Cabana Blendibilities Set! Precious! I added a little knot of Hello Honey Satin Stitched Ribbon on the left to finish it off! Of course the greeting is popped up on Stampin’ Dimensionals as well! What is a card without those?
Of course you can check out the Video Tutorial on this as well and don’t forget to give it a thumbs up if you liked it!!!
What is your favorite way to add color to the Irresistibly Yours Designer Series Paper – Mask, Sponge Daubers, Spritzing, Stamping, or something else? Leave me a comment down below!
I am loving the Irresistibly Yours Designer Series Paper from the Sale-A-Bration Brochure! It is so much fun and simple to get an emboss resist look without pulling out all of your embossing tools. You only need to pull out this paper and a coloring tool of your choice! Today, I’m using Sponge Daubers – my favorites!
I started off with a card base of Pool Party and then I cut a piece of Irresistibly Yours Designer Series Paper into 4″ x 5-1/4″! Using my Sponge Daubers and Ink Pads (Pool Party & Calypso Coral) I added color to the paper! I went from the corner to the middle with each color applying ink by going side to side (diagonally). Then I took the flower from the Crazy About You Stamp Set in the Occasions Mini Catalog and stamped it in Calypso Coral. I love how it gave that darker look! I used the coordinating Hello You Thinlits to cut out the Hello and stamped the Sunshine from the Crazy About You Stamp Set. You can get this stamp set in Wood, Clear, and Photopolymer! Bundle with the Thinlits and Save! I layered the greeting on top of a strip of Pool Party and a strip of Beach House Washi Tape! Of course a little bling of Rhinestones finished it off! LOVE IT!
Check out this post and this Video Tutorial on more ways to use the Irresistibly Yours Designer Series Paper!
Happy Tuesday!!!! I hope you are having a fabulous week and this technique makes it even better!!! 🙂 Today, I’m going to show you how to use the Irresistibly Yours Designer Series Paper that you can get for FREE through Sale-A-Bration when you place a $50 (US) order! The catalogs shows the paper like this!
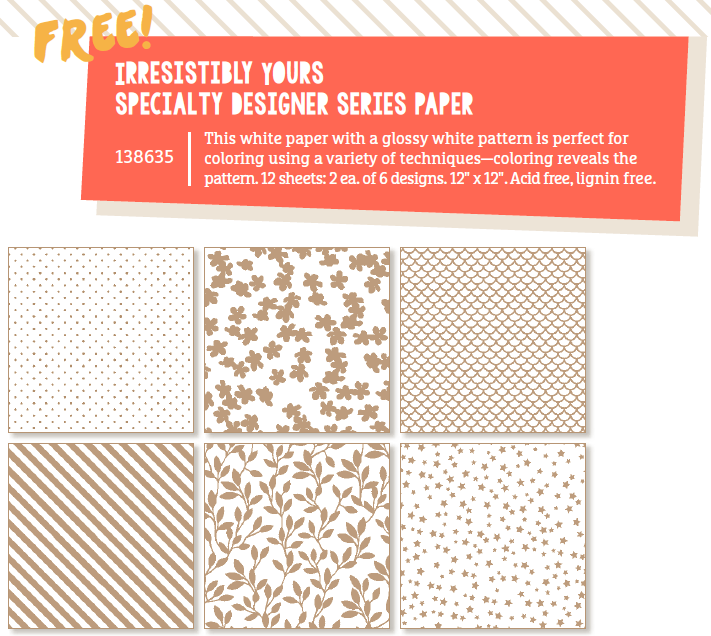
When you first see this, you may be confused and think it is tan and white paper. Really, it is white paper with the images you see in tan clear embossed onto the paper. You can’t really photograph clear on white (as you can see in my video) so Stampin’ Up! is showing it like this! Since this paper is clear embossed, you can add color to the paper and it will only pick up the color on the white areas and not on the clear embossed images. You can add your color with Spritzers, Sponge Daubers, Sponges, Brayer, Markers, Blendabilities, and stamping! It is sooooo much fun to add color and see the image show up. It is like being a child again and painting in one of those books that you add water and the image appears. (Just me?)
SUPPLIES NEEDED: Irresistibly Your Designer Series Paper, Spritzers, Stamps, Embellishments
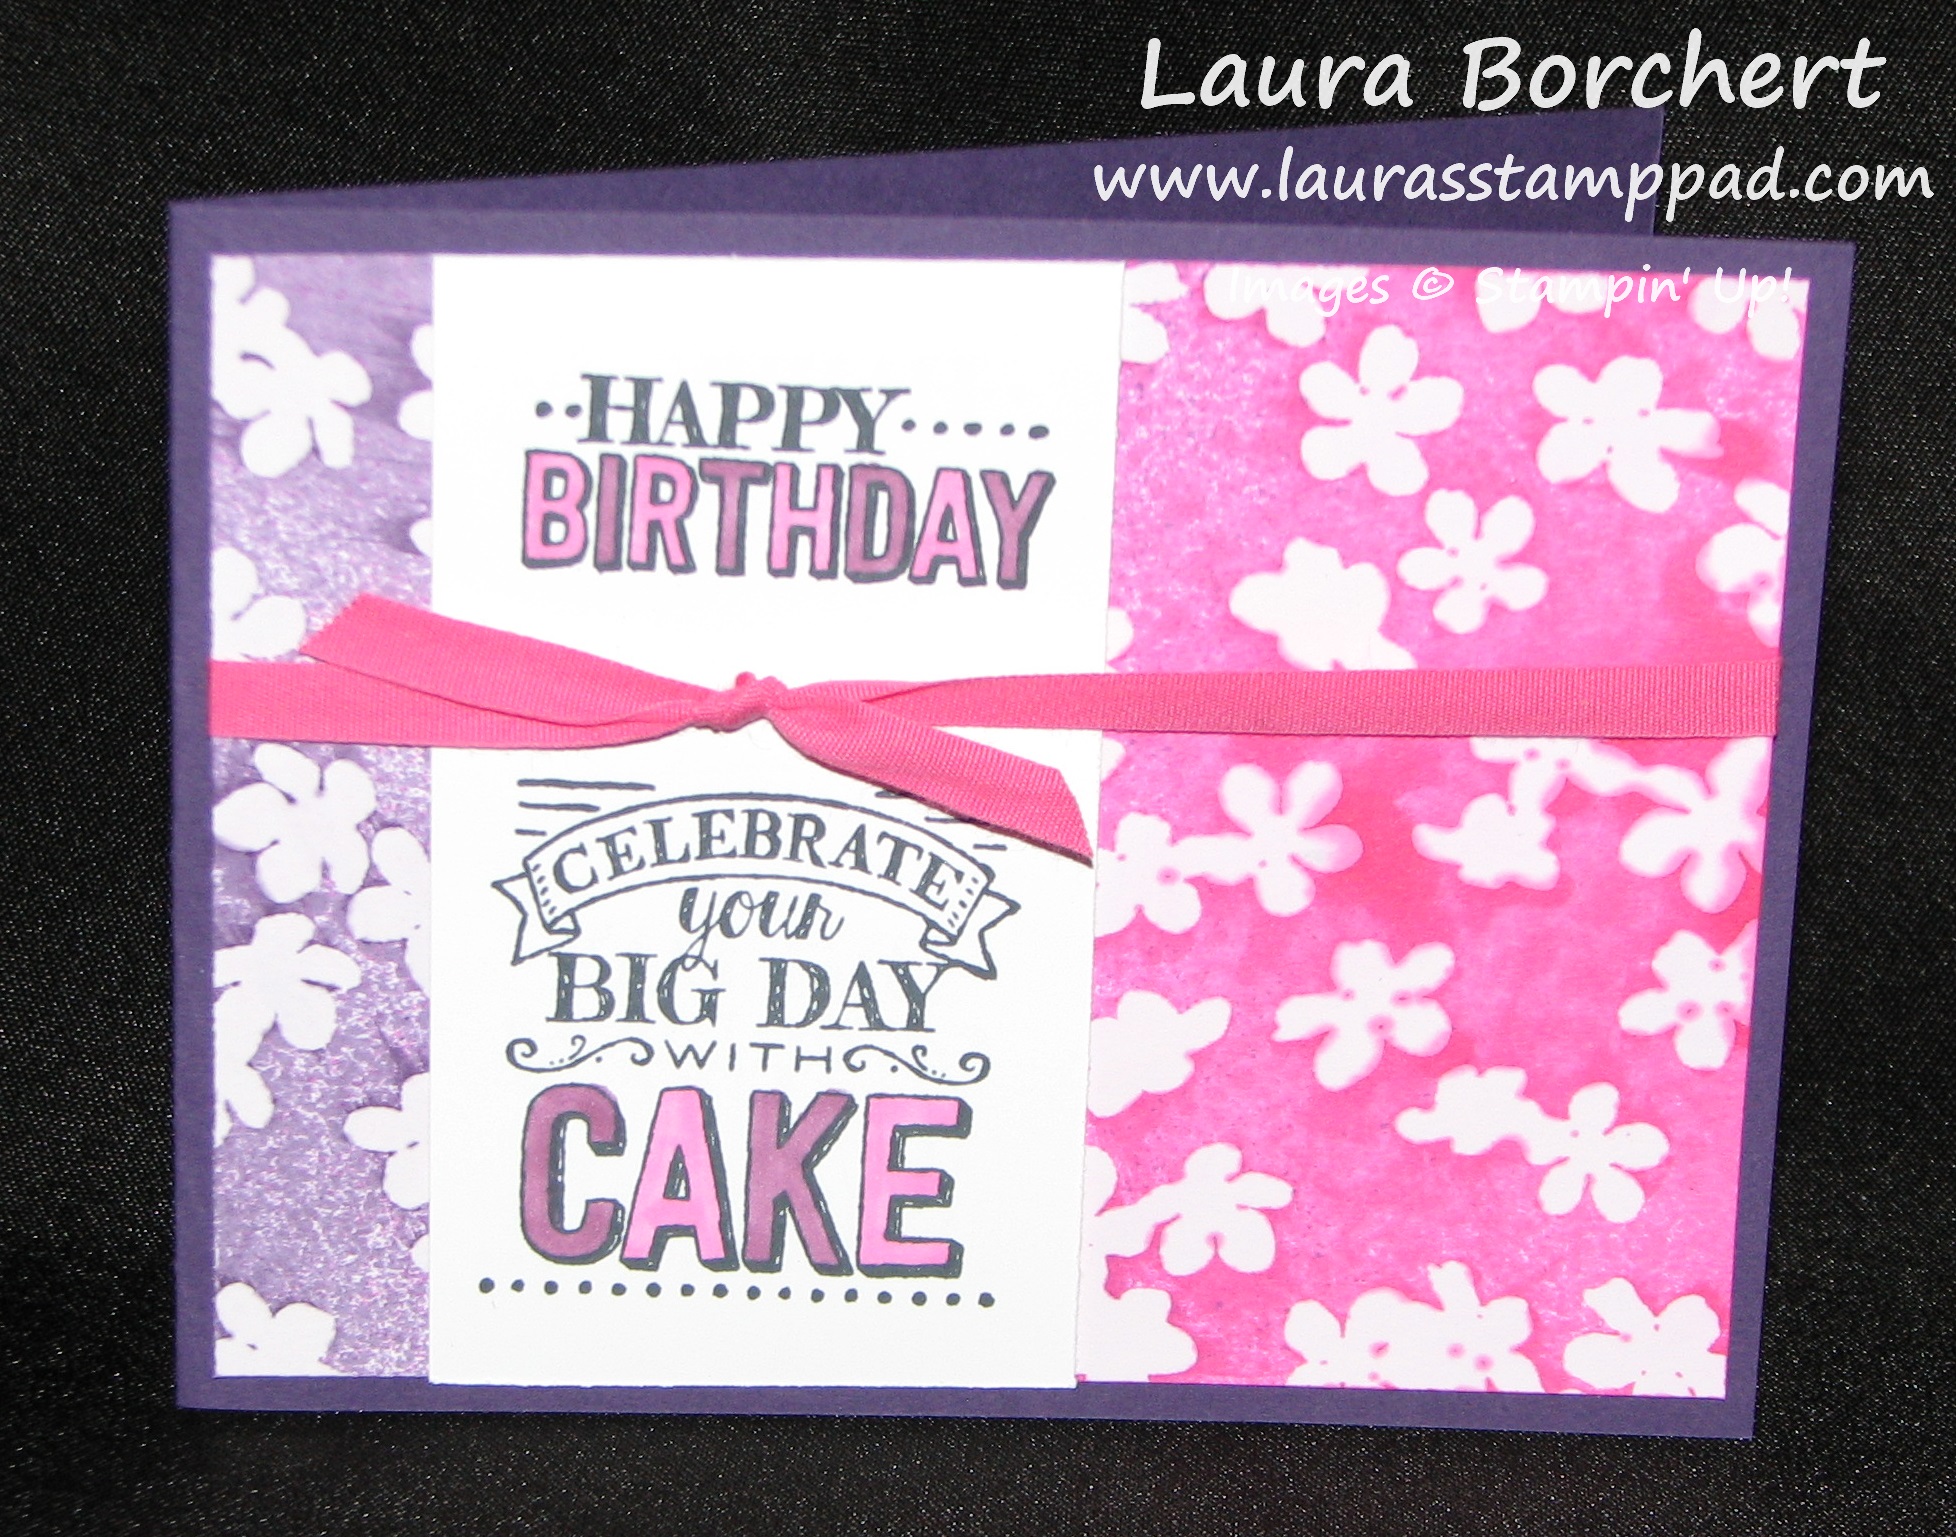
Yeah it’s that simple! You can get this emboss resist look with just this paper. If you created this yourself, you would need Cardstock, VersaMark, Heat Tool, and Embossing Powder. I cut my Irresistibly Yours paper into 4″ x 5-1/4″ and placed it into a box for spritzing. I look the look of Spritzing but it scares me every time because I tend to get messy! 😉 I spritzed the right with Melon Mambo and the left with Elegant Eggplant. (Mix re-inker and alcohol (70 Proof or less) in a Spritzer). Underneath the greeting is the overlap or dots and spritz. I wasn’t sure if I liked that look or not so I covered it with my greeting. You could always show that off and move your greeting down. My greeting is from the Big Day Stamp Set which is also a Sale-A-Bration item! I am loving this stamp set. I colored in the letters with my Rich Razzleberry & Melon Mambo Blendabilities! You can earn those for FREE with Sale-A-Bration as well! I finished off the card with some Melon Mambo Cotton Ribbon! Here is another photo of this card!
If you would like to see this in action, check out my Video Tutorial below! Don’t forget to give it a thumbs up if you liked it and be sure to subscribe so you don’t miss out on any other videos I create!
Be sure to check back later this week to see more samples using the Irresistibly Your Designer Series Paper!
While I am not a huge fan of real chalkboards……chalk gives me the chills just to touch it or think about it, let along writing with it on a chalkboard….I so love this look! I know you are probably thinking but Laura doesn’t like rustic or dirty. It’s true, I’m more of a clean, bold stamper but I do love this chalkboard look! It mostly reminds me of a bakery like Panera (YUM!) or a little bistro restaurant and I love that! Stampin’ Up! has made getting this look easy and fun with no chills crawling up your spine!
How fabulous is this card? I love the polka dots and ribbon and chalkboard and ALL OF IT! I started off with a Whisper White card base. Then I took a piece of Birthday Bash Specialty Designer Series Paper (4″ x 5-1/4″) and wrapped some Calypso Coral Seam Binding around it and tied a knot. Now you can adhere that to your card front. For the greeting, I used some of the NEW Chalkboard Paper in the Occasions Mini Catalog! I found that this image is small enough that you can stamp first or after cutting it out. I stamped the greeting from the Big Day Stamp Set which is one of the Sale-A-Bration items you can earn for FREE! I stamped it with the Aquamarine Colorbox Chalk Ink Pad and then cut it out with the Labels Collection Framelits and my Big Shot. Then I used my Chalk Marker to create the border!!! Love it!!! NOTE: The Aquamarine color comes out really light but it slowly gets darker as it dries and it is just a light look. Also, a few tips for using the Colorbox Chalkboard Ink:
~Be sure to stamp straight down and right up again because it could slide and smear if you wiggle it.
~Be sure you are stamping on the slick/sort of rubbery/textured (not sure how to describe it) side of the Chalkboard Paper. The back side feels and looks like regular paper.
~Be sure to allow it to dry for a bit as it takes longer than traditional ink. If you would like to speed up the process, you can set the ink with your Heat Tool.
~For a more bold look, you can stamp the greeting once and then using your Stamp-A-Ma-Jig to stamp again right on top.
I hope you try out this new Chalkboard Paper and Ink! It is super fun! Don’t forget that every $50.00 (US) order placed between now and March 31st earns you a FREE Sale-A-Bration item!
I am loving the Big Day Stamp Set in the Sale-A-Bration brochure! It is so much fun to play with and you know I make lots and lots of Birthday Cards each year. Check out this amazing card style!!!
You know I love PINK and this is just precious!!!! I started with a Crumb Cake card base and then added a Top Note piece of Sweet Taffy Designer Series Paper! The Top Note is one of my favorite dies….I love the shape and that stitched edge! Then I took the Clear Block I and placed the Birthday Greeting on top, the Cake on the bottom, and the Cake Greeting in the middle. This way I can stamp with all at the same time. I had to stamp the candle separate because otherwise it would have been floating on top of the cake. I stamped these images with the Memento Ink because I colored them in with the Melon Mambo Blendabilities. If you are using Markers, just be sure to stamp with your Stazon Ink. This was all stamped on a piece of Whisper White cardstock measuring 2-1/4″ x 5-1/4″ and then layered on a piece of Melon Mambo measuring 2-1/2 ” x 5-1/2″. I added this to my card front with Stampin’ Dimensionals! For a little more flare, I added some Linen Thread to the left side and added a few tags. One tag has the Ice Cream Greeting stamped on it and the other is a piece of Sweet Taffy Designer Series Paper…..using up those scraps! 🙂
Of course I did a boy version as well! I used the Sweet Taffy Designer Series Paper again and my Coastal Cabana Blendabilities! I can’t wait to try this out in many other colors and Designer Series Paper Packs! If you try out this card, be sure to send me pictures! I would love to see what you come up with! Also, I wanted to give a shout out to Julie Davison for this amazing idea!!!!
If you would like to get this Big Day Stamp Set for FREE, you can do so by placing a $50 or more order between now and March 31st! Click here to place your order and check out the items you can earn for FREE here – Sale-A-Bration!
Happy Tuesday!!! This is a fabulous Tuesday because the Occasions Mini Catalog has begun as well as the Sale-A-Bration Promotion! Now I can share all these fabulous products with you!!!! Today I am sharing the amazing Lotus Blossom Stamp Set from the Sale-A-Bration Brochure! This stamp set takes a little technique and finesse. So lets get started!!!!
You saw the sneak peak of this card last week! Today I’m going to show you how to create it!
I started with a Whisper White card base and added a piece of the Gold Foil Designer Vellum (4″ x 5-1/4″). I love using Vellum when there are lots of spots covered because then you don’t have to worry about your adhesive showing through. Just add adhesive under the spot where you flower is! Now with a piece of Whisper White cardstock measuring 3-1/2″ x 4-3/4″ it is time to stamp your flower. I used the Lotus Blossom Stamp Set from the Sale-A-Bration Brochure! You will see that the flower images are labeled 1, 2, & 3. You will also notice that where that number is, there is also an arrow. This is for perfect placement when stamping! Always note where that arrow is so you can stamp the next flower with the arrow in the same spot. The #1 Stamp is your first image. Ink it up in your color choice and stamp down! I used Bermuda Bay in the sample above and I usually point the arrow to the corner of the paper but that depends on the flower placement! Now get your #2 flower image and ink it up in the same color, stamp off on a scrap piece of paper and then line it up and stamp on top of the #1 flower image. Remember your arrow placement to help with each additional image. Now for the #3 flower image, ink it up in the same color again and lightly stamp off (you can stamp off twice if you wish) and then stamp over top your two other flowers! These three images give such texture and dimension and color to your flower! I just love it! It looks so artistic and real! TIPS: You can stamp off as many times as you wish. You can use a second color for the #2 stamp image. You can even use three different ink pads if you wish! Here are some more samples using just one color!
I could play with this stamp set for hours! For the stem I used Old Olive and you will stamp the spotty stem first and the solid one second. Again before stamping the second one, you will want to stamp off or use a lighter color. NOTE: You can bend your stem to whatever angle you wish! Got to love photopolymer!!!! I then stamped the greeting in Basic Gray in the corner and added a piece of a Paper Doily to the left edge. I was able to get 3 “pieces” of a doily from just 1 doily….with another pie looking piece leftover. You only need a little bit! I added this piece to my card front with Stampin’ Dimensionals! Then I wrapped the Baker’s Twine around my card front twice and tied it into a bow! I got this card idea right out of the Sale-A-Bration Brochure! It was just so beautiful, I didn’t want to make any changes! If you would like to see this stamp set in action, check out my Video Tutorial here! Don’t forget to give it a thumbs up if you liked it and be sure to check out the other videos posted today showing off items from the Occasions Mini Catalog and Sale-A-Bration Brochure!