That is what my husband calls the Texture Boutique Machine – the Mini Big Shot! It is on SALE this week! WOOT WOOT! This little machine is like the Mini Big Shot because it is smaller and lighter weight and it only does a little bit of what the Big Shot does – Texture Embossing Folders! When the Big Shot first came out I just had to have it because of the Embossing Folders and to this day I probably use my Big Shot 80% on Embossing Folders and 20% on Framelits/Thinlits/etc! If you love embossing as much as I do, you NEED this Mini Big Shot!!!!!
The Week’s Weekly Deals are HOT! I love love love them because I used Embossing Folders ALL THE TIME! I would link a few posts but it would be to hard to pick from so here is the Embossing Folder tag for you to browse through them all! 🙂 These deals end on Monday night and don’t forget that for every $50 you spend, you can pick out a free Sale-A-Bration item!
I hope you all have a wonderful weekend! I will be stamping with a wonderful group of ladies tomorrow and we are making Valentine’s goodies! I love sharing my love of stamping!!!!
Which do you prefer – cake or cupcakes? Cupcakes all the way right here!!!! I love them!!! Either way this card is super cute and festive! I started off with a Tangelo Twist card base and added a piece of Basic Black (4″ x 5-1/4″)! Then I took a piece of Whisper White (3-3/4″ x 5″) and ran it through the Big Shot with my Decorative Dots Embossing Folder. I punched out a few Banner Punches with the Birthday Bash Designer Series Paper. I took some Linen Thread and went from the left side to the top middle, adhering it to the back with Stampin’ Dimensionals. I then attached the banner with Stampin Dimensionals as well, making sure to have the dimensional go over Linen Thread to hold it in place! Now you will need to stamp the tag border and the eat cake greeting with a Memento Pad on a scrap piece of Whisper White (use your Stazon Ink if you are using Markers to color in). Then color in as much or as little as you wish with your Blendabilities (Bermuda Bay & Daffodil Delight)! You won’t be punching this piece out but instead using the Note Tag Punch to punch out the image from your embossed Whisper White. I lined it up so that the bottom of the paper was all the way in the punch and you will want to be on the right side of your paper. Now you can add Stampin’ Dimensionals to the rest of the back of the embossed Whisper White. Before you go to lay it down you will want to add adhesive to your colored greeting and line it up in the punched hole and place that down first, just right before you place the embossed piece. Now you have that window effect where the greeting is set in! Super cute and fun! Here is another photo of this sample straight on!
You can check out this Video Tutorial that I created using this stamp set for this card and a few others! Be sure to subscribe to my blog in the upper right corner so you don’t miss out on the rest of these samples which will be posted next week! Don’t forget to leave me a comment below on whether you prefer cake or cupcake!!!!
Tis the season of seeing hearts and love EVERYWHERE!!!! Valentine’s Day is right around the corner so lets get started on card making and treat packaging!!! You can check out this post to see some adorable treats!!!
This card is fairly simple! I started off with a Pink Pirouette card base (4-1/4″ x 5-1/2″). I would use those dimensions for your card base so that you can adhere your Stacked with Love Designer Series Paper on the bottom and tie the Blushing Bride Baker’s Twine all the way around the card. (Note: I used a 5-1/2″ x 8-1/2″ piece and the tied my twine around the Designer Series Paper and I found it really bumped and pulled on that little piece of paper.) So once you have your paper and twine on the bottom, you can start working on your hearts. I used the Hearts Collection Framelits (4th Up for the Smallest) for the Whisper White heart. Then I stamped the greetings from the Hello Life Stamp Set from the Occasions Mini Catalog in Real Red Ink! Then using the Hearts Collection Framelits (2nd Up from the Smallest) again, I cut out the Black/Heart from a piece of the Stacked with Love Designer Series Paper!!!! I love this paper because it is lovey with shades of pink on one side and Black and White on the other!!!!!! LOVE!!!! Okay back to the card, I attached the black heart with Stampin’ Dimensionals for a little texture and dimension. The little red heart is stamped from the Hello Life Stamp Set!!!! Cute & Simple! I hope you are enjoying my Valentine’s Day samples! Let me know your favorite – This One? This One? or This One?
Happy Tuesday!!! That means I have a fabulous technique to share with you today and I do!!!! I received the One Tag Fits All Stamp Set for free from Stampin’ Up when I attended the New Catalog Premiere! It was super fabulous and a great perk of being a demonstrator is getting to see the new catalog items before everyone else….and free stamps! If you would like to join me for these events, you can sign up to be a demonstrator now and earn a FREE kit from the Occasions Mini Catalog! Woot Woot!!!
Okay so lets get started on this fabulous technique I have to share with you today! Actually there are a few techniques….multiple uses of 1 stamp set and some cool ways to use your punches!!!! Isn’t this baby card just precious? It is very simple to make and since it is light blue and yellow, it isn’t gender specific so you can make a few of these up to have on hand. Love it!!!
I started with a piece of Soft Sky cardstock measuring 4-1/4″ x 11″. I folded the card in half and then stuck the front of the card in my Polka Dot Embossing Folder and ran it through the Big Shot! Then I stamped the New Baby image, from the One Tag Fits All Stamp Set which is in the new Occasions Mini Catalog, with the Memento Ink onto a scrap piece of Whisper White Cardstock. If you are coloring the duck in with Markers, you will want to use Stazon Ink. If you are coloring the duck in with Blendabilities, you will want to use Memento Ink. This is so the ink won’t bleed when you are coloring. After stamping it down, I colored it in with my Pumpkin Pie Blendabilities and Daffodil Delight Blendabilities! Then I lined up this image in my Decorative Label Punch and punched it out. I then took my Decorative Label Punch and put my card front in the punch towards the right side and all the way into the punch so that I knew it was straight/even. I punched! Then I added Stampin’ Dimensionals to my stamped, colored, and punched piece and placed it in the punched hole on my card front. The best way to line it up is to have the card folded shut and just lay it in that punched hole. This is adhering the piece to the inside of the card which makes a fabulous front and inside to the card! Precious! Then I added some Daffodil Delight Cotton Ribbon around the side of the card and through that punched hole! Quick and simple and fabulous!!!!
Here is another photo showing the image on the inside! If you want to see this in action, check out my Video Tutorial on this card and others that you can create with this amazing One Tag Fits All Stamp Set! Don’t forget to subscribe here so you don’t miss out on those cards that will be posted later this week and next week. At the top right of my page – www.LaurasStampPad.com you can enter your email address and then you will get an email every time I post something new!
My Mom’s Birthday was last week and this was the card that I created for her! It’s adorable, funny, and perfect for her! The first time I saw the Stamp Set – From the Herd which is in the Occasions Mini Catalog I loved it! It is just so funny and cute! I grew up on a farm and while we only had cow, chickens, and sheep I still love it! For this card to my Mom, I only wanted two animals to represent my husband and I (I’ll let you decided who is who 😉 )! Using my Basic Black Marker, I colored the goat and the bird and then stamped it on my piece of Whisper White cardstock. I’m not going to lie, I had to go over a few lines with the marker again because they didn’t come out clean and I wanted a bold line! Then I colored them in using my markers – Bermuda Bay, Basic Gray, and Smoky Slate. Adorable! Then I cut it out with the Deco Label Framelits! I wanted a nice layer so I cut a piece of Basic Gray out with the next Framelit up! For some texture, I ran the gray piece through the Big Shot with my Perfect Polka Dot Embossing Folder. I added this to my card base which was Wild Wasbi and added some Linen Thread. For the greeting, I stamped Happy Birthday on the front and then using the other greetings I stamped From the Party Animals on the inside! This stamp set also had a party hat, balloon, and noise maker so I decorated the envelope with some balloons on the front and party hats along the tab of the envelope in the back! It was just fabulous! I loved making a special card for someone who is so very special to me! 🙂
Happy Tuesday!!!! That means I have a fabulous technique to share with you today!!! I’m sharing the Crazy About You Stamp and coordinating Hello You Thinlit Die! I love this stamp set because it has some fabulous greetings and flowers!!!! Double Win!!!
How fabulous is that? I am loving that color combo too – Strawberry Slush, Calypso Coral, and Crisp Cantaloupe!!! Let’s get started!
I started off with a card base of Pistachio Pudding (4-1/4″ x 11) and I stamped the leaf image from the Crazy About You Stamp Set from the Occasions Mini Catalog with Pistachio Pudding ink on the bottom! Then I stamped the flower in Strawberry Slush, Calypso Coral, and Crisp Cantaloupe Ink onto scrap paper and punched them out with my 1-3/4″ Scallop Circle Punch! I adhered one of the flowers right to the paper and popped the other two up with Stampin’ Dimensionals! Now comes the fun part – picking out a fabulous greeting! The Crazy About You Stamp Set has greetings that coordinate with the Hello You Thinlits as you can see above! There are so many mix and match options!
When you are using your Thinlits to cut out the greetings I have the following tips it goes smooth! 🙂
~Use Wax Paper on top of the cardstock when cutting out the words! This will help it pop right out of the die much easier. Your layers will go…Magnetic Plate or Multi-Purpose Platform / Clear Cutting Pad / Cardstock / Wax Paper / Thinlit / Clear Cutting Pad
~If your words don’t pop out right away, you can use the back of a straight pin or even Paper Snip tips to push it from the backside through those little holes in the Thinlit!
~If it seems that your Thinlit is not cutting through the cardstock, you may need to add a shim (I use a little piece of the cardstock that comes in the back of Designer Series Paper packs)! This adds a little bit of thickness so the die is pressed nice and tight!
Once you have your words cut out you can attach them to your card and stamp the coordinating greeting of your choice! I stamped “So Much” in Pistachio Pudding! Super fabulous! I hope you enjoyed this and if you want to see it in action, check out my Video Tutorial below! Be sure to give it a Thumbs Up if you liked it and don’t forget to subscribe to my Channel so you don’t miss any future videos!
If you want to see the other sample shown in the video, click here!!!
I am loving the Irresistibly Yours Designer Series Paper from the Sale-A-Bration Brochure! It is so much fun and simple to get an emboss resist look without pulling out all of your embossing tools. You only need to pull out this paper and a coloring tool of your choice! Today, I’m using Sponge Daubers – my favorites!
I started off with a card base of Pool Party and then I cut a piece of Irresistibly Yours Designer Series Paper into 4″ x 5-1/4″! Using my Sponge Daubers and Ink Pads (Pool Party & Calypso Coral) I added color to the paper! I went from the corner to the middle with each color applying ink by going side to side (diagonally). Then I took the flower from the Crazy About You Stamp Set in the Occasions Mini Catalog and stamped it in Calypso Coral. I love how it gave that darker look! I used the coordinating Hello You Thinlits to cut out the Hello and stamped the Sunshine from the Crazy About You Stamp Set. You can get this stamp set in Wood, Clear, and Photopolymer! Bundle with the Thinlits and Save! I layered the greeting on top of a strip of Pool Party and a strip of Beach House Washi Tape! Of course a little bling of Rhinestones finished it off! LOVE IT!
Check out this post and this Video Tutorial on more ways to use the Irresistibly Yours Designer Series Paper!
While I am not a huge fan of real chalkboards……chalk gives me the chills just to touch it or think about it, let along writing with it on a chalkboard….I so love this look! I know you are probably thinking but Laura doesn’t like rustic or dirty. It’s true, I’m more of a clean, bold stamper but I do love this chalkboard look! It mostly reminds me of a bakery like Panera (YUM!) or a little bistro restaurant and I love that! Stampin’ Up! has made getting this look easy and fun with no chills crawling up your spine!
How fabulous is this card? I love the polka dots and ribbon and chalkboard and ALL OF IT! I started off with a Whisper White card base. Then I took a piece of Birthday Bash Specialty Designer Series Paper (4″ x 5-1/4″) and wrapped some Calypso Coral Seam Binding around it and tied a knot. Now you can adhere that to your card front. For the greeting, I used some of the NEW Chalkboard Paper in the Occasions Mini Catalog! I found that this image is small enough that you can stamp first or after cutting it out. I stamped the greeting from the Big Day Stamp Set which is one of the Sale-A-Bration items you can earn for FREE! I stamped it with the Aquamarine Colorbox Chalk Ink Pad and then cut it out with the Labels Collection Framelits and my Big Shot. Then I used my Chalk Marker to create the border!!! Love it!!! NOTE: The Aquamarine color comes out really light but it slowly gets darker as it dries and it is just a light look. Also, a few tips for using the Colorbox Chalkboard Ink:
~Be sure to stamp straight down and right up again because it could slide and smear if you wiggle it.
~Be sure you are stamping on the slick/sort of rubbery/textured (not sure how to describe it) side of the Chalkboard Paper. The back side feels and looks like regular paper.
~Be sure to allow it to dry for a bit as it takes longer than traditional ink. If you would like to speed up the process, you can set the ink with your Heat Tool.
~For a more bold look, you can stamp the greeting once and then using your Stamp-A-Ma-Jig to stamp again right on top.
I hope you try out this new Chalkboard Paper and Ink! It is super fun! Don’t forget that every $50.00 (US) order placed between now and March 31st earns you a FREE Sale-A-Bration item!
I am loving the Big Day Stamp Set in the Sale-A-Bration brochure! It is so much fun to play with and you know I make lots and lots of Birthday Cards each year. Check out this amazing card style!!!
You know I love PINK and this is just precious!!!! I started with a Crumb Cake card base and then added a Top Note piece of Sweet Taffy Designer Series Paper! The Top Note is one of my favorite dies….I love the shape and that stitched edge! Then I took the Clear Block I and placed the Birthday Greeting on top, the Cake on the bottom, and the Cake Greeting in the middle. This way I can stamp with all at the same time. I had to stamp the candle separate because otherwise it would have been floating on top of the cake. I stamped these images with the Memento Ink because I colored them in with the Melon Mambo Blendabilities. If you are using Markers, just be sure to stamp with your Stazon Ink. This was all stamped on a piece of Whisper White cardstock measuring 2-1/4″ x 5-1/4″ and then layered on a piece of Melon Mambo measuring 2-1/2 ” x 5-1/2″. I added this to my card front with Stampin’ Dimensionals! For a little more flare, I added some Linen Thread to the left side and added a few tags. One tag has the Ice Cream Greeting stamped on it and the other is a piece of Sweet Taffy Designer Series Paper…..using up those scraps! 🙂
Of course I did a boy version as well! I used the Sweet Taffy Designer Series Paper again and my Coastal Cabana Blendabilities! I can’t wait to try this out in many other colors and Designer Series Paper Packs! If you try out this card, be sure to send me pictures! I would love to see what you come up with! Also, I wanted to give a shout out to Julie Davison for this amazing idea!!!!
If you would like to get this Big Day Stamp Set for FREE, you can do so by placing a $50 or more order between now and March 31st! Click here to place your order and check out the items you can earn for FREE here – Sale-A-Bration!
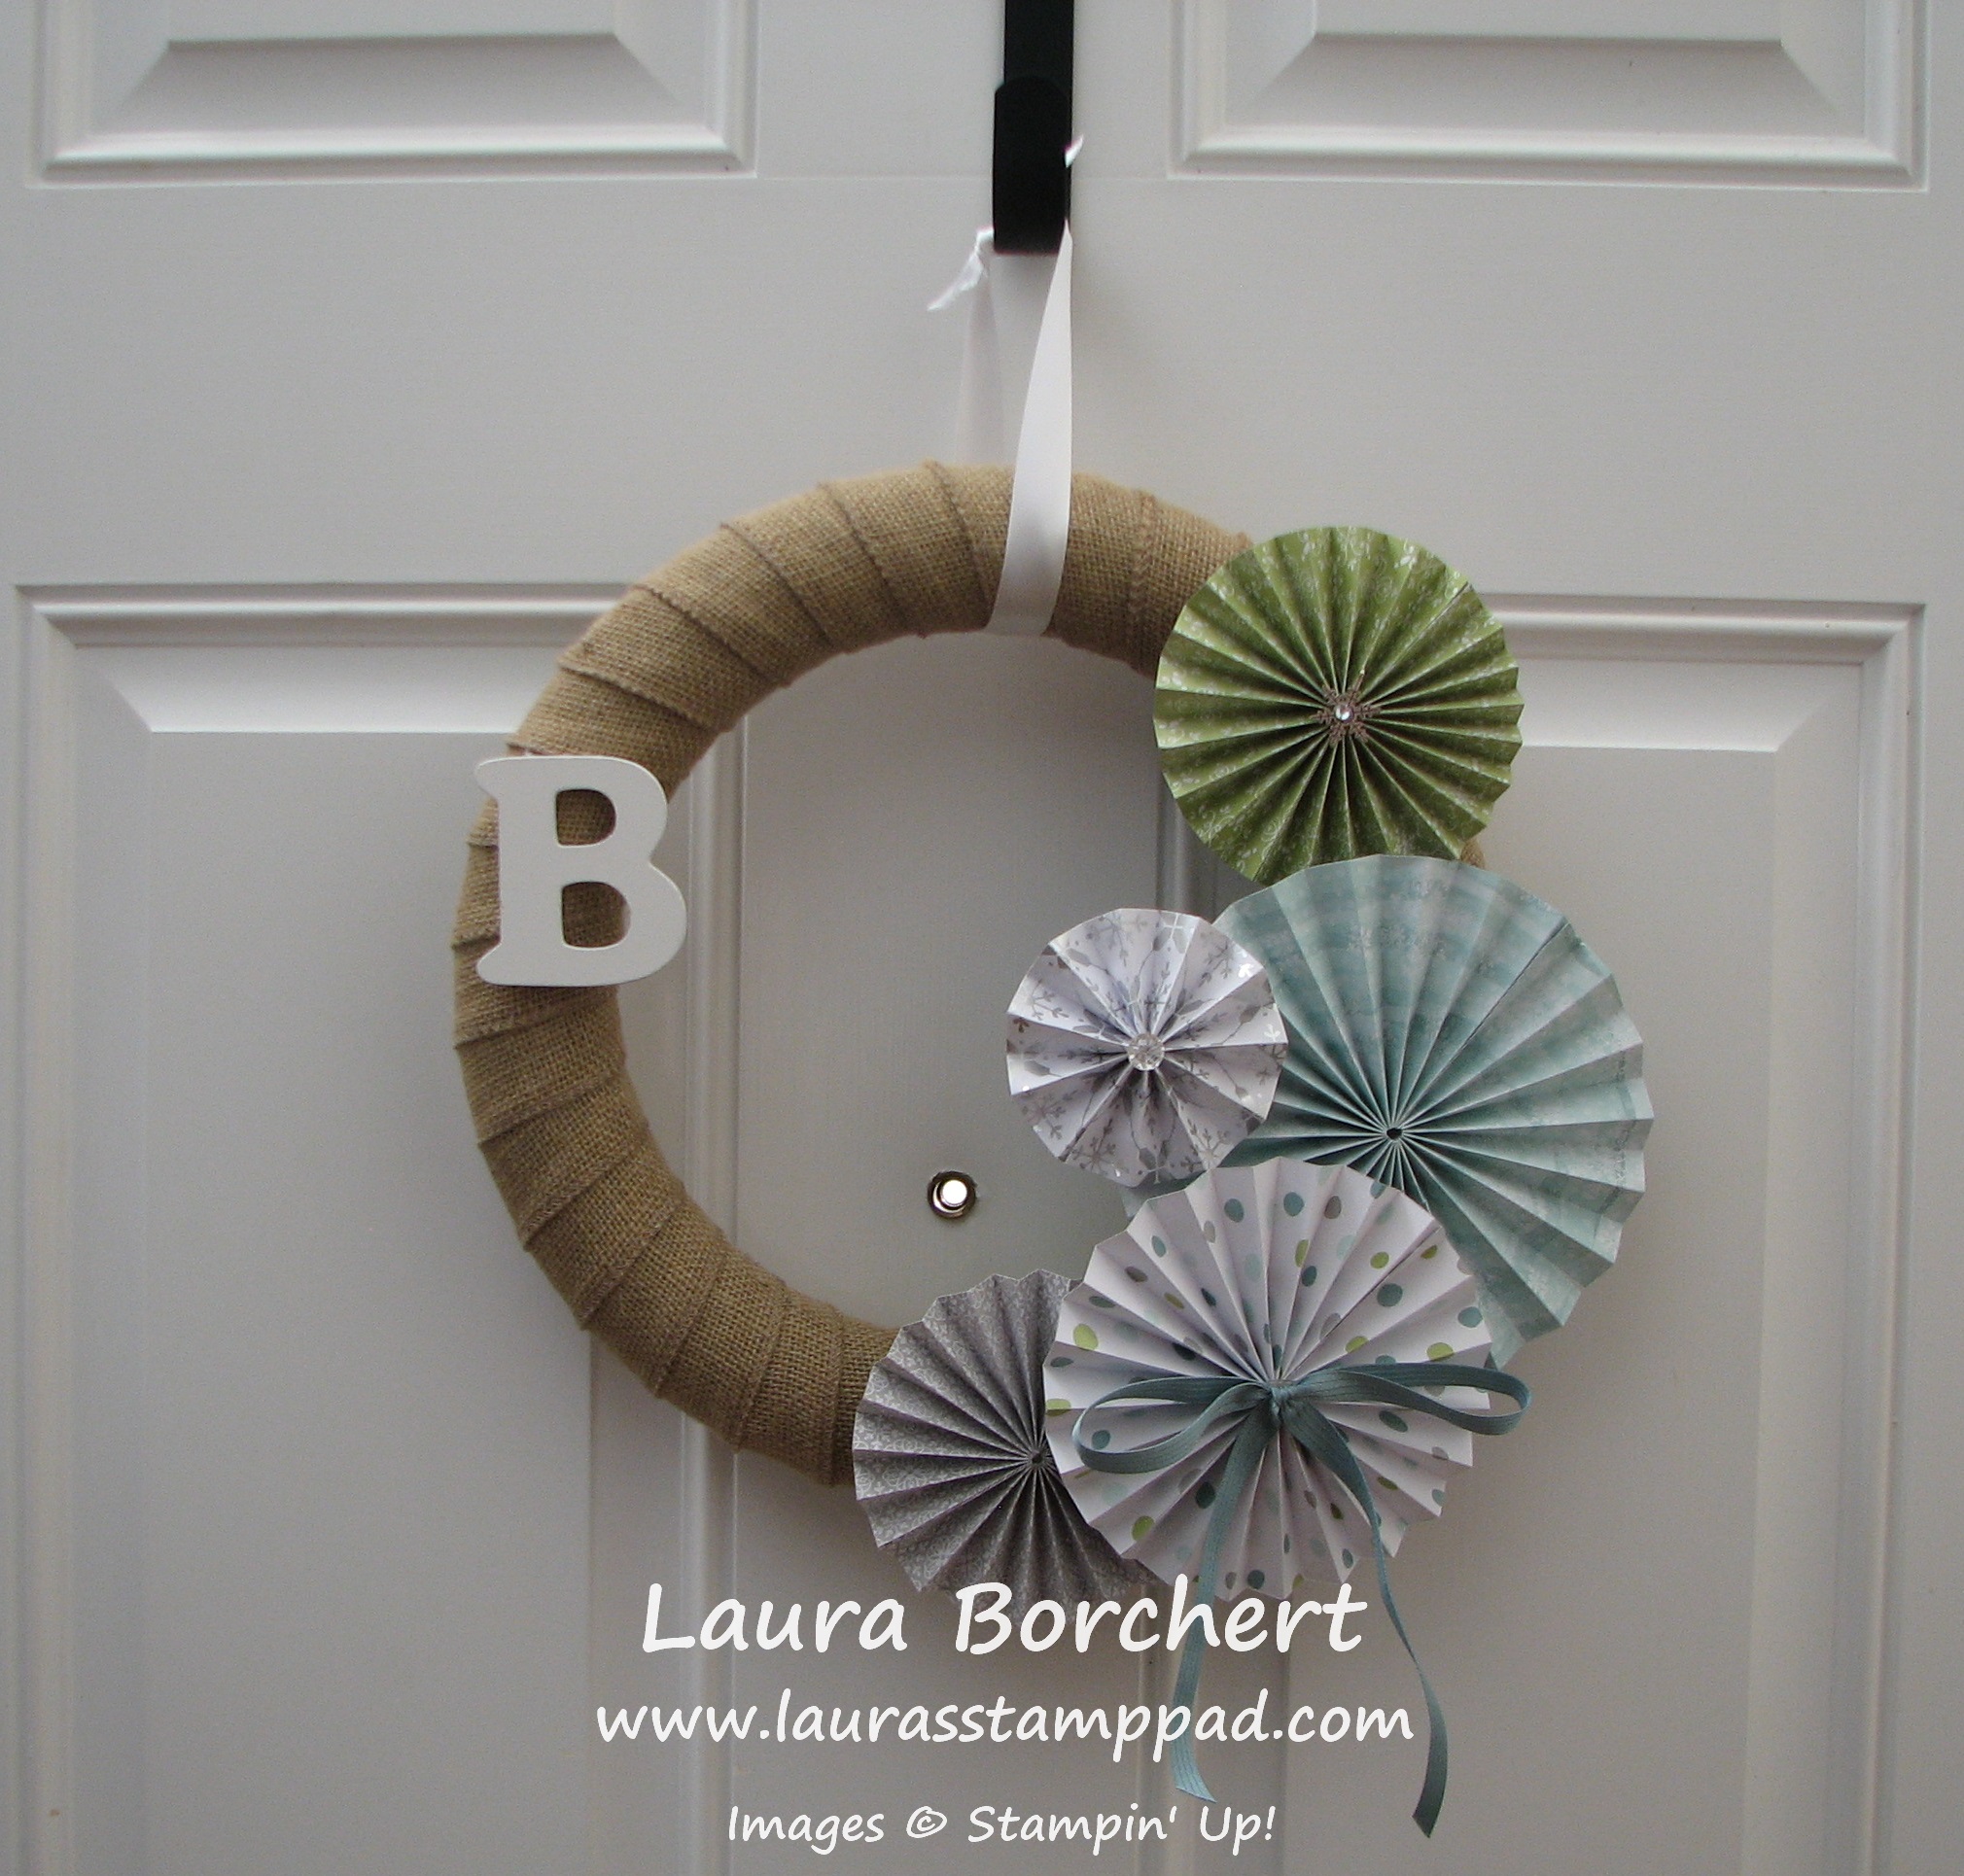
Happy Tuesday everyone!!! That means I have a fabulous technique to share with you today and that is a fabulous winter wreath!!! After my Halloween wreath, I realized I needed to come up with something for the Holidays. After some thought and time going by, I realized that a winter wreath would be better and last longer than a Christmas one. Now I can keep this one up until the end of February or so.
This is what I came up with!!!! What do you think?
I started by wrapping my foam wreath with the Burlap Ribbon! You can secure the ends with hot glue or straight pins. Be sure to go at an angle and make it just barely overlap or you won’t have enough to cover the wreath. Mine didn’t go all the way around but I covered up the missing portion with my rosettes. I did a class and some were able to cover all of it. You can always add more from another roll as well. Now it is time to make your Rosettes.
Smallest Rosette – One strip of Designer Series Paper: 1-1/2″ x 12″
2 Medium Rosettes – 2 strips of DSP for each Rosette: 2″ x 12″
Medium/Large Rosette – 2 strips of DSP: 2-1/2″ x 12″
Large Rosette – 2 strips of DSP: 3″ x 12″
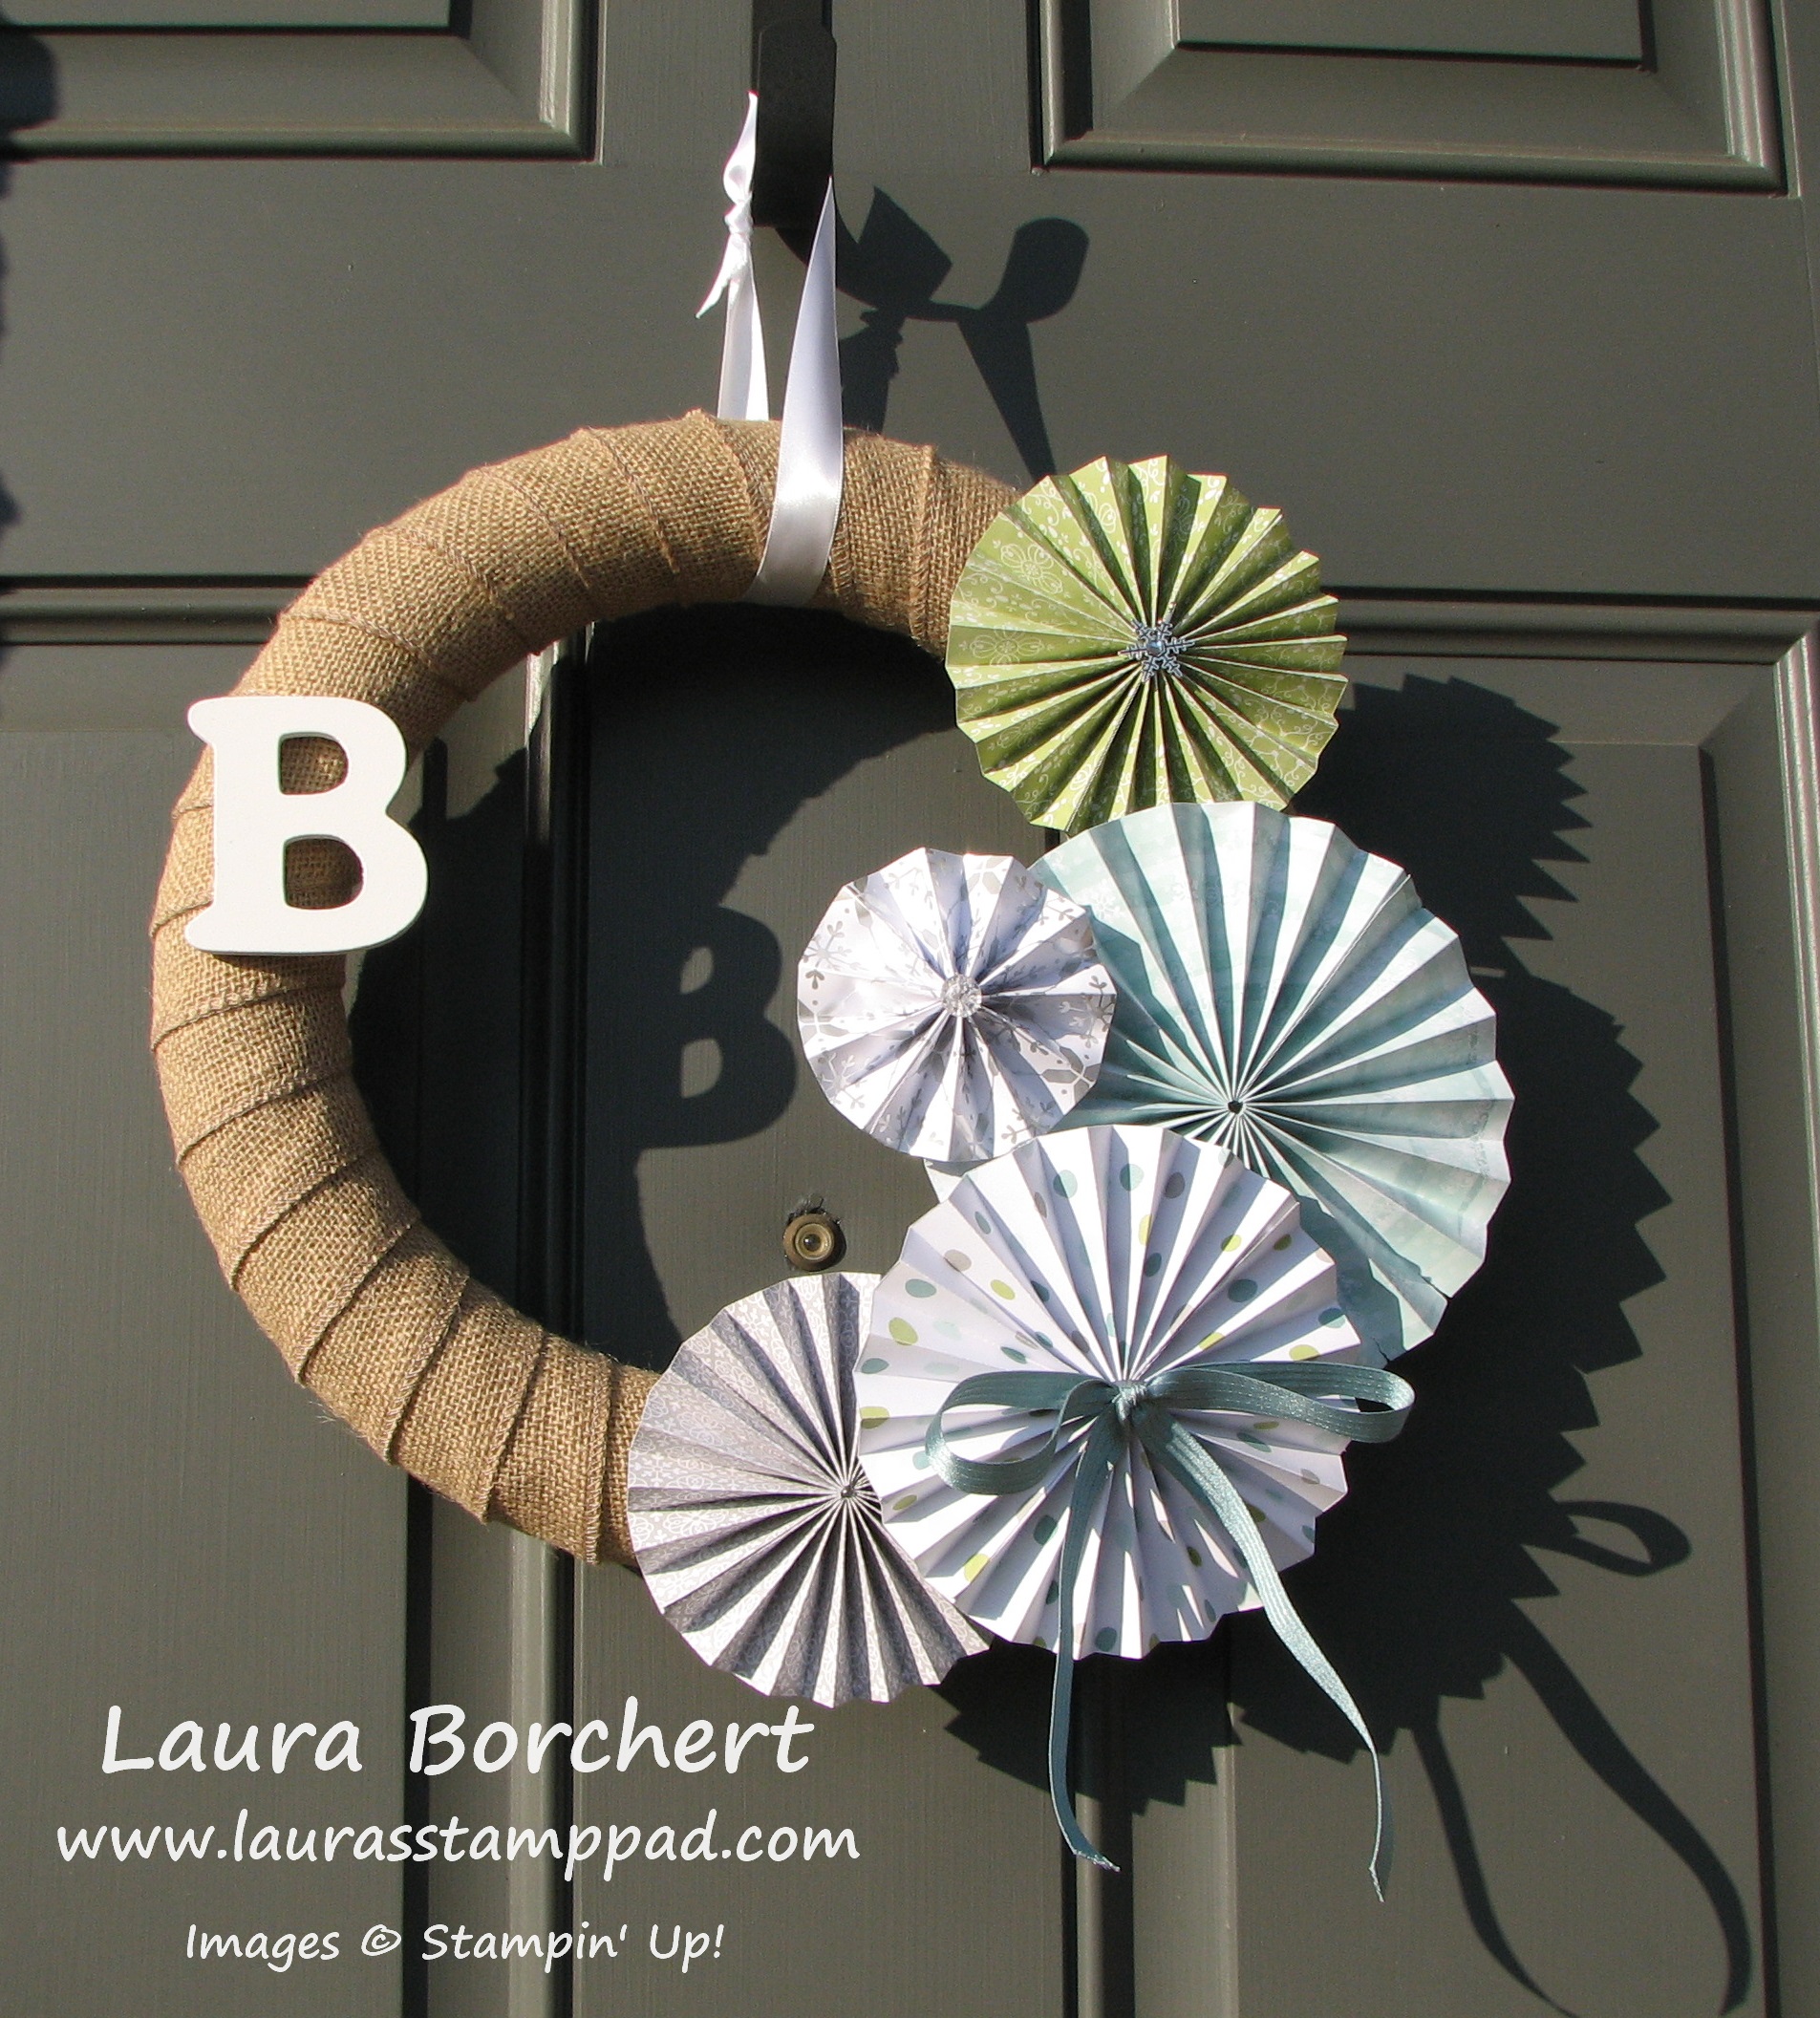
Run each of the strips through your Big Shot with the Rosette Designer Die to get the folds for creating your Rosettes. Fold on the creases in a mountain/valley fold style. You can use your hot glue gun or some Sticky Strip to adhere the strips together and into a circle. To get your Rosette to stay down and not pop up, you will want to get our your Silicone Mat and put a glob of hot glue in the middle. Press your Rosette down onto the glob of glue right in the middle and hold while it cools. Once it is cool, it will pull right off and you are set. I did add a little scrap punched oval of cardstock to the back to cover up that glue spot and in case some of them still needed a little more stability. Once you are done with all of your rosettes, it is time to assemble them to your wreath. You can arrange them in the bottom right corner like I did or do 3 down there and 2 in the top left corner. You could even make lots of these rosettes and cover the entire wreath. Note: when assembling them to your wreath, place the glue on the wreath and place the rosette on top rather than putting the glue on the rosette. There were many times I would put it on the rosette and then realize that spot wasn’t even touching the wreath. 🙂 I added some Lost Lagoon Satin Stitched Ribbon, Vintage Faceted Buttons, and Snowflake Embellishments. You can always hang the wreath as is or you can add a ribbon loop. My ribbon loop was created with Whisper White Satin Ribbon. Love it!!!! Here it is on my front door!!!
Let me know if you want this wreath! I would love to see your creation! Also, do you create a wreath for Valentine’s Day or just skip to Spring? Leave me a comment down below!