I love how Designer Series Paper can make a card so fabulous and it was really easy to create! This card consists of a few layers, a stamped greeting and tying some ribbon yet it is so beautiful!!! I’m not 100% sure if those are Peonies on the paper but I do love Peonies (minus the ants)!!!
For this card, I started with a card base of Watermelon Wonder. Then I cute out a piece of Old Olive measuring 4-1/8″ x 5-3/8″. I added some of the Birthday Bouquet Designer Series Paper (retiring) to the bottom portion and Blushing Bride cardstock to the top portion. Before adhering it on, be sure to stamp your greeting. I used the Happy Birthday Everyone Hostess Stamp Set (retiring) and stamped it in Watermelon Wonder. Then I adhered it all on the Old Olive. Using some Whisper White Seam Binding (retiring), I tied a knot around the overlap of the 2 papers. Then I adhered this piece to the card base and that’s it!!! Quick and Simple!!!
This card is pretty basic and would be great for any occasion! What occasion would you use it for – Wedding? Birthday? Sympathy? Thinking of You? Let me know in the comments below!
Also, be sure to check out my Video today about how I use Rubbing Alcohol in my Craft Room! Don’t forget to give it a thumbs up if you liked it! Be sure to subscribe so you don’t miss out on any of the videos! I post a video every Tuesday and Thursday!
Happy Stampin’
~Laura
Be sure to check out the Retiring Items that will no longer be available after May 31st!
Mother’s Day is right around the corner so now is the time to start working on that perfect card for the World’s Best Mother! I could go on and on about why my Mom is the best but I’m sure you all could! To be honest, I’m not sure whether this card will go to my Mom or not. I have a couple ideas for her card and just don’t know which one is best! Maybe I’ll just send her a card every day the week before Mother’s Day with each one saying why she is so fabulous. Wouldn’t that be wonderful……good idea Laura! 🙂 (I’m working on the World’s Best Daughter Award! hehe) Let’s get started on this beauty!
I started with a Whisper White card base and stamped the greeting from the A Nice Cuppa Stamp Set (retiring) in the bottom right corner in Rose Red. Then I took a piece of Old Olive measuring 4-1/4″ x 5″ and placed the vine framelit from the Botanical Builder Framelits diagonal towards the bottom of the cardstock. I ran it through the Big Shot and that is how I created that beautiful vine piece. I placed that on the card lined up with the top. Then I added various flowers which were die cut from the Botanical Builder Framelits. The center flower is in Rose Red and I used Stampin’ Dimensionals to pop it up! The next flowers were done in Pumpkin Pie and I adhered them flat to the card. The little centers were done in Daffodil Delight and I adhered them on with the Fine Tip Glue Pen! The last flowers were die cut in Elegant Eggplant and popped up on Stampin’ Dimensionals. I added some Pearls to a few of the flowers for a little bling! You could really do any assortment of colors and use up some scraps you have laying around! Love it!
Happy Stampin’
~Laura
Be sure to check out the Retiring Items before they are gone at the end of May!
Happy Tuesday everyone!!! We are back at it with another Technique after last week’s celebration!! This technique uses my favorite Framelits – Rose Garden and some bling!!!! Check this out!
Aren’t those roses just stunning? I am still on the fence as to whether this card is a bit much or just fabulous! My husband says its a bit much and only one rose was needed. Let me know in the comments below what you think. Be honest!!!
I used the Silver Foil Paper and Blushing Bride Glimmer Paper for these roses! I die cut the rose with the Big Shot once in the Silver Foil and once in the Blushing Bride Glimmer Paper. Then I popped out all of the pieces with the Big Shot Die Brush. Be very gentle with the Glimmer Paper. It could brush off a little glitter and we want all the bling!!! Be sure to keep track of all of the little pieces that you pop out. Then I took a piece of Blushing Bride cardstock measuring 4″ x 5-1/4″ and placed one of the rose frames in the corner where I wanted it. I took a pen and marked little dotted lines around the INSIDE of the rose frame. This was my guide for adding Snail Adhesive to the area. I took away the rose frame and filled the entire area with adhesive. Then I placed the Glimmer Rose down and started putting together the rose with the Silver Foil pieces inside. It really is like a puzzle!
You will repeat the same thing in the opposite corner with the Silver Foil Rose frame and glimmer puzzle pieces. If for some reason you don’t have enough adhesive, you can always add a dab of glue from the Fine Tip Glue Pen. I just found it to be much easier and less messy to use the Snail Adhesive for the majority of it, rather than gluing each piece in. Once I had my roses complete, I added some Whisper White Organza Ribbon around the middle and stamped my greeting. The greeting is from the Number of Years Stamp Set and I stamped it in Rose Red (stamp off once). I added this to a Whisper White Card base and Viola!!! Love it!!!
I played around with a few other looks as well. Here is a Black Glimmer Paper (ops….retired from the Holiday Mini Catalog) and Real Red Cardstock. You could always do Real Red Foil Paper or all cardstock!! I think this one is amazing!!!
And then I just had to do a Pink Rose!!!! I used one of the other Framelits in the Rose Garden Set. The border is Dazzling Diamonds Glimmer Paper and the puzzle pieces are Melon Mambo and Pear Pizzazz cardstock! I LOVE IT!!!!
If you would like to see this all in action, check out my Video Tutorial below or click here! Don’t forget to give it a thumbs up if you liked it and be sure to subscribe so you don’t miss out on any future videos!
Let me know in the comments below which one your favorite is!!! I’m between the Red and Melon Mambo one….they are both amazing!!!
Happy Puzzle Piecin’
~Laura
Be sure to check out the Retiring Items before they are gone at the end of May!
I loved the You’re So Lovely Project Kit (see here) and coordinating You’re So Lovely Stamp Set so I thought I would see what else I could create with that same set! I love how this card turned out!!! After all it is pink and has some bling on it so who wouldn’t??
I started with a Melon Mambo card base and stamped the stars from the You’re So Lovely Stamp Set in Smoky Slate and Melon Mambo randomly along the edges. Then I took a piece of Whisper White measuring 3″ x 5-1/2″ and stamped randomly on there making sure to leave a spot for the greeting. Then I took the circle wreath image and stamped in multiple times moving it slightly with each stamp. It looks like barbed wire kind of….or a wreath! I stamped the greeting from the same set in Melon Mambo. I love that greeting. I added the stamped piece to the card base and added some Silver Glitter Tape along both sides. The Glitter Tape was a Sale-A-Bration Item so if you have that you can use it. If you don’t, you can always use a thin strip of Silver Glimmer Paper! That bling really adds the final touch! Love it!
What color combination would you use for this card? Pink like me or perhaps Purple, Blue, Yellow Green??? Ohhh Black and White with that pop of Silver….that would be fabulous!!! Let me know your ideas in the comments below!
Happy Stampin’
~Laura
Be sure to check out the Retiring Items before they are gone at the end of May!
You all know how I struggle with a good man card because I just love flowers, ribbons and bling! Well check out this one!!!! I love it and I think it’s a perfect Man Card!!! I will be making multiples of this one to have on hand!!!
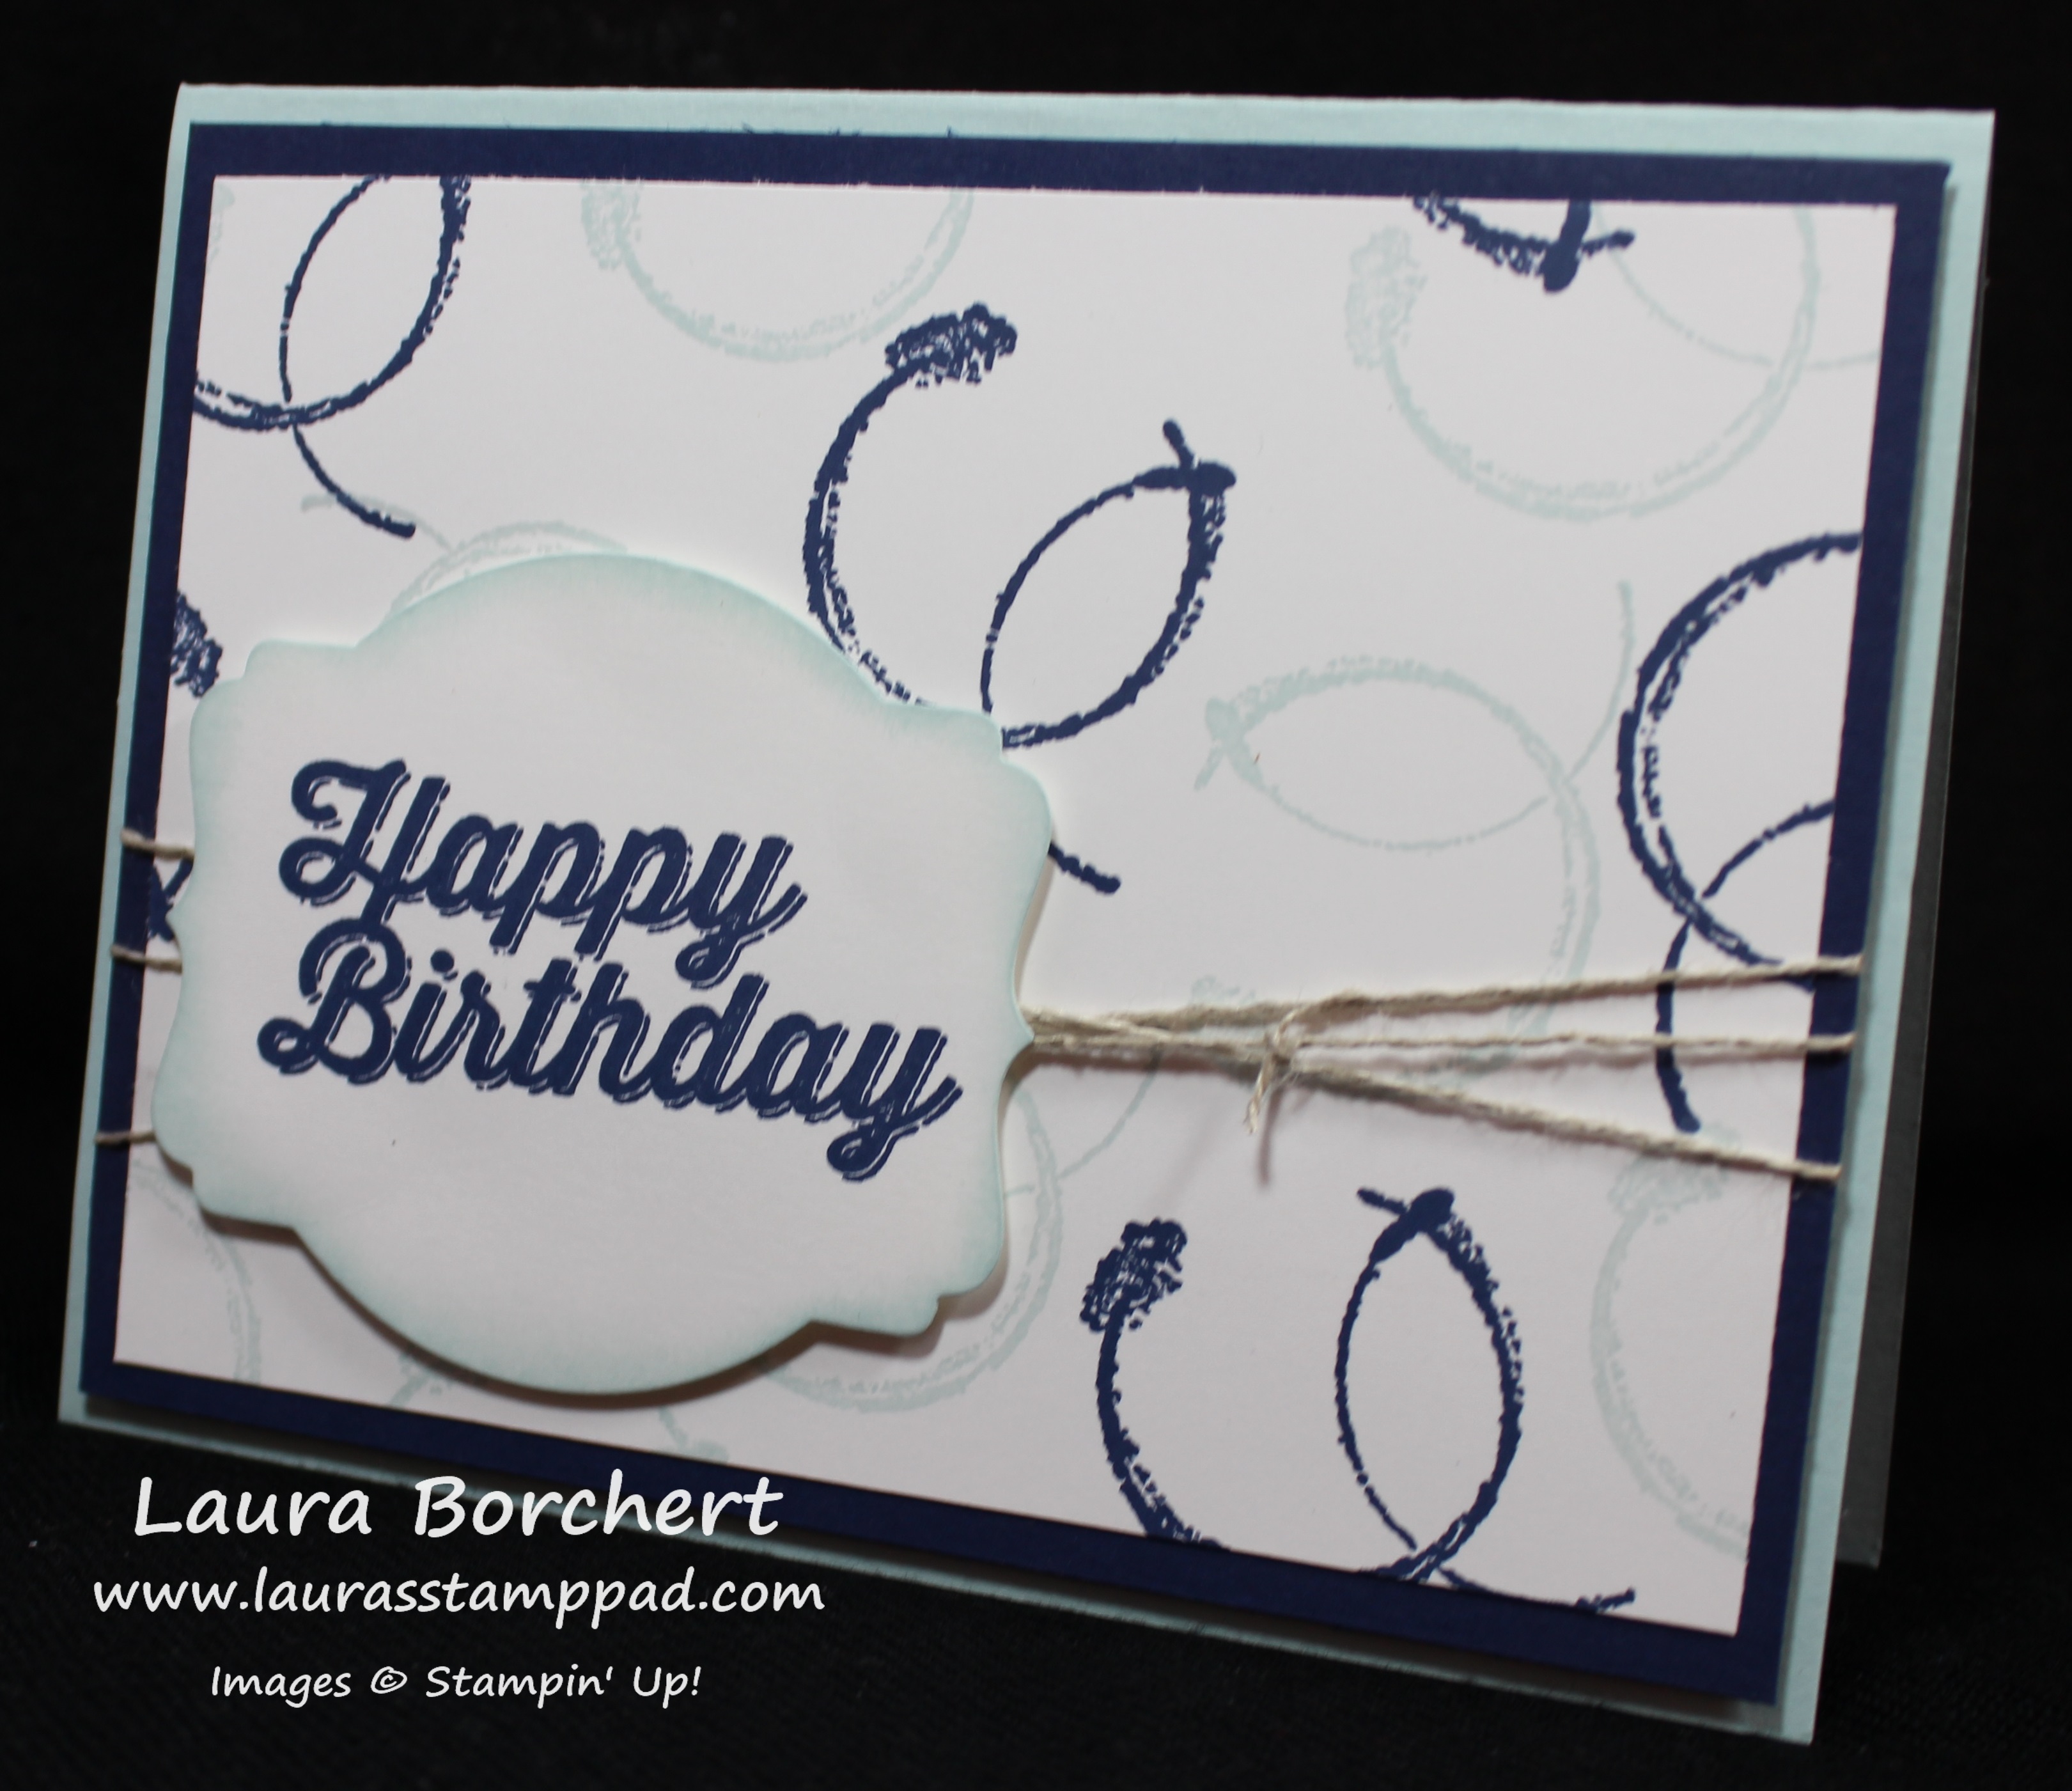
I started with a Soft Sky card base. Then I cut a piece of Night of Navy measuring 4″ x 5-1/4″ and White White measuring 3-3/4″ x 5″. On the Whisper White, I stamped the tea cup stain image from the Timeless Textures Stamp Set all over in Soft Sky and Night of Navy. Just randomly stamp and be sure to fall off the sides to make it look like the pattern continues. I adhered this piece to the Night of Navy and then wrapped some Linen Thread around the 2 pieces a few times and tied a knot (no bow since it’s a Man Card)! 😉 I added this piece to the card base with Stampin’ Dimensionals. You all know I love those things and I like to use them when there is ribbon (or something wrapped around) because it allows for it to still look smooth! For the greeting, I stamped the Happy Birthday in Night of Navy and die cut with the Deco Label Framelits. I brushed the edges with a Sponge Dauber and Soft Sky Ink and attached it with Stampin’ Dimensionals as well! Just perfect!!!!
What do you like to use for your Man Cards? Let me know in the comments below! I always need help with Man Cards! Also, if you would like to see more samples using the Timeless Texture Stamp Set, click here and here!
Happy Stampin’
~Laura
Be sure to check out the Retiring Items before they are gone at the end of May!
I really struggle with Man Cards so when I saw the In The Meadow Stamp Set, I though I need that set!!! It is the perfect masculine look. I have lots of family and friends who are outdoorsy so this is perfect!!!
I started with a piece of Very Vanilla cardstock measuring 3-1/2″ x 4-1/2″ and I stamped the deer and trees with Basic Gray Archival Ink. I like the lighter look of gray over black for this card! You can always add in a little bit of the grass to fill in if you would like to. All of the images are from the In The Meadow Stamp Set from the Occasions Mini Catalog. The greeting was stamped in Chocolate Chip from the Rose Wonder Stamp Set! I colored in the images with an Aqua Painter! I did the deer in Crumb Cake, the grass and leaves in Old Olive, and the tree trunk in Chocolate Chip. You can always make one of the deer a different color to off set them a little more. I’m really starting to like coloring with an Aqua Painter! I took a Crumb Cake card base and added a piece of the Corrugated Cardstock (4″ x 4″) with opposing corner touching the sides. I thought I would do an off set look rather than just layering it on there. I added the Very Vanilla to the card front with Stampin’ Dimensionals. This adds texture and dimension to the card but also makes for a smooth look on the corrugated paper. Love it!
I plan on making lots of these for Father’s Day, Birthdays, and maybe even Sympathy. If you would like to see this in action, check out my Video Tutorial below or by clicking here! Don’t forget to give this video a thumbs up if you liked and be sure to subscribe if your new!
You all know how much I love flowers! 🙂 I just can’t get enough of them! Here I used the Botanicals Bundle from the Occasions Mini Catalog. The greeting is from the coordinating Botanicals For You Sale-A-Bration Stamp Set (promotion ended in March). You could use this card for any occasion!!!
I started with a Pool Party card base and then took a piece of Whisper White measuring 4″ x 5-1/4″ and stamped on it. I stamped the greeting from the Botanicals For You Stamp Set in Basic Gray. The little flowers are from the same set and I stamped them in Crushed Curry. For the main flowers, I used the Botanical Builder Framelits and Botanical Blooms Stamp Set. The leaf is done in Pear Pizzazz and I stamped the vein in the same color. The larger flower is Pool Party with a Bermuda Bay smaller flower and Crushed Curry mini flower. I added the leaf with regular Snail Adhesive. I popped up the big flower with Stampin’ Dimensional. I layered the rest of the flowers on top with the Fine Tip Glue Pen. Love it!!!
You could mix up the colors to be your favorites or whatever color you have on hand. With the simple Just For You, it could be used for just about anything!
Happy Tuesday everyone! We are going to take a mini break on the Technique Tuesday because today is even more special! Today marks my 12th Anniversary with Stampin’ Up! These past 12 years have been amazing. I started out as a demonstrator who was just enjoying the discount on my scrapbooking stuff. I was still in college and loving every minute of it. I graduated college, got a full time job but still enjoyed the creative outlet. I started doing classes in my very small apartment. Thank you to all of those who came because it was tight, the lighting was poor, and the stairs to get up to the apartment were dark. You are amazing for sticking with me! I moved to a bigger, much nicer place. I quit my full time job that was making my life miserable. Now I am doing my Stampin’ Up business full time and I’m happier than ever and enjoying every moment! I love meeting new people. I love the moments that have taken place. It truly has been an amazing 12 years and I look forward to the next 12!!! Thank you to all of my customers, blog followers, and YouTube Subscribers. Thank you to my fabulous upline – Meg for asking me to join you in the fun! Thank you to Stampin’ Up for being an amazing company that I’m so proud to say I work for!
Here is a picture of me and my biggest Stampin’ Up! Supporter – Brad! I was looking for a picture of just me and all I could find were selfies with my sweetie so here you go! 🙂 Today I’m going to share my Top 12 Favorite Products from Stampin’ Up!!!! Let’s get started!
Tin of Cards Stamp Set – I bought this to create the Tin of Cards Project Kit but I have been reaching for this set for lots of cards because I love the greetings!
Wink of Stella Brush – I love me some bling and this brush just adds the perfect amount with no messes!
Stampin’ Dimensionals – These things are just amazing. You can see a video dedicated to my love for them here!
#ImBringingBirthdaysBack – This is a fabulous movement and I am excited to join in. I love sending cards even more now.
Aqua Painters – I never saw this one coming since I don’t normally have the patience to color. Lately I want to color more and more and I have been having lots of fun with these!
Big Shot Die Brush – This thing is super amazing and makes die cutting those intricate pieces so much more fun! You can check out this video on it!
Fine Tip Glue Pen – This glue is amazing for those intricate details. The fine tip is perfect and so far mine has never clogged.
Balloon Bouquet Punch – Balloons are perfect for every occasion and this punch is perfect for creating bouquets of them!
Rose Wonder Bundle – This is another stamp set that I grab for each time I’m creating a card. I love the scroll-y font and amazing greetings. The coordinating Rose Garden Framelits are super fun too and I have done lots of amazing creations with them. Check those out here, here, and here!
Linen Thread – I have been using this more and more. It’s perfect for Man Cards and it goes with so many different looks!
You can check out a complete video of these favorites here or click below!! Last year I did my Top 11 and you can check that out here. I actually didn’t duplicate any of the items…..and that wasn’t on purpose. I checked after I did my Top 12! 🙂 Be sure to give the video a thumbs up if you liked and don’t forget to subscribe!
Let me know in the comments below what your favorite products are….same as mine? Something different? I would love to hear from! Here to many more amazing years stamping!
Don’t forget the Retiring Products List is out so you will want to check that out! Click here to see the items!!
While it is sad to see these products go, it just means that many NEW items are coming out in the New Big Catalog coming out on June!!! I have seen the new catalog and it is AMAZING!!!! I think I screamed like a little girl the entire time I looked through it!
Remember that the Retiring Products are while supplies last so don’t wait long or the items may no longer be available!
I got the Enjoy The Little Things Project Kit and Enjoy The Little Things Stamp Set months ago. I opened up the kit and thought it was very detailed and pretty! You can see all the supplies here! I just couldn’t decide what I wanted to do with this kit. I loved the little chalkboard easel and I loved all of the cards but I just didn’t think I would display this or have a place for it. So I held off all of these months and finally decided to just make it into cards! I always need cards and I loved the designs. I got 13 cards out of the kit and used only my own Whisper White for the card bases! I could have easily made many more cards with all of the supplies but instead made the cards just like the samples for the home decor piece! Here are more photos!
There is a card for every occasion, season, and moment throughout the year! I love all the intricate details and pieces!
These 4 are my super favorites! I really like all of them but these are the best! I love the colors, the golden accents, and the designs!!! Let me know what you favorites are in the comments below!