The Kits Collection Sale – Up to 30% Off!

Posted on

If you’ve been waiting for the perfect time to stock up on Stampin’ Up! kits, this is it! The Kits Collection Sale is happening NOW!

Kits Collection Sale, www.LaurasStampPad.com

For a limited time, all kits in the Kits Collection are up to 30% off—that means more creativity, more fun, and more savings! Whether you’re brand new to stamping or a seasoned crafter who loves quick and easy projects, these kits make creativity simple and stress-free.


Why You’ll Love the Kits Collection

  • All-Inclusive: Everything you need—pre-cut pieces, adhesive, and instructions—comes right in the box. Minimal mess!!!
  • No Prep, No Pressure: Just open your kit and start crafting!
  • So Many Styles: From cardmaking and gift tags to home décor and treat boxes, there’s a kit for every occasion.
  • Perfect for Parties: Invite a friend (or a few!) and turn it into a Kits & Giggles Party for double the fun. Ask me for more details!
  • Gift-Ready: These kits make wonderful gifts for both new and experienced crafters. Teacher Gifts, Office Parties, Rob Your Neighbor Exchanges, and more!

Sale Details

All Kits in the Kits Collection – Up to 30% Off
Available through tomorrow – Wednesday, October 8th!
While supplies last, some kits are going fast!

You can shop all the kits right here → SHOP NOW!


My Favorite Part

I love these kits because they take the guesswork out of crafting—everything is beautifully coordinated and ready to go. It’s like I get to a attend one of my classes without doing the prep work! Claire loves these kits too and I enjoy working on them together with her with minimal mess. Many times we will take them upstairs and work on them at the table! I also like to gift them because they come with everything you need and card making is fun! This sale is the perfect excuse to treat yourself to a little creative joy and maybe knock a few people off your gift list!!!!


Don’t wait too long—kits tend to sell out quickly during this event!

Click here to shop the Kits Collection Sale now!

Happy Crafting (and happy saving!),
~Laura

Free Gift of the Month, www.LaurasStampPad.com

Stampin’ Up! 12 Days of Crafting Advent Calendar

Posted on

The holiday season is the perfect time to celebrate creativity—and this year, Stampin’ Up! is making it even more magical with the 12 Days of Crafting Advent Calendar! I’m so excited because it’s like the perfect gift for me and I’m done shopping in September!!!

12 Days of Crafting, www.LaurasStampPad.com

Instead of candy or trinkets, this special advent calendar is filled with crafty surprises that will inspire you to create all season long. Behind each door, you’ll discover exclusive stamping and crafting goodies that are perfect for holiday projects, handmade cards, gift tags, and more!!! Eeeeee!

What makes the 12 Days of Crafting Advent Calendar so special?

  • 12 Days of Surprises – Each day reveals a new item to spark your creativity!
  • Perfect for Paper Crafters – Stamps, embellishments, and other goodies designed with cardmakers and scrapbookers in mind!
  • Holiday Ready – Everything is themed for Christmas crafting, so you can add handmade touches to your gifts, décor, and cards!!!
  • Gift-Worthy Packaging – Beautifully designed, making it a thoughtful present for the crafters in your life!

Who is it for?

  • New stampers who want a fun way to try out Stampin’ Up! products!!
  • Experienced cardmakers looking for fresh inspiration!
  • Anyone who loves the joy of opening daily surprises during the holidays! That’s me for sure!

A Gift that Keeps on Giving

Imagine sitting down each day in December (if I can wait that long), opening a new door, and finding just what you need to create something festive and handmade! The Stampin’ Up! 12 Days of Crafting Advent Calendar isn’t just about supplies—it’s about creating memories, traditions, and joy through crafting.

Click here to order your Advent Calendar before they sell out!

Make this Christmas season extra special with daily doses of creativity. Treat yourself—or surprise a friend—with the 12 Days of Crafting Advent Calendar and unwrap the joy of handmade holidays.

Happy Stampin,
~Laura


Crafting Essentials: Bone Folder

Posted on

It’s time for another episode of Laura’s Crafting Essentials! Today, I’m talking about the Bone Folder! That Bone thing. The Bone. Where is that tool for folding cardstock? I have heard lots of different things for this handy tool! In my classes, I always say that you might think it’s silly in the beginning but by the end of class, you will be asking for it!

Crafting Essentials Bone Folder, www.LaurasStampPad.com

The Bone Folder is a smooth, flat tool (made of durable plastic, not actual bone) that helps create crisp folds and creases in paper and cardstock without damaging the material.


Key Uses for the Stampin’ Up! Bone Folder

  1. Scoring and Creasing:
    • Create sharp, professional-looking folds on card bases.
    • Reinforce score lines for box-making or 3D projects.
  2. Burnishing Adhesive:
    • Press down on glued areas to ensure strong, flat adhesion—especially helpful for layers or envelopes.
  3. Curling Paper:
    • Gently pull the edge of paper against the bone folder (like curling ribbon) to add dimension to flowers or banners.
  4. Smoothing Out Bubbles:
    • Ideal for flattening paper over adhesive sheets or when using specialty papers.

I love my Bone Folder and have lots of them! Of course, I place that at each spot for classes but I have 2-3 on my crafting desk at all times. Part of that is because I tend to lose them too! 🙂 Another TIP: Use your Bone Folder to hold your cardstock down with you are using a Heat Tool! This helps you not burn your finger!

Do you have a Bone Folder or 3?!? If not, click the link below! If you are wondering what other Crafting Essentials I am loving, click here!!! Let me know in the comments what your Crafting Essentials are!

Happy Stampin’

~Laura

Product List

Crafting Essentials: Paper Snips!

Posted on

Here is another post about my favorite crafting essentials! Today, I’m chatting about Paper Snips! Sure we probably all have scissors in our crafting area or around the house. Paper Snips are not your average scissors though!

Paper Snips, www.LaurasStampPad.com

Stampin’ Up! Paper Snips – Small But Mighty!

If you do any kind of paper crafting, you need these in your toolbox. The Stampin’ Up! Paper Snips are precision scissors designed especially for fine, detailed cutting—perfect for fussy cutting stamped images, trimming ribbon, or working in tight corners. They are also super sharp….ask me how I know!!! LOL

Why You’ll Love Them:

  • Ultra-sharp stainless steel blades for clean, smooth cuts
  • Needle-point tips let you get into intricate corners and tight areas
  • Comfortable, ergonomic handle (for right- or left-handed crafters)
  • Protective blade cover included—safe for travel or storage (if you remember where you placed it)

Perfect For:

  • Fussy cutting stamped images or dies….so not my favorite thing but these make it easier!
  • Trimming thread, ribbon, or twine!
  • Crafting clean card edges or removing small paper imperfections

These little scissors are a crafter’s secret weapon—and once you try them, you won’t want to use anything else! If you happen to get adhesive or gunk on them, simply wipe them with some rubbing alcohol to clean them off!

I hope you are enjoying my Crafting Essential posts! In case you missed the last one, check that out here!!

Happy Stampin’

~Laura

Product List

Crafting Essentials: Grid Paper!!!

Posted on

I thought I would share a few of my crafting essentials! These things come in handy when crafting. While not always necessary, they do make thing easier sometimes!

Grid Paper, www.LaurasStampPad.com

Grid paper is something I use every time I am stamping and take to each of my Stamp Classes! This might be a surprise but it’s a very versatile tool! Here are several practical and creative uses for grid paper that you can use in your card-making and stamping setup:


Practical Uses for Grid Paper in Card Making & Stamping

1. Stamping Alignment & Positioning

  • Use the grid lines to align stamps perfectly—especially helpful with sentiments or geometric patterns.
  • Easily center die cuts or embellishments by working on a gridded background!!

2. Protect Your Work Surface

  • Prevent ink, glue, or marker bleed-through from damaging your table or crafting area.
  • Grid paper catches all the mess during inky techniques like blending or spritzing.
  • Once it gets too messy, just toss it and grab another sheet!

3. Measuring & Layout Planning

  • Use the printed measurements to pre-plan card layouts or matting layers.
  • Quickly check dimensions without grabbing a ruler!

4. Practice Stamping

  • Test new stamps or ink colors on it before using them on your project.
  • Use for stamping off to achieve different color variations or for 2-step stamping!
  • Practice pressure and placement, especially with photopolymer stamps.

5. Masking & Blending

  • Use sheets to mask off areas or to create temporary backgrounds for blending and sponging.
  • Fold or cut the paper to create custom templates or straight-edge guides.

6. Project Notes & Sketching

  • Take notes, draw layout sketches, or jot down supply lists directly on the sheet during a class or creative session. My customers do this all the time – write down something we use in class that they want to order or sometimes a doodle of something we are all chatting about! 🙂
  • Great for remembering card measurements or layering dimensions or colors used in a project.

I hope this gives you some ideas for using Grid Paper if you have it already! If not, maybe Grid Paper will help solve some problems you have while crafting! Get your Grid Paper today!!!

Happy Stampin’

~Laura

Product List


Two-Toned Cardstock!

Posted on

Stampin’ Up! launched their Two-Toned Cardstock in all the colors so now we can enjoy this amazing product with all of our projects!

Stampin Up Two-Toned Cardstock, www.LaurasStampPad.com

What is Two-Toned Cardstock?
This 12″ x 12″ cardstock has a lighter shade on one side and a darker shade on the other side. The core of this cardstock is white. It comes in 53 Stampin’ Up! Colors and there are 12 sheets in each paper pack!

White Core Cardstock, www.LaurasStampPad.com

What does white core mean?
This cardstock has a white core with the lighter shade on one side and the darker shade on the other side. This makes it fun to create a lot of texture in your greeting card, scrapbook pages, or other project when you tear it and get that detailed look. You could also brush some ink over those white edges for even more color variation and texture!

Have you tried out the Two-Toned Cardstock yet? Click here to shop all of the colors or click the images below for my favorite colors!

Happy Stampin’

~Laura

Product List

Water Painters For The Win!

Posted on

Stampin’ Up! Water Painters come in a 3 pack and they are amazing for watercoloring, creating backgrounds AND sealing envelopes rather than licking them!

Water Painters, www.LaurasStampPad.com

Stampin’ Up! Water Painters come as a 3 pack. There is a fine tip brush, a thicker (marker like tip) brush, and a wide, flat brush (as shown in blue above). These brushes are just $13.00 (plus tax and shipping) and you can do so many amazing things with them!

Simply fill the barrel with water and use to watercolor a stamped image. Once you are finished with a color, wipe off the tip on a paper towel and move to the next color. You can also create backgrounds with them. Stripes, polka dots, plaid, a border…..the possibilities are endless. One of my favorite things to use my Water Painter for is sealing envelopes. Especially during this time of year when I’m sealing lots of envelopes, it’s quick and simple and no watery mess. Best of all no nasty taste in my mouth or a paper cut on my tongue. So handy for so many reasons!

Get yours today for the holiday season and all year long!!

Happy Stampin’

~Laura

Product List

Stampin’ Up! Kit Collection

Posted on

What is the Stampin’ Up Kit Collection? I’m glad you asked because it is AMAZING for everyone. I love these kits…and so does Claire! These kits make amazing gifts, rainy day projects, and something to keep your hands busy while hanging out with family or friends!!! There is a kit for every occasion and style! Here are just a few.

Stampin' Up Kit Collection, www.LaurasStampPad.com

Why the Kits Collection?

  1. Kits are pre-designed, pre-cut, and all-inclusive, which means that anyone can have a successful crafting experience with them. No need to have tons of supplies and the directions walk you through it all.
  2. Crafting kits make great gifts for friends and family—think birthdays, Christmas, etc. Perfect price point and great for anyone….of any age!
  3. Busy? No craft space? Kits are a perfect way to enjoy a bit of creativity in a small little box.
  4. With so many kits to choose from, there’s something for everyone!
  5. New kits are released regularly, so there’s always something to look forward to for the next holiday or season.
  6. Kits are portable. You can take them anywhere and start crafting in minutes. Great for vacations, family gatherings, etc.
  7. For card emergencies, having a kit or two on hand means quick access to beautiful, easy-to-make cards.
  8. Need something to re-start dwindling crafting mojo? Kits can be the answer because the color combinations and easy crafting is perfect to inspire you again!!
  9. Kits give anyone an easy way to test-drive card making/paper crafting and the Stampin’ Up! experience!
  10. The boxes are cute and easy to reuse for shipping or gift giving!

Check out the complete Stampin’ Up Kit Collection here!!! Snag some of these amazing kits for teachers, neighbors, office parties, family, and friends! They are also perfect to have on hand when you need a last minute gift….and if you don’t, you can enjoy it in January! 😉

Happy Stampin’

~Laura


Baby Blending Brushes!!!

Posted on

Stampin’ Up! released NEW Baby Blending Brushes AND a Blending Brush Storage piece. Eeeee Bring all on the cuteness and organization! I am so game!

Baby Blending Brushes, www.LaurasStampPad.com

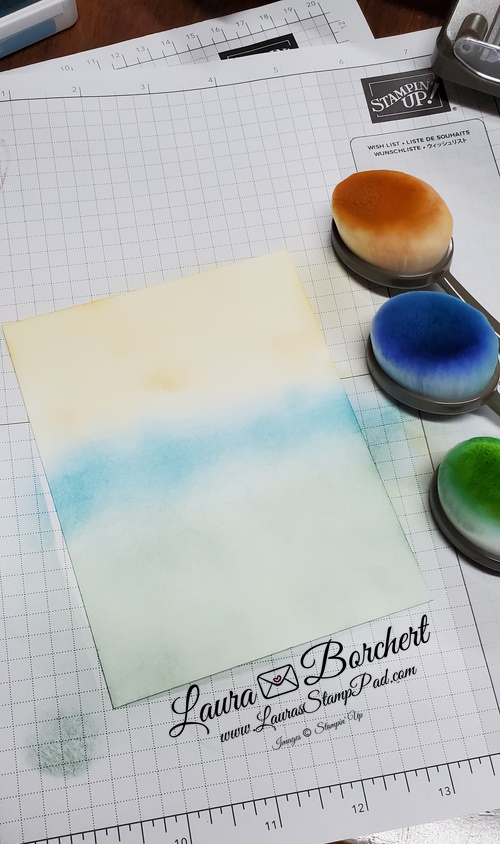
The front 3 brushes are the NEW Baby Blending Brushes. I would say they are almost half the size of the bigger ones or so. The smaller ones offer a little more control of color and a smaller surface for doing smaller/tighter spaces.

You will also notice this amazing NEW Blending Brushes Storage. It holds 9 brushes (big and small). It nice and small and light weight so it can sit on a shelf or on your desk. It’s very clean and sleek looking so it is sure to match! I’m pretty excited about it because before this I had them in a cup but I couldn’t see each brush at a glance.

Blending Brush Background, www.LaurasStampPad.com

Here is a little sneak peak at a background that I created with Blending Brushes. Any guesses as to what the final card might look like?!?! Let me know in the comments below and stay tuned for the finished card!

Have you ever used Blending Brushes?!? Try them out by clicking the link below to get some today and don’t forget every order of $50 will earn you a FREE Sale-A-Bration item too!

Happy Stampin’

~Laura

Product List

Take Your Pick!

Posted on

The Take Your Pick Tool is one of those super handy tools to have on your crafting space all the time. I even have more than 1 because I lose mine in the mess….and for when I have classes! 🙂 Do you have one?

Take Your Pick Tool, www.LaurasStampPad.com

Reason I love it / Tips:
~It’s small and easy to have in a cup next to your craft space.
~There are lots of different ends for lots of different uses!
~My favorite is now the putty end to put jewels on your project. It’s just so easy to press the putty on the side of a jewel to pick up and then set on your project! Just put your finger on the jewel and pull the putty away! So quick and easy and better than a fingernail! You can get putty refills as well!
~The stylus end can be used to make a fabulous edge around your die cut image for a little extra texture and dimension. Simply leave the cardstock in the die and run the stylus around the metal edge! Click here to see that video!


~I used the pointy tip for various things like popping out a die cut, pocking out cardstock that doesn’t come out with the die, holding cardstock while I heat emboss and more!
~Also, did you know there is a Brush Attachment that you can use to pop die cut bits out of your image???
~The pancake flipper end is used to get under a project to pop it up, slide adhesive under in a spot I missed, and sometimes for jewels.
~The only con I have is that it gets buried in the mess on my desk and I can’t find it. LOL Good thing I have more than one!


Do you have a Take Your Pick Tool? Do you love it? How do you use your tips? Do share! I would love to hear more.

Happy Stampin’

~Laura

Product List