For this card, I started with a Whisper White card base! Then I took a piece of the Love Blossoms Designer Series Paper (3-7/8″ x 5-1/8″) and layered it onto Smoky Slate (4″ x 5-1/4″). This gives a very small border but still sets it off and makes it stand out more. Then I placed a piece of Silver Satin Ribbon across the middle of the paper and wrapped the ends to the back before adhering it to the card base. For the greeting, I stamped the frame image from the Rose Wonder Stamp Set in VersaMark Ink and poured Silver Embossing Powder over the top. I set the powder with the Heat Tool and let it cool before die cutting it with the Rose Garden Framelits. Then I stamped the greeting in Blushing Bride in the center. I also die cut out two flowers with the Rose Garden Framelits in Silver Foil Paper. I added the flowers to the card front with the Fine Tip Glue Pen and the greeting with Stampin’ Dimensionals! Love it!
You can check out other samples using the Bundle here, here, and here! More samples using this Designer Series Paper Stack can be seen here, here and here!
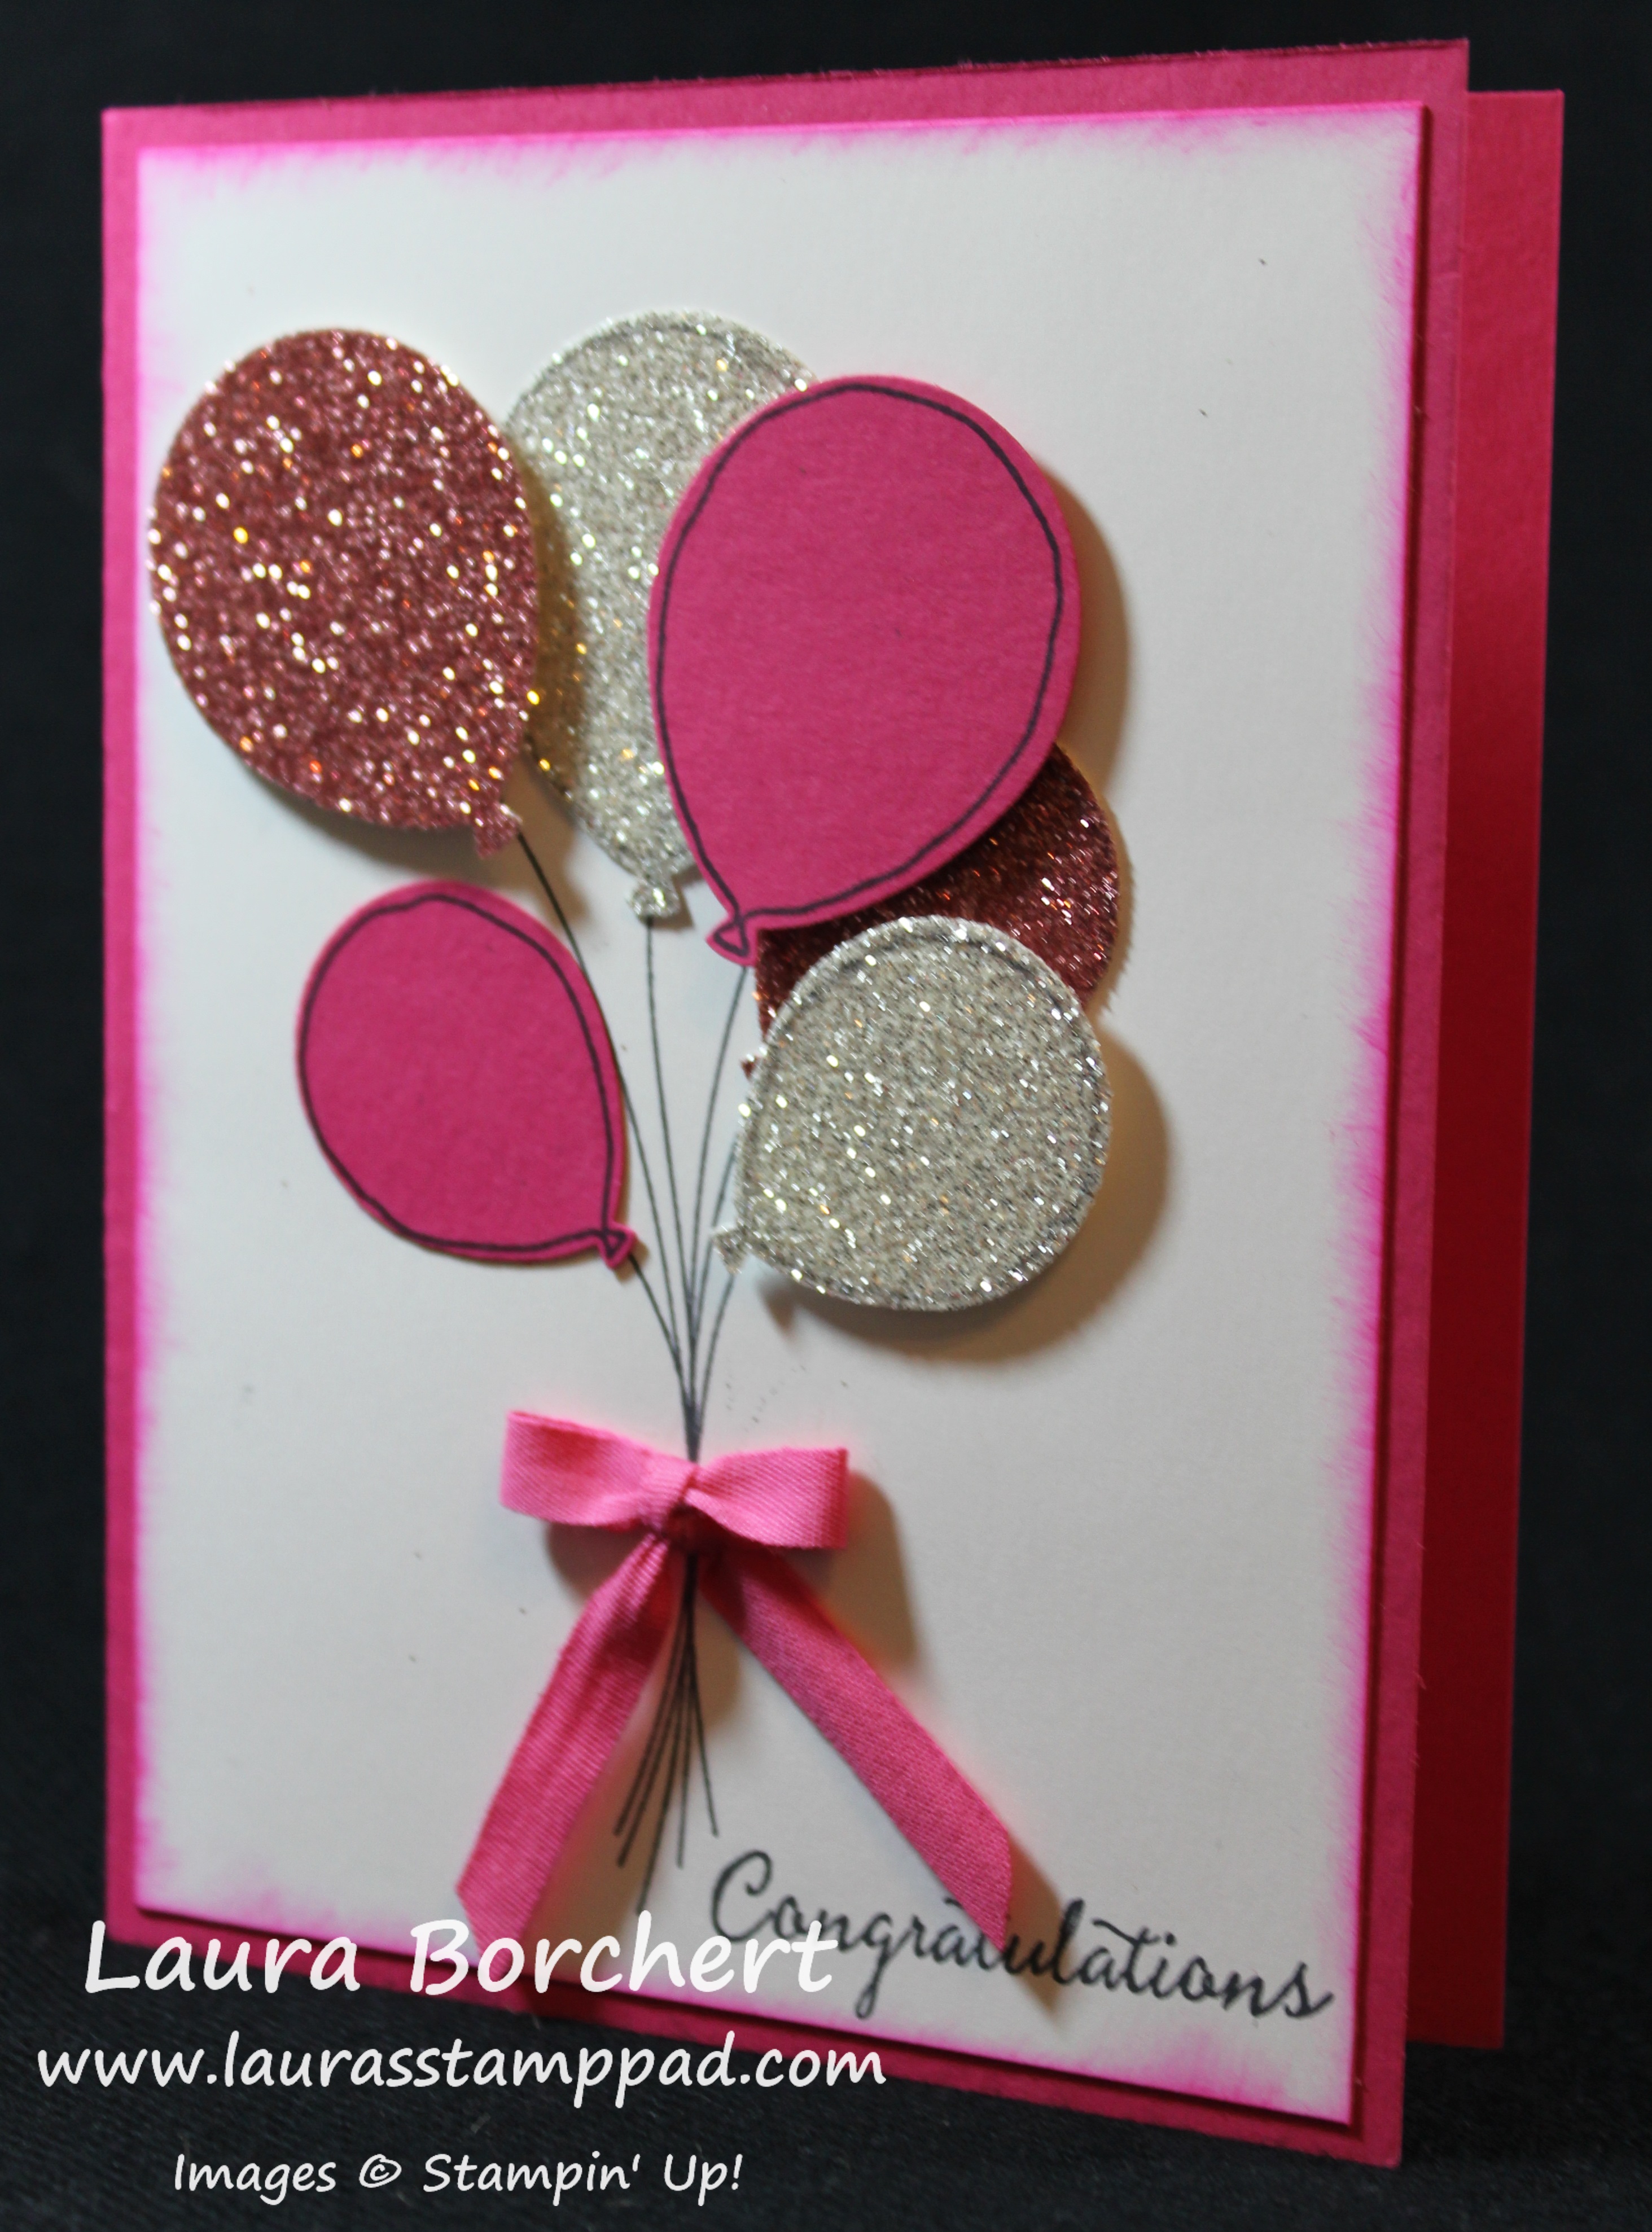
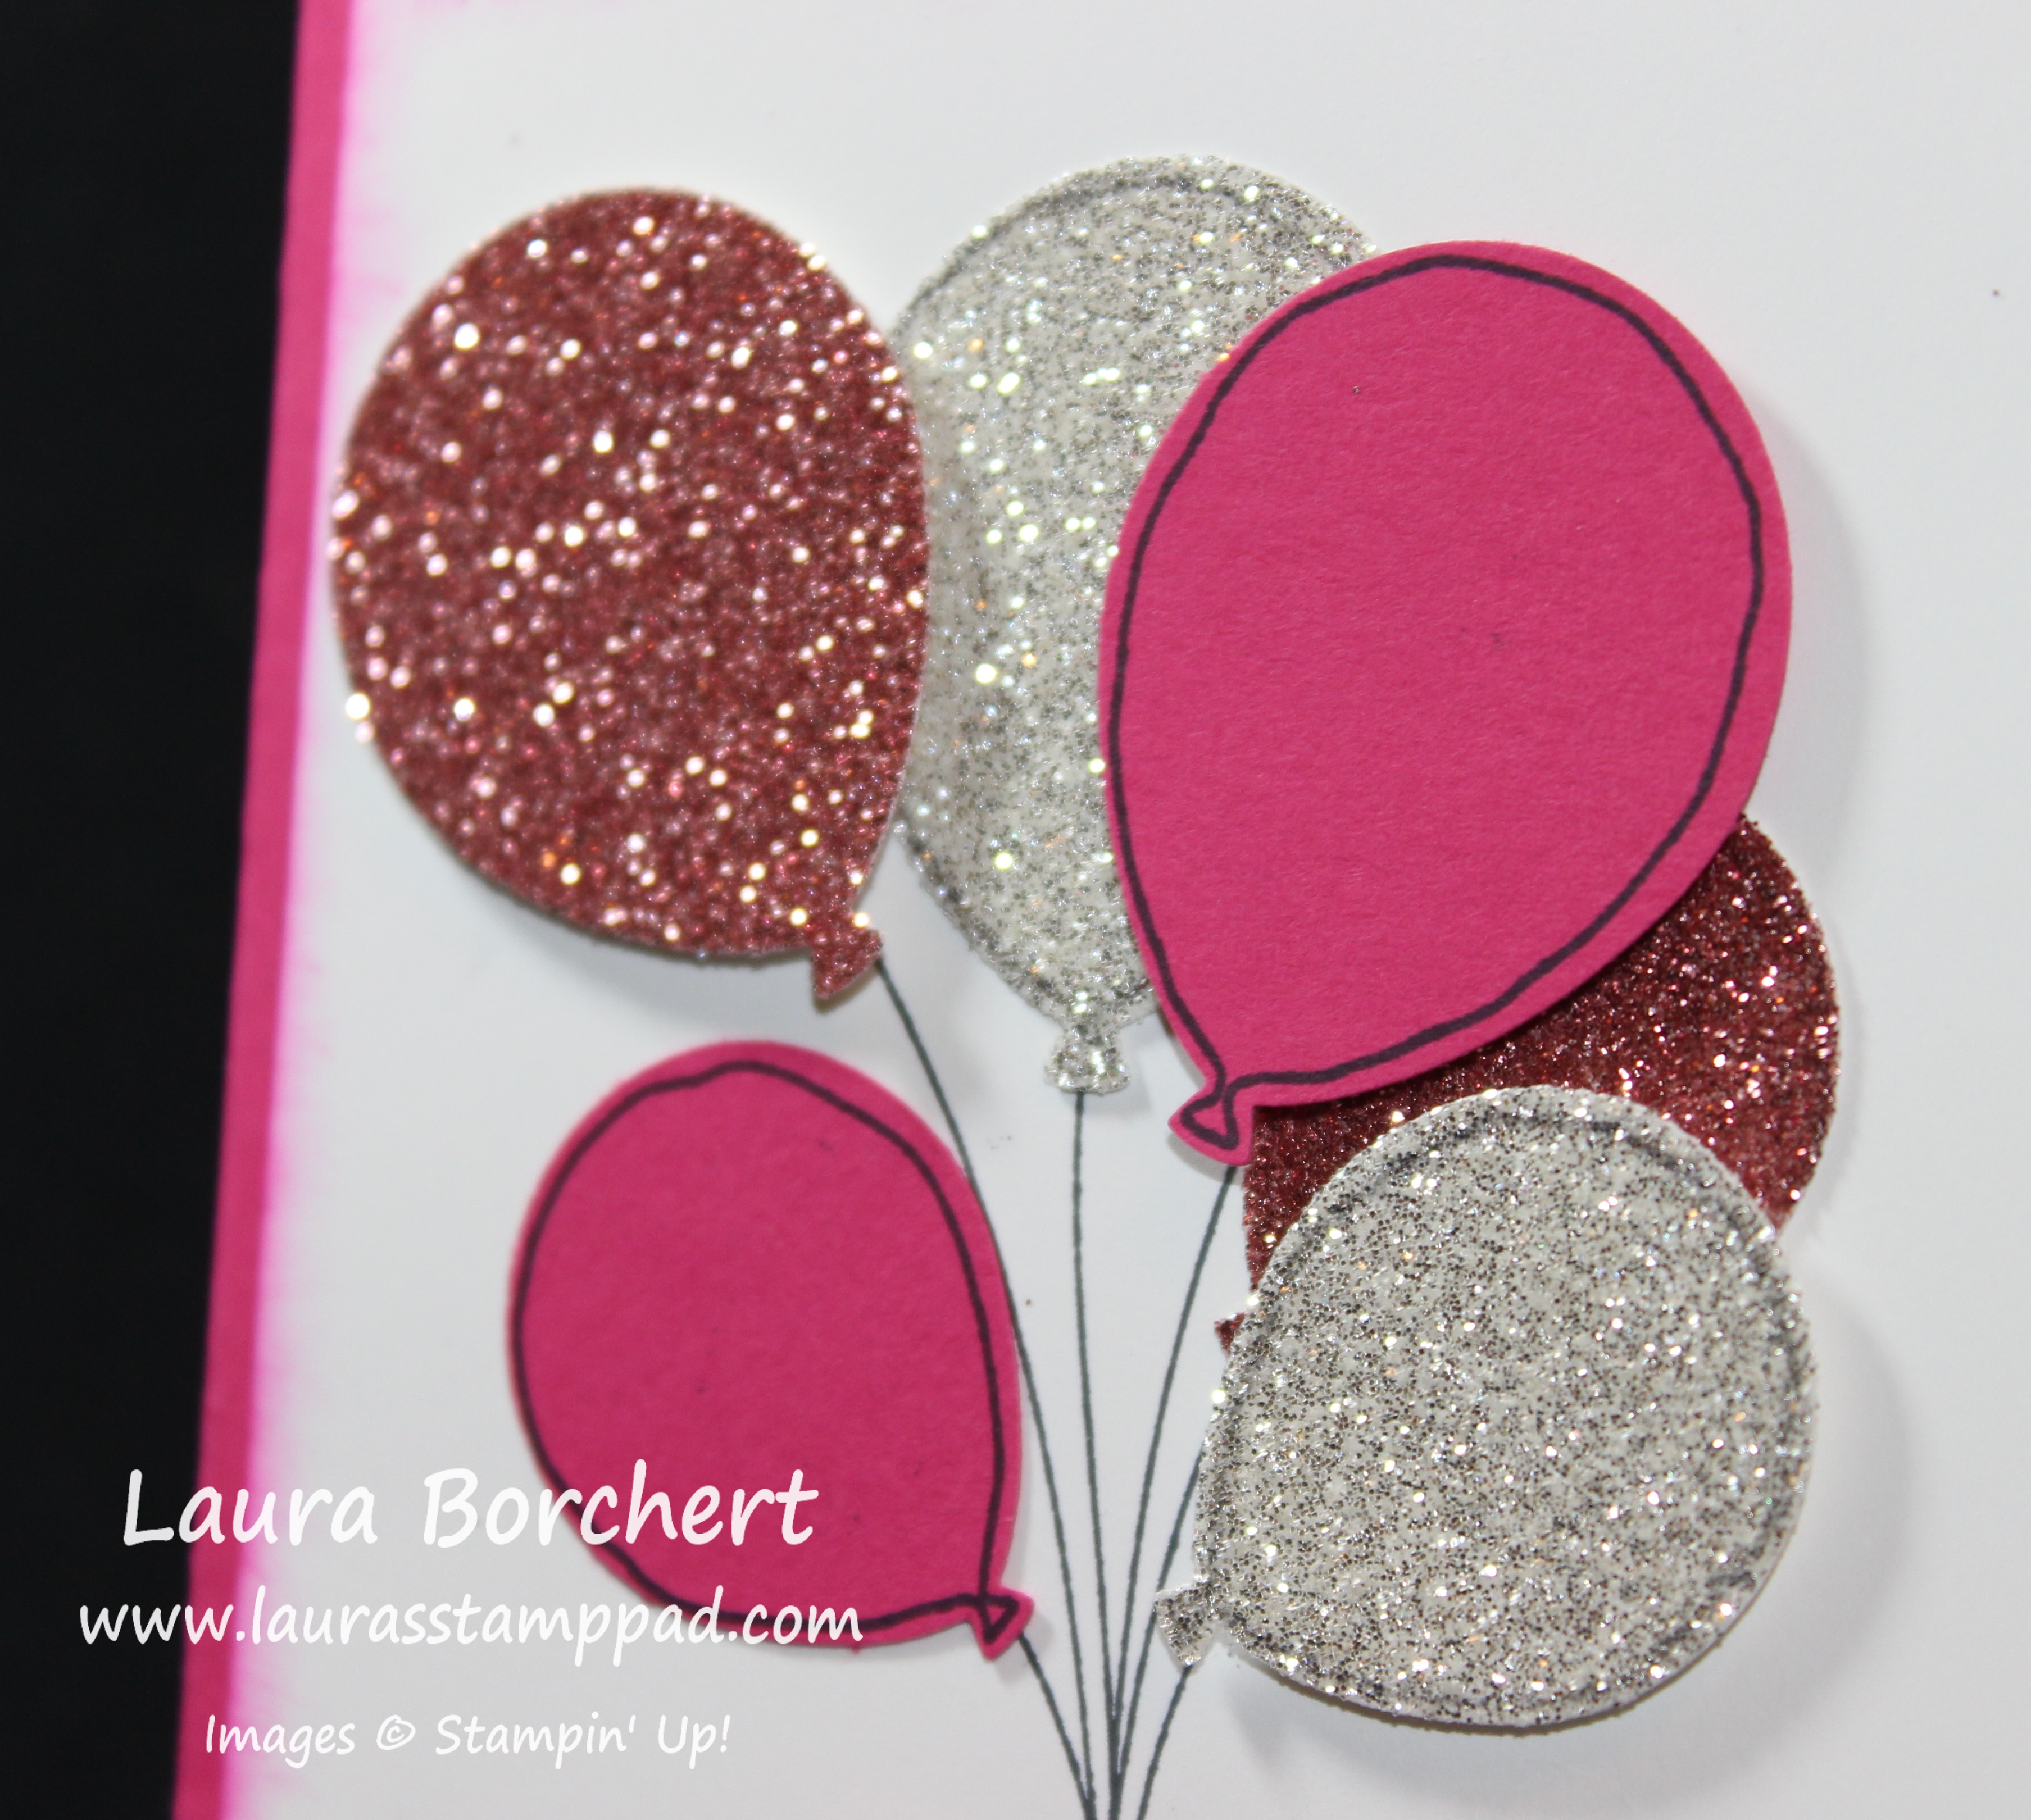
Who doesn’t love ALL THE BALLOONS!!!! You could create this card in any color combination for a boy or girl!!! I used the Balloon Celebration Stamp Set from the Occasions Mini Catalog!!! It is lots of fun! You can see more samples here and here!
I started off with a Rich Razzleberry card base. Then I took a piece of Whisper White measuring 4″ x 5-1/4″ and stamped the solid balloon in Rich Razzleberry from the Balloon Celebration Stamp Set. I stamped a few times to get those various shades! Some overlap and some fall off the card for that full look! TIP: If you stamp partially off the cardstock, go back to the ink and start again because otherwise your next stamp will be dark on the part that was falling off the cardstock. Does that make sense? I sure hope so! 🙂 I just think that balloons look odd without their tails (string) so I added them in Basic Black. I took a scrap piece of paper to mask some of the balloons and add tails to some of the higher balloons. I adhered this piece to the card front and tied some Gold Ribbon along the left hand side. I tied it around and into a knot. Then I took another piece and tied a knot on either side for a little extra foo foo and texture! For the greeting, I stamped the Happy Birthday onto Gold Foil Paper with Stazon Ink. Be careful not to slide on the foil paper with the stamp….straight up and down! Let it sit for a bit too so it can dry completely. Once it is dry, you can punch it out with the Washi Label Punch and adhere it to the card front with Stampin’ Dimensionals! Love it!
What color of balloons would you stamp? Let me know in the comments below! I’m thinking Cucumber Crush and Pacific Point would be fabulous as well!!!
Look at all of these beautiful cards!!!!! I am loving the color combination of Bermuda Bay and Cucumber Crush!! The Pocketful of Cheer – March 2016 Paper Pumpkin Kit arrived and I was super excited. You can see the reveal of the kit in this video! When it came time to make the kit, I realized I’m not really a big gift card giver so I don’t need that many. I do have some graduates this May that I will give giving either a gift card or cash and it would look super cute but what I really need is cards so that is what I made!
These 4 cards I created just like the instructions! I loved the look and enjoy just following along and not having to think when crafting sometimes. That is one of the reasons I love Paper Pumpkin!!! I don’t always have to come up with the ideas but I can mix it up if I want to! 🙂 I love the patterned paper with the flowers and the green pearls are super fabulous!!!
Then for my graduates, I created these little cards!!! I think the kit really meant for these cards to go with the other holders but I liked this better. I stamped the little note cards and adhered the pocket inside the envelope. How cool is that??? The envelope holds the card and the gift. It’s an all in one!!! LOVE IT!!! There were 4 of these!
Then I took all of the leftover pieces and some Whisper White cardstock and created tons of cards! How cute are these?!?!?! I stamped the flowers on the background and added some pieces. I cute the polka dot crumb cake piece from the other gift card holders. I used the Decorative Label Punch and Scallop Circle Punch for the greetings. Even the Cucumber Crush Baker’s Twine came in the kit!
Here are a few more that I created with the leftover pieces. After all of these everything was used up except 2 of the Crumb Cake Gift Cards Holders and 2 circle stickers. So I just created them into little pockets or gift card holders! The striped inside is super cool looking as well!
So from this 1 Paper Pumpkin Kit, I was able to get 13 Cards, 4 Gift Card Holders and Cards, and 2 Gift Card Holders. That is amazing!!! I only used my own Whisper White cardstock and Envelopes! I love it!!!
Be sure to sign up for the April Kit before April 10th because there is going to be a BONUS Stamp Set! That means 2 Stamp Sets, at least 1 ink spot, and the project inside for just $19.95 (plus tax, no shipping)!!! That is a steal!!! Click here to get started!
If you are a Paper Pumpkin Subscriber, you can purchase refill kits of this kit so you can make samples like mine or have more gift card holders on hand! Click here to get yours today!
I love bling and let me tell you the Sale-A-Bration Glitter Tape is AMAZING!!!! I am blown away at how awesome this stuff is. It is thick and durable but still easy to tear. It is bling-y but yet not chunky and falling off. It is amazing to add that little POP!
For this card I started with a Melon Mambo card base! Then I took a piece of Whisper White measuring 4″ x 5-1/4″ and stamped the rustic image from the Timeless Textures Stamp Set all around the edge in Crushed Curry! There is no perfect way to stamp the border. It’s okay if you overlap a little or miss a spot. It looks fabulous either way! Then I laid down a piece of the Silver Glitter Tape across the card. You can cut the ends or tear it and wrap it to the back side! I stamped the greeting from the Sale-A-Bration Perfect Pairings Stamp Set in Melon Mambo. I like how the greeting looks a little rustic so it fits perfect!! Then I added some Bermuda Bay Stitched Ribbon around the card and tied into a knot! I did this after the greeting so it didn’t get in the way when I stamped the greeting. Then I added this to my card front! Simple and fabulous!!!
Here is another one with a Bermuda Bay greeting from the same Perfect Pairings Stamp Set! Don’t forget that TODAY is the last day of Sale-A-Bration! Every $50 order will earn you a FREE Sale-A-Bration item! Now is the time to stock up or get those items that have been on your wish list for a while! Click here to shop now!
To see this card in action and how I created the rustic border, check out this Video Tutorial below or click here! Don’t forget to give it a thumbs up if you liked it!
Happy Tuesday everyone!!! In celebration, I’m sharing some fabulous FLOWER Cards!!! I just love flowers and you can never go wrong with them because they are so versatile. They are perfect for any occasion! I used the Sale-A-Bration What I Love Stamp Set for this card!!
Isn’t it fabulous? You could change up the greeting on the top for any occasion. You could change the colors of the flowers to whatever your favorite color is, whatever you have on hand, or whatever matches the occasion. I love it!
For this card, I started with a Whisper White card base measuring 4-1/4″ x 11″ and then I layered on a piece of Old Olive measuring 4-1/8″ x 5-3/8″. I took another piece of Whisper White measuring 4″ x 5-1/4″. On the bottom 2/3 of this piece of cardstock, I stamped the flower from the What I Love Stamp Set. I stamped the outline image in Rich Razzleberry and I stamped the second image in Rich Razzleberry (stamped off once). Then I stamped the leaves in between the flowers in Old Olive. I stamped the greeting from the One Big Meaning Stamp Set in Old Olive. For the ribbon, I placed a piece of Rich Razzleberry Cotton Ribbon across the card and adhered the ends behind the card. Then I took another piece of ribbon and created a Fork Bow. I attached the bow with a Mini Glue Dot! I love it!
Here is another version of the same card but quick and simple. This card doesn’t have any layers or use of adhesive! Same great look but less product and layers! I used Calypso Coral and Old Olive. The ribbon is Daffodil Delight Cotton Ribbon and I just tied it around and into a knot!
If you would like to see this card in action, check out the video tutorial below or click here! Don’t forget to give it a thumbs up if you liked it and be sure to subscribe to my channel!
Don’t forget that Sale-A-Bration ends on March 31st so click here to start shopping and earning your Free Product! To see samples using the the Sale-A-Bration items, click here!
I love the name of this stamp set – Party Pants which is one of the Sale-A-Bration items that you can earn for Free with every $50 order. This promotion ends on March 31st!!! I have really enjoyed all of these fabulous Sale-A-Bration items and will be sad when it is over!!!
For this card, I started with a Cucumber Crush card base. I added some of the Silver Striped Designer Paper from the Neutrals Designer Series Paper Stack to the bottom portion of the card. I stamped the balloons from the Party Pants Stamp Set in Pacific Point onto Whisper White. I punched them out with the Balloon Bouquet Punch. I added the end of some Whisper White Baker’s Twine to the back of each balloon and attached it with a Stampin’ Dimensional. I added them to the card front and then tied the tails together with a little bit more Baker’s Twine. For the little white line/glare look on the balloons, I used the White Chalk Marker! For the greeting, I stamped Happy Birthday from the Party Pants Stamp Set. I omitted “to you” part by just coloring in the Happy Birthday portion with a marker! I punched out the greeting with the Washi Label Punch and brushed the ends with some Cucumber Crush ink on a Sponge Dauber! I added the greeting to the card with Stampin’ Dimensionals too! Love it!!!
This would make a fabulous Man Card! You could always change up the colors for a girl or to match the recipients favorite colors. What colors would you use? Let me know in the comments below!
To check out more samples using Sale-A-Bration items, click here! There are only 8 more days of Sale-A-Bration!
There is always something beautiful even on a cloudy day! With this card, I think the clouds are sparse enough that is is just a bright and beautiful day!!! 🙂 I love that POP of color in the balloons on this card!
I started with a Soft Sky card base and added a piece of Marina Mist measuring 4″ x 5-1/4″. Then I took a piece of Very Vanilla measuring 3-3/4″ x 5″ and stamped the clouds from the Balloon Celebration Stamp Set in the Occasions Mini Catalog. I stamped the big cloud in Marina Mist (stamped off once) and the smaller cloud in Soft Sky. You can always stamp the images a few times to get those various shades and lighter look. For the balloons, I stamped onto scrap Very Vanilla cardstock with the Balloon Celebration stamps. I stamped the solid balloon in Calypso Coral (stamped off once) and then I stamped the texture/dots in full strength Calypso Coral. I punched the balloons out with the Balloon Bouquet Punch (Bundle & Save 15%). I placed the end of the Gold Baker’s Twine on the back of the balloon and placed a Stampin’ Dimensional over the top of it to hold it in place. Then I added 1-2 more Dimensionals up higher and placed it on the card. I pulled the strings tight and wrapped them to the back of the cardstock and placed another Stampin’ Dimensional on top of the ends. I added more Dimensionals to the back and placed it on the card front. You all know how I love my Stampin’ Dimensionals. For the greeting, I stamped it in Marina Mist onto Soft Sky. I slide the paper into the Banner Triple Punch and added it to the card front! Love it!
Eeeeee! This card just makes me so excited I have to scream! PINK! BLING! RIBBON! SPONGE DAUBERS!!! I love it!!! You could always change up the color to your favorite color/s or even for a more masculine card! I’m super excited about the Balloon Celebration Stamp Set and coordinating Balloon Bouquet Punch (Bundle and Save 15%)!
I started with a Melon Mambo card base. Then I took a piece of Whisper White measuring 4″ x 5-1/4″. I stamped the balloon strings and greeting in Basic Black. Then I stamped one large and one small balloon outline onto Melon Mambo cardstock and punched them out. I also punched out one large and one small balloon in Blushing Bride Glimmer Paper and Dazzling Diamonds Glimmer Paper. You will want to adhere the balloons from the bottom up (shortest strings first)! I did half of them directly to the cardstock and the other half with Stampin’ Dimensionals! Then I brushed the edges of the cardstock with Melon Mambo and a Sponge Dauber and added it to the card base. For the bow, I used Melon Mambo Cotton Ribbon and used the Fork Bow Technique! You can check out the video tutorial on that here! I adhered the bow to the card with a Mini Glue Dot! Perfect!!!
TIP: So you might notice a bit of an outline of a balloon on the glimmer paper….DON’T DO IT! I added the balloon border to the Melon Mambo balloons and I liked how it really defined the balloon so I thought I would do the same with the Glimmer Paper. It didn’t dry and then smeared and got all over my fingers/project. I guess it eventually dried but I wouldn’t recommend doing it. 🙂 That’s what I’m here for….to make the mistakes and pass along the tips!
If you would like to see more samples and some basics on the Balloon Celebration Bundle, check out my video tutorial here or by clicking below! Don’t forget to give it a thumbs up if you enjoyed it!!!
Happy Tuesday!!! You all know that means I have a fabulous technique to share with you today! This one is super simple and yet super fabulous!!! Check this out!!!
The Botanical Blooms Stamp Set coordinates with the Designer Series Paper so you can stamp the leaf veins and centers of the flowers to add more texture and interest to the flowers. It really makes the paper POP! I love it! It goes from cute to WOWZA!!!
For the card above, I added the Designer Series Paper to a Hello Honey card base. Then I wrapped some Linen Thread around the card a few times and tied it in a knot! I like the jungle look that the thread gives! For the greeting, I used the Rose Wonder Stamp Set and stamped it in Cajun Craze. I punched out the Whisper White with the 2″ Circle Punch and layered it onto Mint Macaron punched out with the 2-3/8″ Scallop Circle Punch. I added the greeting to the card with Stampin’ Dimensionals.
If you would like to see this in action, check out my Video Tutorial below or by clicking here! Don’t forget to give it a thumbs up if you liked it and subscribe to my channel – Laura’s Stamp Pad so you don’t miss out when future videos are posted!
I am LOVING the Wildflower Fields Designer Series Paper and coordinating Flowering Fields Stamp Set. Both of these items are Sale-A-Bration items that you can earn for FREE with every $50 US order. You all know I love flowers and these items are just perfect!!!
I cut the Designer Series Paper into 4-1/4″ x 5-1/2″ pieces which leaves a 1″ piece leftover. I adhered the big piece directly to the a Whisper White card base which fits perfectly. The left over 1″ piece I flipped over and created banner tips on the end. You can use your Paper Snips or the Banner Triple Punch! Then I used a small scrap piece of Whisper White cardstock and stamped the flowers from the Flowering Fields Stamp Set in Basic Black Archival Ink. I used Blender Pens to color in the flowers and then stamped the greeting from the Crazy About You Stamp Set! For the card above, I used Blackberry Bliss and Old Olive on the flowers. Also, I added a little bow of Whisper White Baker’s Twine!
For this card, I used Calypso Coral and Old Olive on the flowers. I added some Old Olive Baker’s Twine around the entire card for a little texture!
For this card I used Old Olive and Lost Lagoon for the flowers. I added some Gold Baker’s Twine in a bow around the card for a little texture and bling.
I had so much fun making these cards and I love them! It is a great way to use scraps of cardstock and all of your Designer Series Paper. If you would like to see the coloring of the flowers and cutting the Designer Series Paper, check out my Video Tutorial below or click here! Don’t forget to give it a thumbs up if you liked it!
Let me know in the comment below which one your favorite is! I think mine is the second card with the coral flowers!