Technique Tuesday – Floating Watercolor!!!

Posted on

Happy Tuesday!!! I have a super fun technique to share with you today!!! It includes watercoloring so remember that each one will turn out differently and it requires some patience….but the look is AMAZING!!! Check this out!!!

Blue Roses, www.LaurasStampPad.com

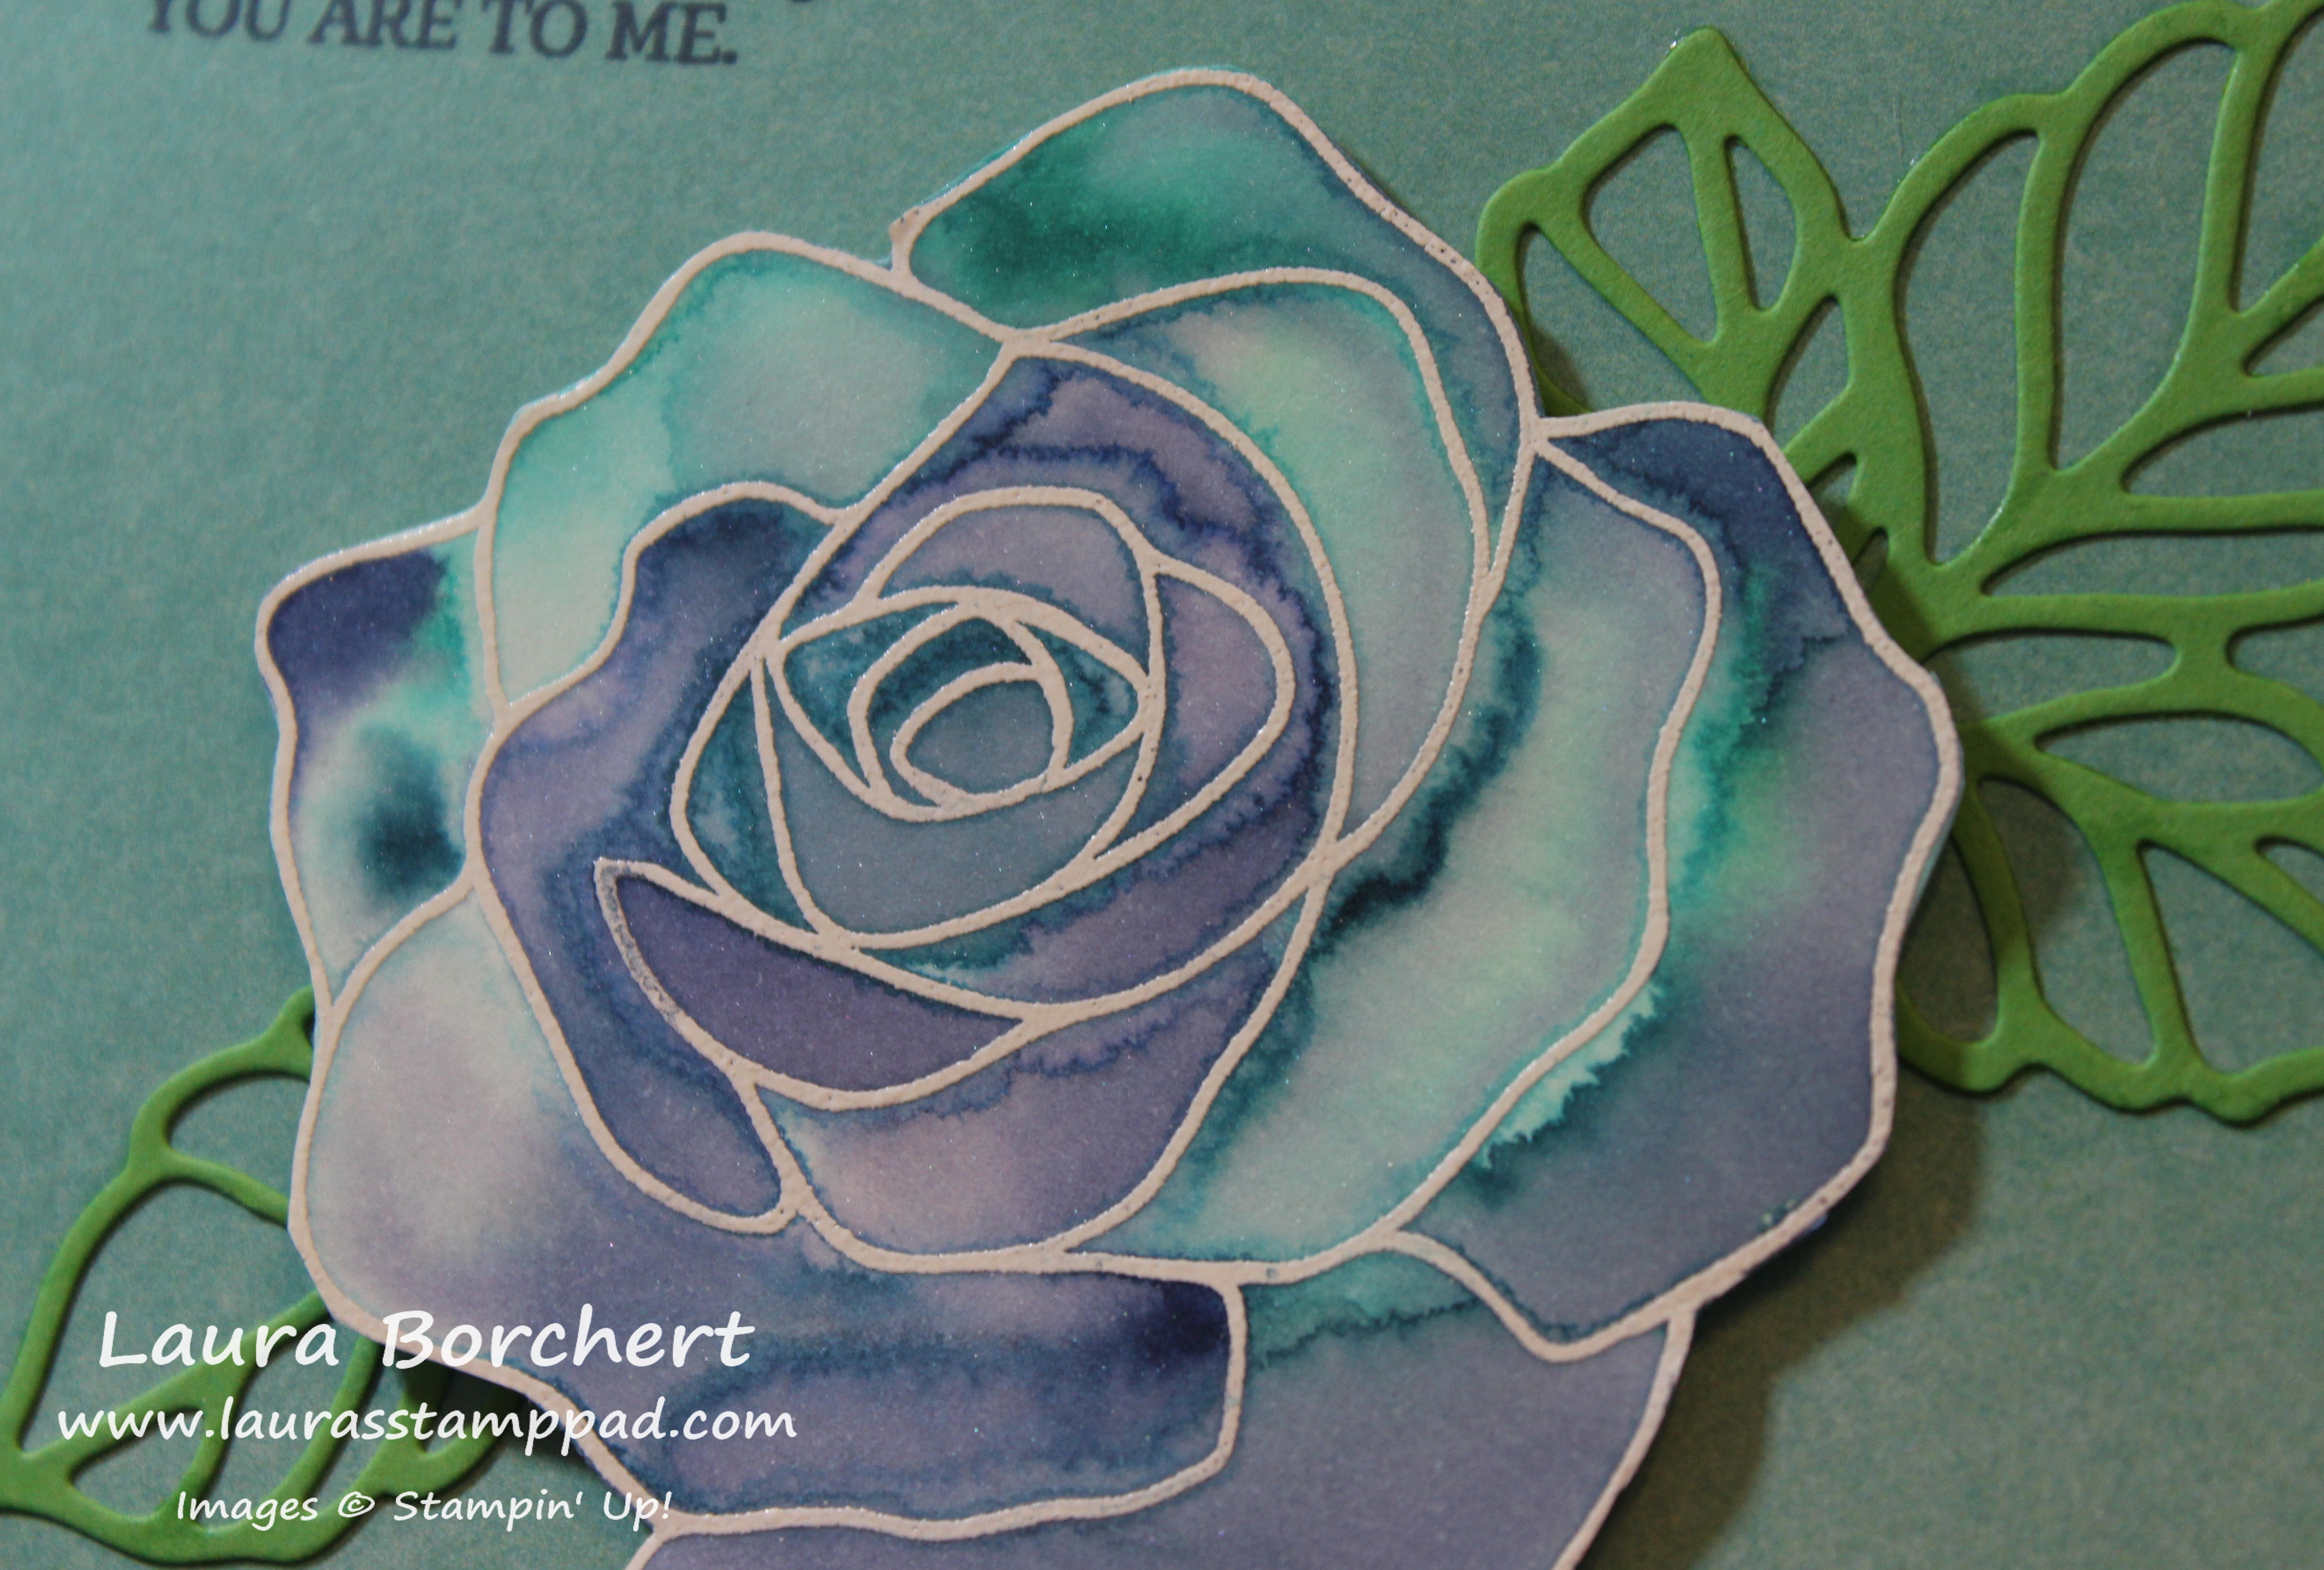
I honestly think this blue one is my favorite even though I don’t know if I have ever seen a blue rose like this. I just love it!!!

Okay so let’s get started. You will need a piece of Shimmery White cardstock for the rose. This cardstock is thicker than regular Whisper White but not as thick as Watercolor Paper so it works perfectly. It always has that beautiful shimmer which is fun! I stamped the rose from the Rose Wonder Stamp Set in VersaMark onto the cardstock. No need to worry about the leaves since you will cut them off. Then you will pour White Embossing Powder over the it and using the Heat Tool, set the powder. Now you will need to pick your colors and add a little drop of re-inker to a clear block or press the block into the ink pad to get some color. Then you are all set with your image, you will spritz the heck out of it with water. I mean like puddles on top of your image. Using an Aqua Painter, lightly touch the ink and then touch the tip of the Aqua Painter into one of the puddles on the flower. You can start with a light color on the outside or inside whichever you prefer. For the rose above, I used Bermuda Bay, Island Indigo, and Night of Navy. When you touch the color to the water, you will see it spread out all over. If it doesn’t but instead seem really dark and like it soaked into the paper, you need more water. You can either squeeze the Aqua Painter or spritz again. Add color as much as you would like. A good tip for myself is….If you think it needs a bit more, STOP! I tend to do a little more here and then there and it ends up messing up. Also, it will dry differently then it looks right now too! You can either set it aside to dry OR you can tip it a bit and allow it to dry like that. This allows the excess water to run to one side and dry darker in those spots. I prop it up on a clear block.

Floating Watercolor, www.LaurasStampPad.com

Once it is all dry, you can cut it out along the border of the embossing flower and add it to your card front. I used the Rose Garden Framelits (Bundle & Save 15%) to die cut the leaves in Cucumber Crush. I used a Whisper White card base and some of the Artistically Yours Designer Series Paper from Sale-A-Bration! I stamped the greeting from the Rose Wonder Stamp Set!

Red Roses, www.LaurasStampPad.com

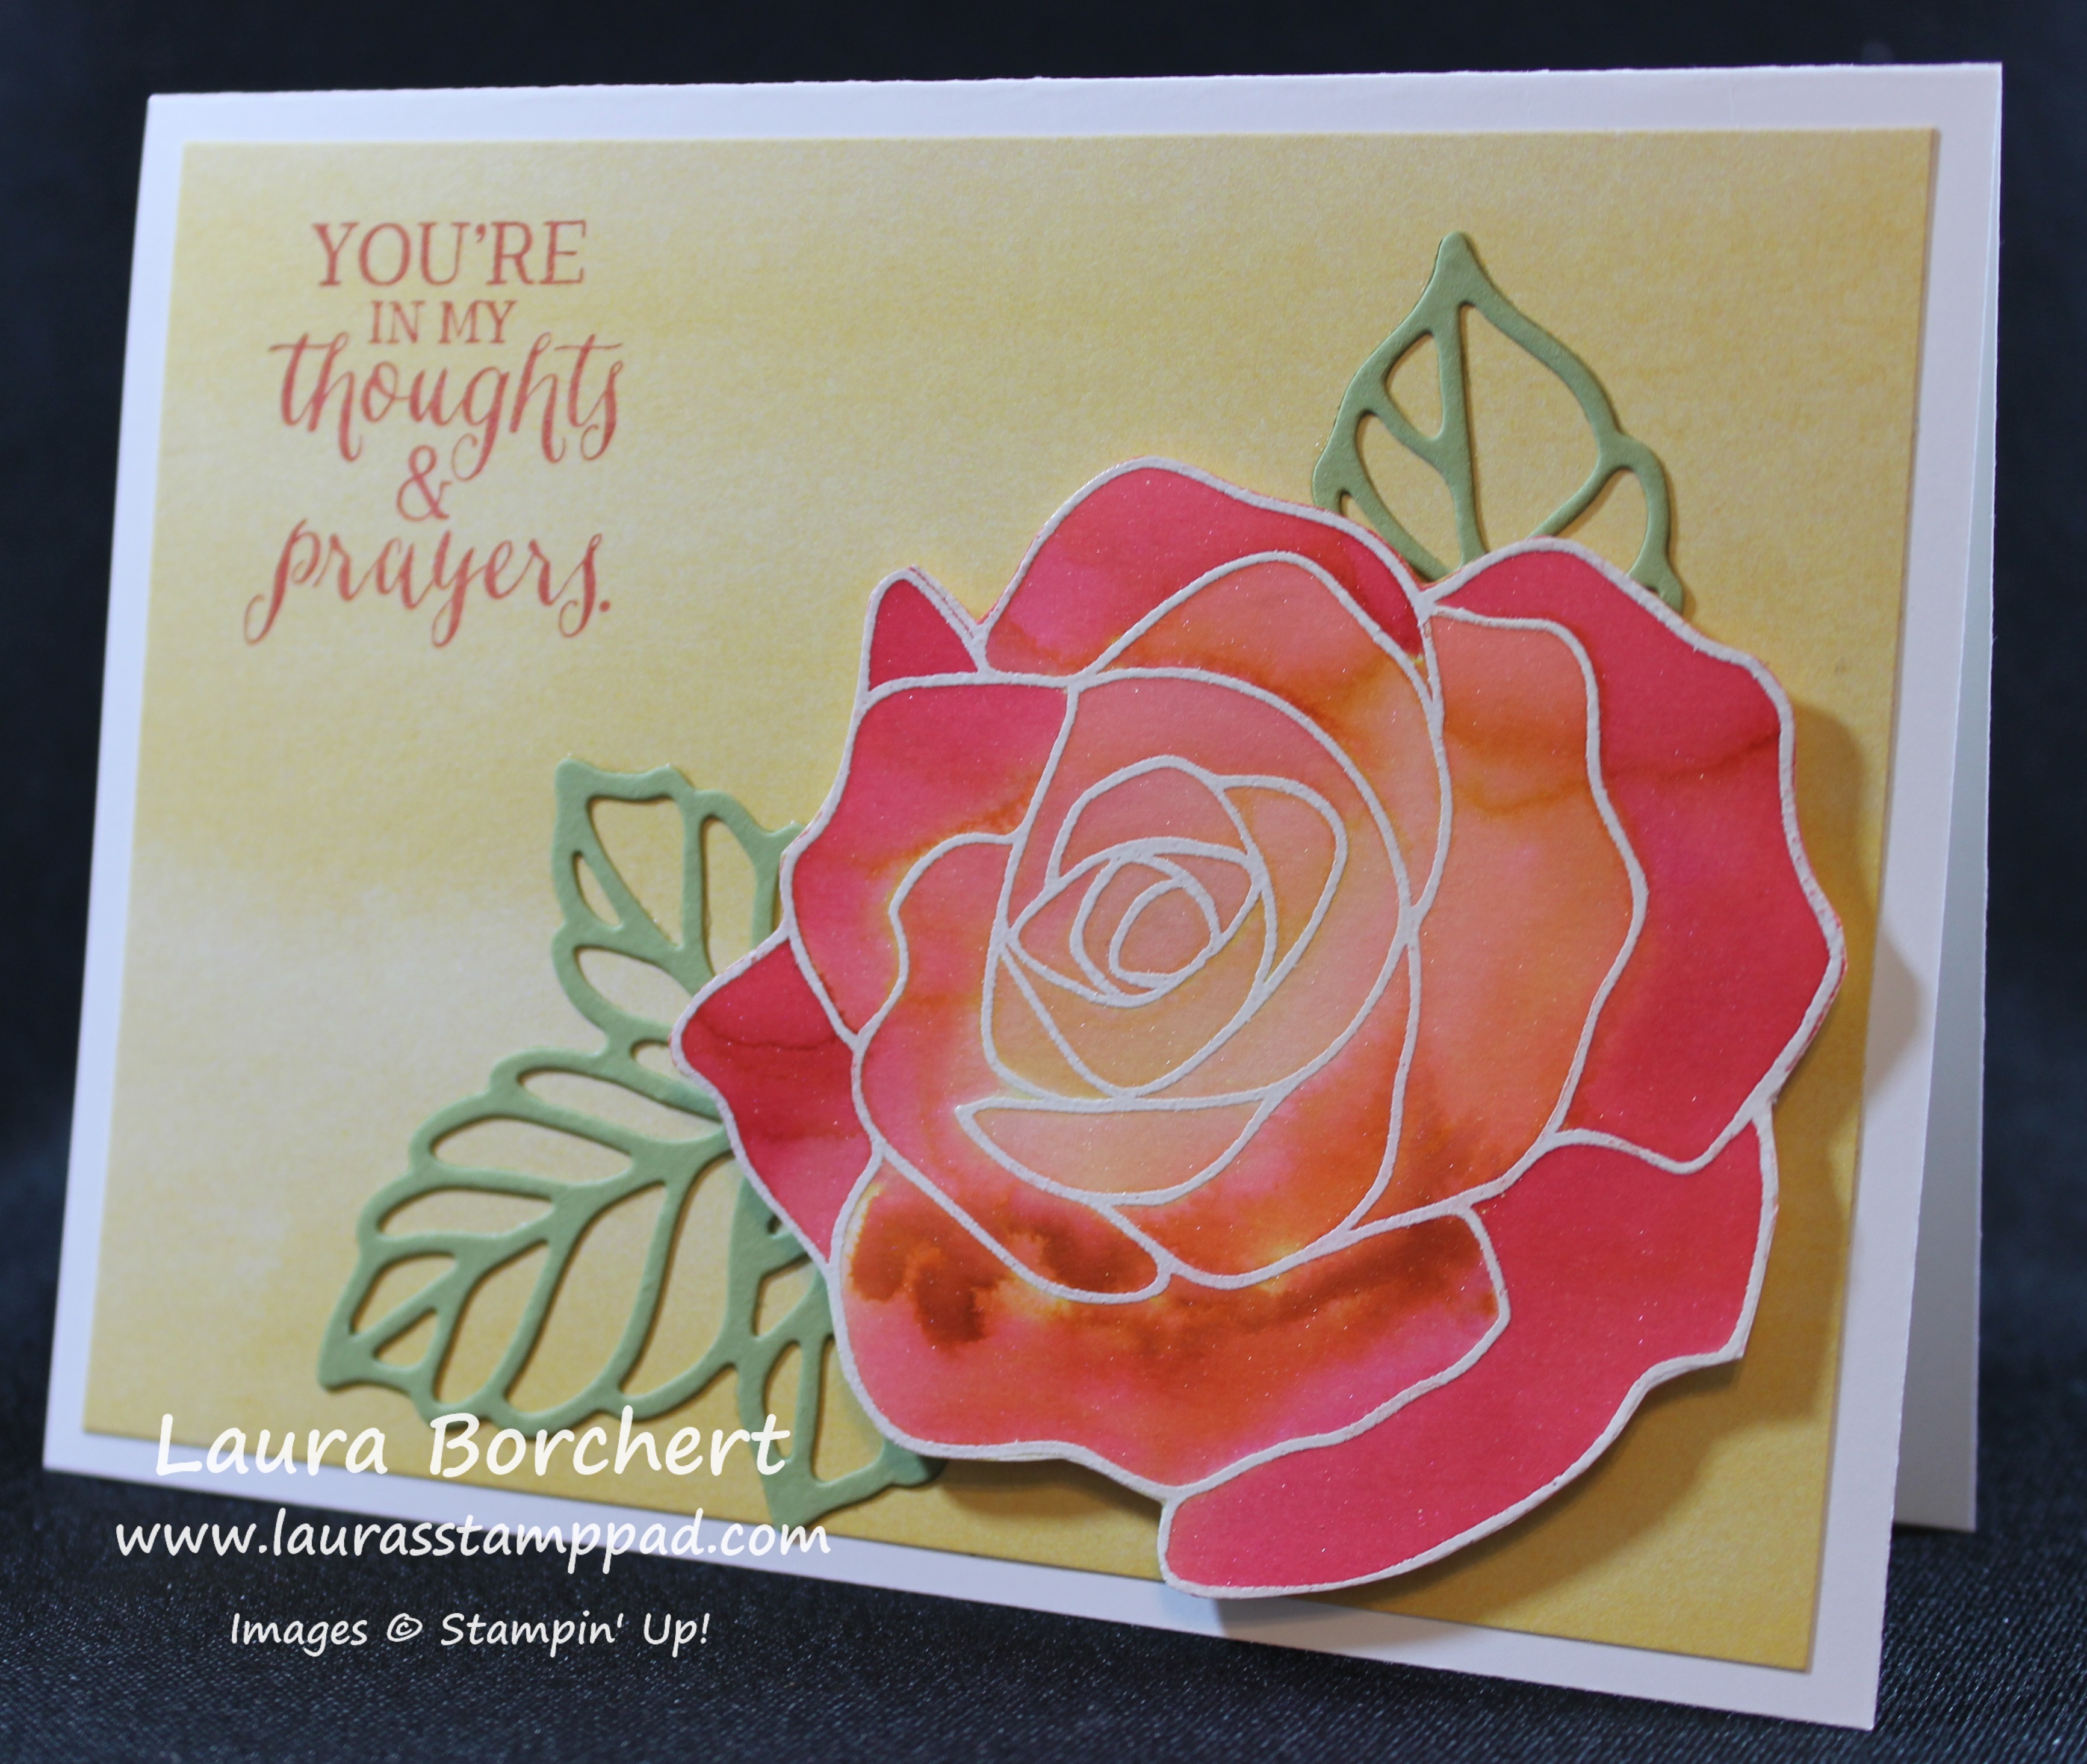
For this rose, I used Real Red, Tangerine Tango and Daffodil Delight. I love how it turned out. The leaves on this one were die cut in Pear Pizzazz!

Watercolor Technique, www.LaurasStampPad.com

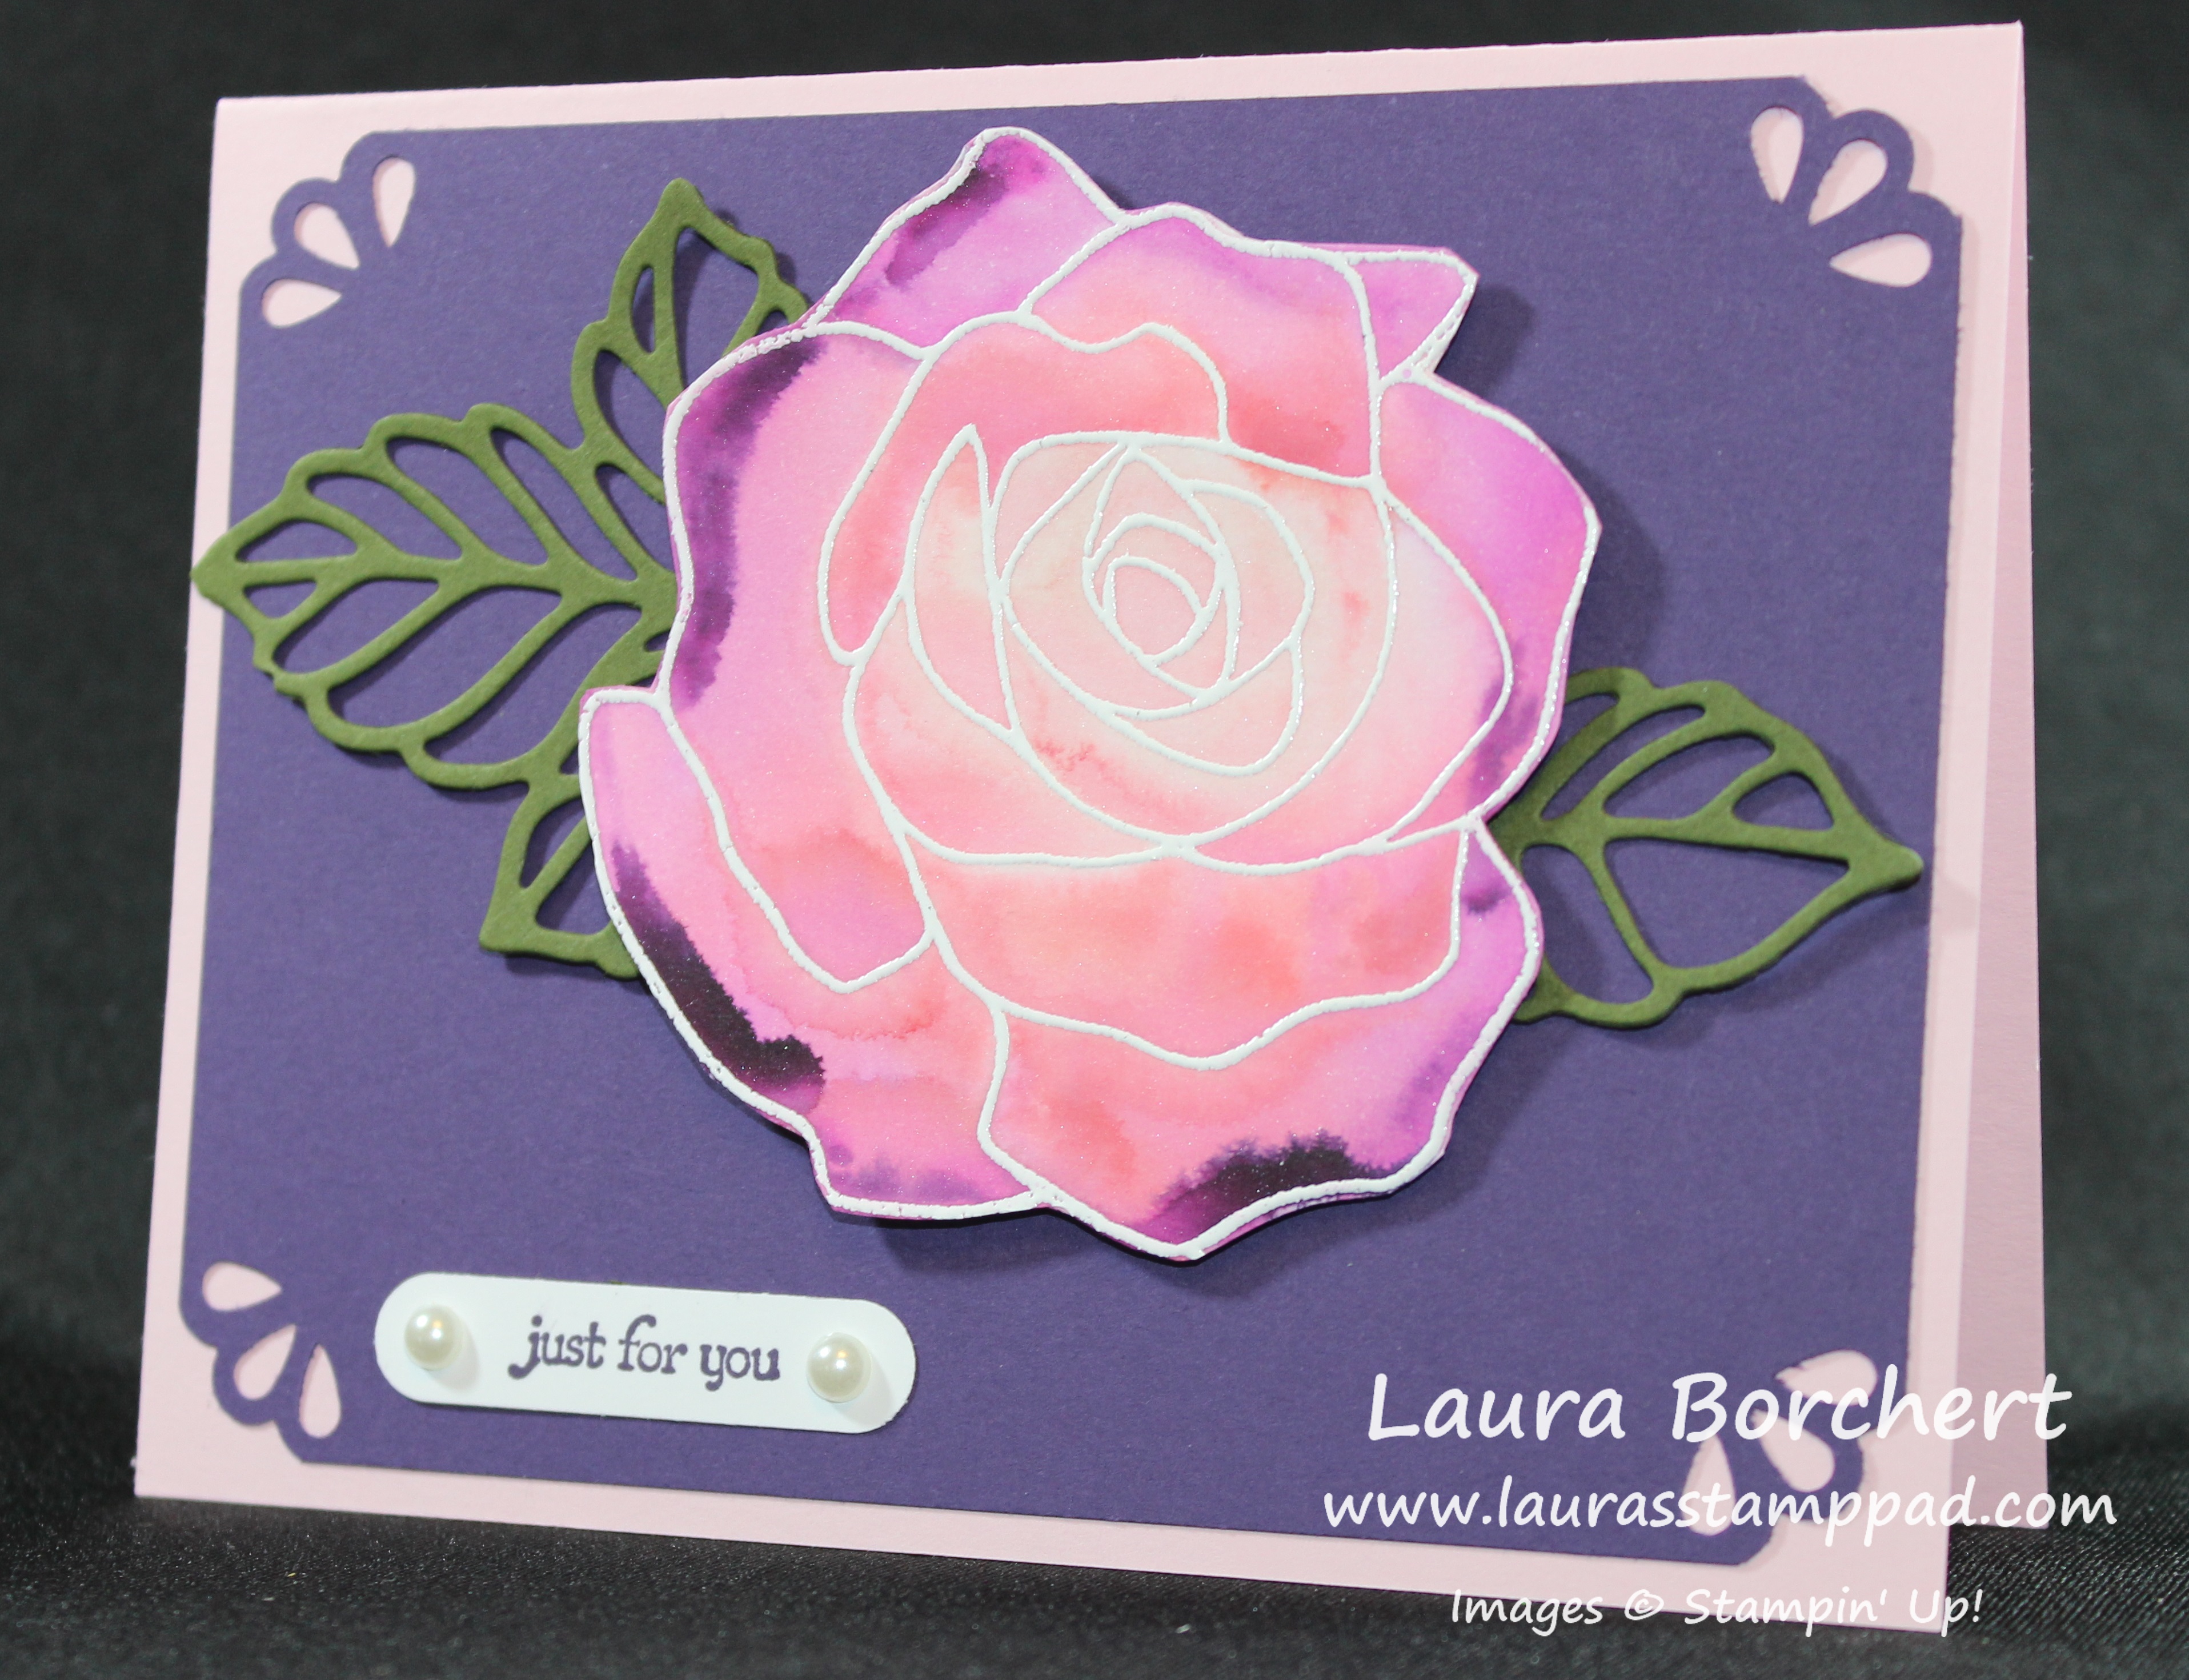
For this one, I used Blushing Bride, Watermelon Wonder, and Elegant Eggplant. You can see those really dark purple spots….that was where I didn’t have enough water and the paper just soaked up the color strongly. I used Mossy Meadow for the leaves on this one. I also used the Curvy Corner Trio Punch as well.

If you would like to see this technique in action, check out the video tutorial below or click here. Don’t forget to give it a thumbs up if you liked it and subscribe so you don’t miss any future videos!

Which color combination is your favorite? Let me know in the comments below! The blue one is my favorite!

Happy Stampin’

~Laura

Built for Free Using: My Stampin Blog


Fabulous Friday!!!

Posted on

Happy Friday!!!! It has been an exciting of week of stamping, playing and working with Brides! I finally got a chance to play with the Botanicals Bundle and I am in love!!! 🙂 Did you know that when you purchase that bundle, you earn a FREE Sale-A-Bration item? Totally go for the Botanicals For You Set because then you have greetings, images, framelits, and Designer Series Paper! I totally didn’t know those went together until like this week. I always thought that set should have been called Just For You and now I get it.

Airplane Stamp, www.LaurasStampPad.com

Speaking of Sale-A-Bration, the last 3 items in the brochure are retiring on Monday!! This includes The Sky Is The Limit (airplane stamp), Artistically Yours Designer Series Paper (shown above) and Hello Stamp Set. If you would like any of those, be sure to place your $50 or more order before the end of the day on Monday! On Tuesday, 3 NEW items are coming out – Glitter Tape, Pedal Pusher Stamp Set, and Party Pants Stamp Set. Check those out here – Sale-A-Bration Part 2!

The fabulous card above was inspired by a sample I saw from Cindy Brown! I love it and just had to re-create it! I used the Artistically Yours Designer Series Paper. I stamped the airplane from the Sky Is The Limit Stamp Set and die cut it with the Ovals Collection Framelits!

Stampin' Up Award, www.LaurasStampPad.com

Also, I wanted to send out a big THANK YOU to all of my fabulous customers! Check out this new “flare” I got from Stampin’ Up! for reaching $100K in Sales! That is a lot of stamps, ink, and paper!!! Yet, we all still don’t feel like we have enough!!! 🙂

Weekly Deals 2.9

Of course it wouldn’t be Friday without the Weekly Deals!!!

I hope you all have a wonderful weekend and Happy Valentine’s Day!!!! You are so loved, never forget that! 🙂

See you back here on Monday!

Happy Stampin’

~Laura


Peacock Perfection!!!

Posted on

Peacock Wedding Invitation, www.LaurasStampPad.com

As many of you may know, I do wedding stationary as well as my Stampin’ Up business! You can check out some of my work here – Weddings.LaurasStampPad.com. I always forget to share some of my work on here but thought I would today. This is one of my favorites because you all know I love Bermuda Bay! Plus the colors and elegance are just amazing!!!

For this invitation, I created a belly band with Gold Glimmer Paper and added some Whisper White Organza Ribbon over top. I used the Elegant Eggplant Re-Inker to dye the ribbon. When you have white ribbon and re-inkers, you have every color you ever wanted!!! TIP: Hot glue works best for adhering Glimmer Paper together since it is so chunky, most other glues don’t work well. I added the Monogram letter in the middle and punched it out with the Artisan Label Punch which was one of my favorites. It retired last year. 🙁 You could always use your favorite punch – circle, oval, scallop circle, Decorative Label Punch, or even Framelits! For the invitation base, I used Bermuda Bay and Elegant Eggplant. I even embossed the Elegant Eggplant flap with the Fancy Fan Embossing Folder to add a little texture! The feather on the inside was printed on a color printer but if you prefer a stamped image, the Perfect Peacock Stamp Set would be perfect!

I really enjoy working with Brides to make their wedding day that much more special. I just love WEDDINGS!!!! Let me know in the comments below if you would like to see more of my wedding stationary posted on here!

Happy Stampin’

~Laura


Technique Tuesday – Rose Wonder!!!

Posted on

Happy Tuesday!!! You all know what that means….I have a fabulous technique to share with you today!!! I loved the Rose Wonder Stamp Set and coordinating Rose Garden Framelits (Bundle & Save 15%) once I first laid eyes on them! I love the beautiful flowers and the greetings…..oh my goodness. I reach for this stamp set for every card I create because the greetings are PERFECT!!!

Thoughts & Prayers, www.LaurasStampPad.com

This is a very simple and yet so beautiful card that is perfect for many different occasions!!! I created this one as a Sympathy and Thinking of You and the other sample is Birthday! I love it!!! You can also play with different colors for even more fun! Let’s get started!

For this card, all you need is cardstock, ink, Fine Tip Glue Pen and the Rose Wonder Bundle! I cut a piece of Very Vanilla Cardstock measuring 4″ x 5-1/4″ and placed it on the Precision Base Plate. I placed the large rose die on the paper where both of the leaf ends are very close to the edge or falling off. Then run this through the Big Shot. You can run it through 1-2 times to make sure you have that nice even cut. Then the best way to get the image out of the die and to pop out all of the cut out piece, you will want to use the Die Brush. Check out how amazing it is here! That thing is best thing ever! Love it!!! You will want to keep the negative/corner of the cardstock of the Rose as well. I used a Lost Lagoon card base and adhered the corner piece to the top right hand corner of the card front. Then using the Fine Tip Glue Pen, I add adhesive to the Rose and placed it right next to that corner piece. In some places it is closer and in others, it is farther away and that’s okay. You don’t need to coat the entire back of the rose. I mostly did the edges and a few spots in the middle, then placed it down and held it for 15-30 seconds. Then if there are a few spots still popping up, just add a little underneath and press it down again. I used Lost Lagoon ink for the greeting from the Rose Wonder Stamp Set! Here is another sample!

Birthday Roses, www.LaurasStampPad.com

I thought it would be fun to use two colors – Elegant Eggplant and Pink Pirouette. I love how it turned out. I think a light and dark blue would be fabulous as well! Since the cardstock is so dark, I decided to add the greeting to the bottom left corner! I also added a few pearls in the center of the rose for a little bling! I love it!

If you would like to see this in action, check out the video below or click here! Don’t forget to give it a thumbs up if you liked it and be sure to subscribe so you don’t miss out on Thursday’s video as well! 🙂

Let me know in the comment below which color combination you like the most or what color combination I should try next!

Happy Stampin’

~Laura


Embossed Ends!!!

Posted on

Make A Wish, www.LaurasStampPad.com

This card is perfect for so many different occasions! I love all the layers and textures with the ribbon, embossing, Designer Series Paper, and punched greeting. Also, I look thinking out of the box on ways to use your embossing folder. I used the Confetti Embossing Folder from the Occasions Mini Catalog! It is a border folder with an oval in the center but don’t let that hold you back. I slide this piece of cardstock in diagonal on the end of the folder. How fabulous is that?

I started with a Melon Mambo card base. I took a piece of Whisper White cardstock measuring 4″ x 5-1/4″. I slide the end of the white paper into the Confetti Embossing Folder at an angle. Slide it in just to the point that hits the flat oval spot. You could do it straight across or diagonal. You could even do the top and bottom. I added some of the It’s My Party Designer Series Paper which I am in love with right now! The colors are so fabulous and it’s a 12″ x 12″ Stack! Woot Woot! Then I wrapped some of the Crushed Curry Baker’s Twine around the card twice and tied it into a bow. With Baker’s Twine, I always double knot it tight before tying the bow. I added this piece to the card front and then started on the greeting. I stamped the greeting from the Party Wishes Stamp Set in Melon Mambo onto a piece of scrap Whisper White. I punched it out with the 1″ Circle Punch. Then I stamped the greeting again in Basic Black onto another scrap piece of white. I cut out the WISH card and added little banners to the ends. I used some of the Stampin’ Dimensional border to the back of “Wish” and placed it on top of the Melon Mambo Wish. Then I punched out some Basic Black with the 1-1/4″ Circle Punch and layered it. I added the greeting to the card front with Stampin’ Dimensionals! Love it!!!

Embossed Bottom, www.LaurasStampPad.com

You can check out other fabulous ways to use this embossing folder in this video!

Happy Stampin’

~Laura


A Nice Cuppa!!!

Posted on

Tea Cup, www.LaurasStampPad.com

While I don’t drink coffee or hot tea, I just knew I had to have the A Nice Cuppa Stamp Set and coordinating Cups & Kettle Framelits (Bundle & Save 15%) from the Occasions Mini Catalog! My parent’s both drink hot tea and coffee daily and the greeting World’s Greatest Mom is always needed! I love my parents! My favorite image is that little heart steam! I love it!! The other thing I super love about this set is the A Nice Cuppa Designer Series Paper Stack because the colors are so fabulous!!!

Let’s get started on this fabulous card! I used a Whisper White card base and adhered a piece of Bermuda Bay measuring 4″ x 5-1/4″ onto the front. I cut a piece of the A Nice Cuppa Designer Series Paper into a 2″ x 5-1/4″ strip and added that to the card front. Using the Deco Labels Framelits, I die cut Whisper White cardstock for the focal point! The little mug was die cut in Bermuda Bay with the Cups and Kettle Framelits. The heart steam was die cut in Melon Mambo. I stamped the heart from the A Nice Cuppa Stamp Set in Bermuda Bay onto the mug and the greeting in Tip Top Taupe over top! Also, I stamped the tea bag in Tip Top Taupe onto Tip Top Taupe cardstock. Then I die cut that out as well. I placed the end of the Linen Thread on the back of the tea bag and placed a Stampin’ Dimensional over the end. The other end of the Linen Thread is placed behind the cup. I adhered the mug to the frame with Stampin’ Dimensionals also. The little steam was adhered with the Fine Tip Glue Pen. I love it!!! This card is perfect for just about anyone – those who love coffee, tea, or any other beverage in a mug. It would be perfect for someone who is sick and needs a little pick-me-up or just a little note to brighten anyone’s day!

If you would like to see all of the image in the Cups & Kettle Framelits and more on this set, check out the Video Tutorial below or by clicking here! Be sure to give it a thumbs up if you liked it!

Happy Stampin’

~Laura


Technique Tuesday – Confetti Fun!!!

Posted on

Happy Tuesday!!! That means I have a fabulous technique to share with you today!! We will be coloring on an embossed image and it is so much fun!!! Check this out!

Sponged Embossed Confetti, www.LaurasStampPad.com

How cute…or manly….is this card? I think this would make a great Man Card and many would probably say a Man Card isn’t described as cute. 🙂 You could use any combination of colors to match the occasion. You could do school colors for a graduation card, wedding colors for wedding or the recipients favorite color for Birthday, Just Because, or Thank You!!! I love it!!

SUPPLIES NEEDED: Embossing Folder, Sponge Daubers, Ink Pads

I took a piece of Whisper White cardstock measuring 4″ x 5-1/4″ and ran it through the Big Shot in the Confetti Embossing Folder from the Occasions Mini Catalog! Then I took my Sponge Dauber and Ink Pads and lightly brushed over the embossed portion. I went in a circular motion to keep in little sections but you could always go back and forth or whichever way you like best. I used Pacific Point, Pumpkin Pie, and Cucumber Crush for this card! Then I placed it onto a Cucumber Crush card base. Since the center is smooth in this folder, I used my Oval Framelits for the greeting! I stamped the greeting from the Party Wishes Stamp Set in Pacific Point. I stamped it on Whisper White and layered it onto Pumpkin Pie. You could always just stamp the greeting directly onto the embossed piece! The greeting is attached to the card front with Stampin’ Dimensionals! How simple is that? I love it!

Colored Confetti, www.LaurasStampPad.com

If you would like to see this in action, check out the Video Tutorial below or by clicking here! Don’t forget to give it a thumbs up if you liked it and be sure to subscribe so you don’t miss out on any future videos!

Happy Stampin’

~Laura


Quick and Simple Birthday Cards!!!

Posted on

Cherry on top, www.LaurasStampPad.com

It’s the end of the year and I am working on cleaning up my stamp room (check that out here) and preparing for the new year ahead! Here are a few cards that I created with some leftover Designer Series Paper pieces, ribbon scraps and pre-cut cardstock! I know I will need lots of Birthday Cards in 2016 because after all everyone has a birthday!

The cards above all have a Pool Party card base and piece of Cherry On Top Designer Series Paper measuring 4″ x 5-1/4″. The ribbon is Whisper White Satin Stitched Ribbon and Bermuda Bay Baker’s Twine! For the greeting, I stamped It’s Your Birthday! from the Big News Stamp Set in Bermuda Bay and brushed the edges with a Cucumber Crush Sponge Dauber! Quick and simple and yet fabulous!!!

Bermuda Birthday, www.LaurasStampPad.com

I love Bermuda Bay and since I had these cut card bases, I thought I would create some cards! I layered on a piece of Basic Black. The one card has some Whisper White Satin Stitched Ribbon and uses the same greeting as above from the Big News Stamp Set! I brushed the edges with some Bermuda Bay and a Sponge Dauber! The other card uses the Happy Birthday Everyone Stamp Set and I die cut the greeting with the Deco Label Framelits!

Sometimes it seems the simple cards have the biggest wow factor!

Happy Stampin’

~Laura


Leftover Winter Wonderland!!!

Posted on

Happy Monday everyone!!! Are you still in a Christmas coma with all the presents, food, family, and chaos?? Now that Christmas is over, it is time to get into that craft room and enjoy some time for you!!! I had leftover Designer Series Paper from the Holiday Mini Catalog and so I came up with a few simple cards to create for all occasion!!!

Anniversary Cards, www.LaurasStampPad.com

I used Melon Mambo for the card base – my favorite color! I added the pieces of gold and white Designer Series Paper from the Winter Wonderland Pack. I got out my ribbon scraps and some were long enough to tie a knot and the others were shorter so I just wrapped. I hid the ends under the greetings. For the greeting, I used the Blessed By God and Decorative Label Punch! I thought these would make great wedding or anniversary cards!!!

Birthday Trees, www.LaurasStampPad.com

I thought these trees looked very manly and we all know I struggle with man cards! I used Pool Party and Island Indigo for these (it’s what I had pre-cut already). The Winter Wonderland Designer Series Paper is 4″ x 5-1/4″. I used Whisper White Baker’s Twine, Pear Pizzazz Cotton Ribbon and Whisper White Satin Stitched Ribbon! For the greeting, I used the Happy Birthday Everyone Stamp Set and die cut with the Deco Label Framelits!!!

Golden Aniversary, www.LaurasStampPad.com

Can you tell I’m low on Anniversary Cards? 🙂 Here I used Rich Razzleberry card bases. I used leftover pieces of Whisper White Organza Ribbon and Gold Metallic Thread. I also brushed the edges of the greetings with a Sponge Dauber.

Let me know which style is your favorite in the comments below!!!! Do you like to save your Holiday Paper for next year or use it up like I did?

Happy Stampin’

~Laura


Last Christmas Card!!!

Posted on

Christmas Tree, www.LaurasStampPad.com

Merry Christmas Eve!!! I think this is probably the final Christmas Card I will post this year! I can’t believe all of the ideas I had this year and I am still sharing them up till the day before! Next week will be ways to use up your holiday-themed paper for all occasion cards! YEAH!

This card uses a Crumb Cake card base and I stamped the greeting from the Peaceful Pines on the bottom in Tip Top Taupe! Then taking a piece of Pool Party cardstock, I rounded the corners with the Corner Rounder Punch and brushed the edges with a Sponge Dauber to add a little color and dimension to the card! I added this piece to the card front with Stampin’ Dimensionals! I stamped the tree from the Peaceful Pines Stamp Set in Mossy Meadow onto Mossy Meadow cardstock and die cut it with the coordinating Perfect Pines Framelits! Bundle & Save 15%! After cutting out the tree, I used another framelit in the set to create that feathering. This is a super cool look and really gives the tree some life. I stamped the little pot in Tip Top Taupe onto Crumb Cake and used the framelits to cut it out as well! The little star was punched out with the Itty Bitty Accents star and some Gold Glimmer Paper! The tree and star are adhered on with Snail Adhesive but the pot is adhered with a Stampin’ Dimensional! This is a very simple tree card with a little bit of elegance! I love it!!!

You can see this Bundle in action on this Video Tutorial! Don’t forget that the Holiday Mini Catalog ends on January 4th and the Occasions Mini and Sale-A-Bration Promotion begins on January 5th!!! If you would like to see a Sneak Peak of one of the Kits in the Occasions Mini Catalog, check that out below or by clicking here! Don’t forget to Subscribe so you don’t miss any more revealing videos or techniques!

Happy Stampin’

~Laura