Valentine Treats!!!!!

Posted on

Valentine’s Day is right around the corner….okay so still a month away but still! I thought I would share some fabulous treats with you that are quick and simple for you to make up for kid’s classrooms, neighbors, nieces and nephews, friends, or random people you see the week of Valentine’s Day! 🙂

Valentine Treat Bag, www.LaurasStampPad.com

This is your traditional treat bag using a 4″ x 6″ Cellophane Bag! I used some of the Stacked with Love Washi Tape to decorate the bag. I overlapped the ends on the back of the bag in the same spot as the seam of the bag. For the Topper, I used a piece of Real Red Cardstock measuring 4-1/4″ x 4″ and punched the bottom of the front with my Scallop Border Punch! Then I stamped the front with a To/From stamp in Real Red Ink. The one I used was from the Wondrous Wreath Stamp Set which is still available from the Holiday Mini Catalog!! Then I folded the piece of cardstock over the top of the bag and stapled it closed. Then I decided I didn’t like the staples showing so I added the Gold Ribbon which looks amazing so I’m glad I added it! If you like the staple took, you can leave the ribbon off or just place it lower. In one of my classes, I had a stamper staple on top of her ribbon so that is an option as well! I finished it off with a few hearts punched out with the Itty Bitty Punch Pack and some Gold Glitter Paper!

Valentine Treat Box, www.LaurasStampPad.com

This little treat box is perfect for oddly shaped candy or other treats or if you wish to keep it a surprise! I started with the Tiny Treat Boxes which have also been held over from the Holiday Mini Catalog! Before assembling the box, I stamped the So Sweet greeting from the Hello Life Stamp Set in the Occasions Mini Catalog! I stamped it to wrap around to left. When we did this box in a stamp class, many of the stampers stamped either the entire greeting again on the back 2 sides or stamped just the curvy end on the other 2 sides! Then I added a little strip of Stacked with Love Washi Tape. After handling the box and showing it off at classes I realized that it started to curl on the corner so I would suggest wrapping the Washi Tape all the way around or at least around the corner to the side and not on the corner! I finished it off with some Real Red Cotton Ribbon! I love how that bow looks! Adorable!

Let me know what you think about these treats and what you plan on creating for your Valentine’s Day Treats in the comments below! I would love to hear your plans!

Happy Stampin’

~Laura


Technique Tuesday – Irresistibly Yours!!!

Posted on

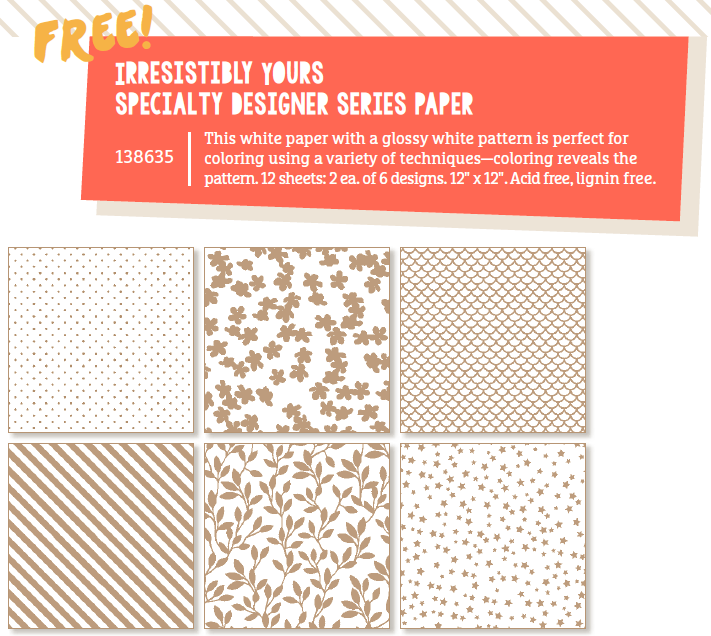
Happy Tuesday!!!! I hope you are having a fabulous week and this technique makes it even better!!! 🙂 Today, I’m going to show you how to use the Irresistibly Yours Designer Series Paper that you can get for FREE through Sale-A-Bration when you place a $50 (US) order! The catalogs shows the paper like this!

Irresistibly Yours DSP

When you first see this, you may be confused and think it is tan and white paper. Really, it is white paper with the images you see in tan clear embossed onto the paper. You can’t really photograph clear on white (as you can see in my video) so Stampin’ Up! is showing it like this! Since this paper is clear embossed, you can add color to the paper and it will only pick up the color on the white areas and not on the clear embossed images. You can add your color with Spritzers, Sponge Daubers, Sponges, Brayer, Markers, Blendabilities, and stamping! It is sooooo much fun to add color and see the image show up. It is like being a child again and painting in one of those books that you add water and the image appears. (Just me?)

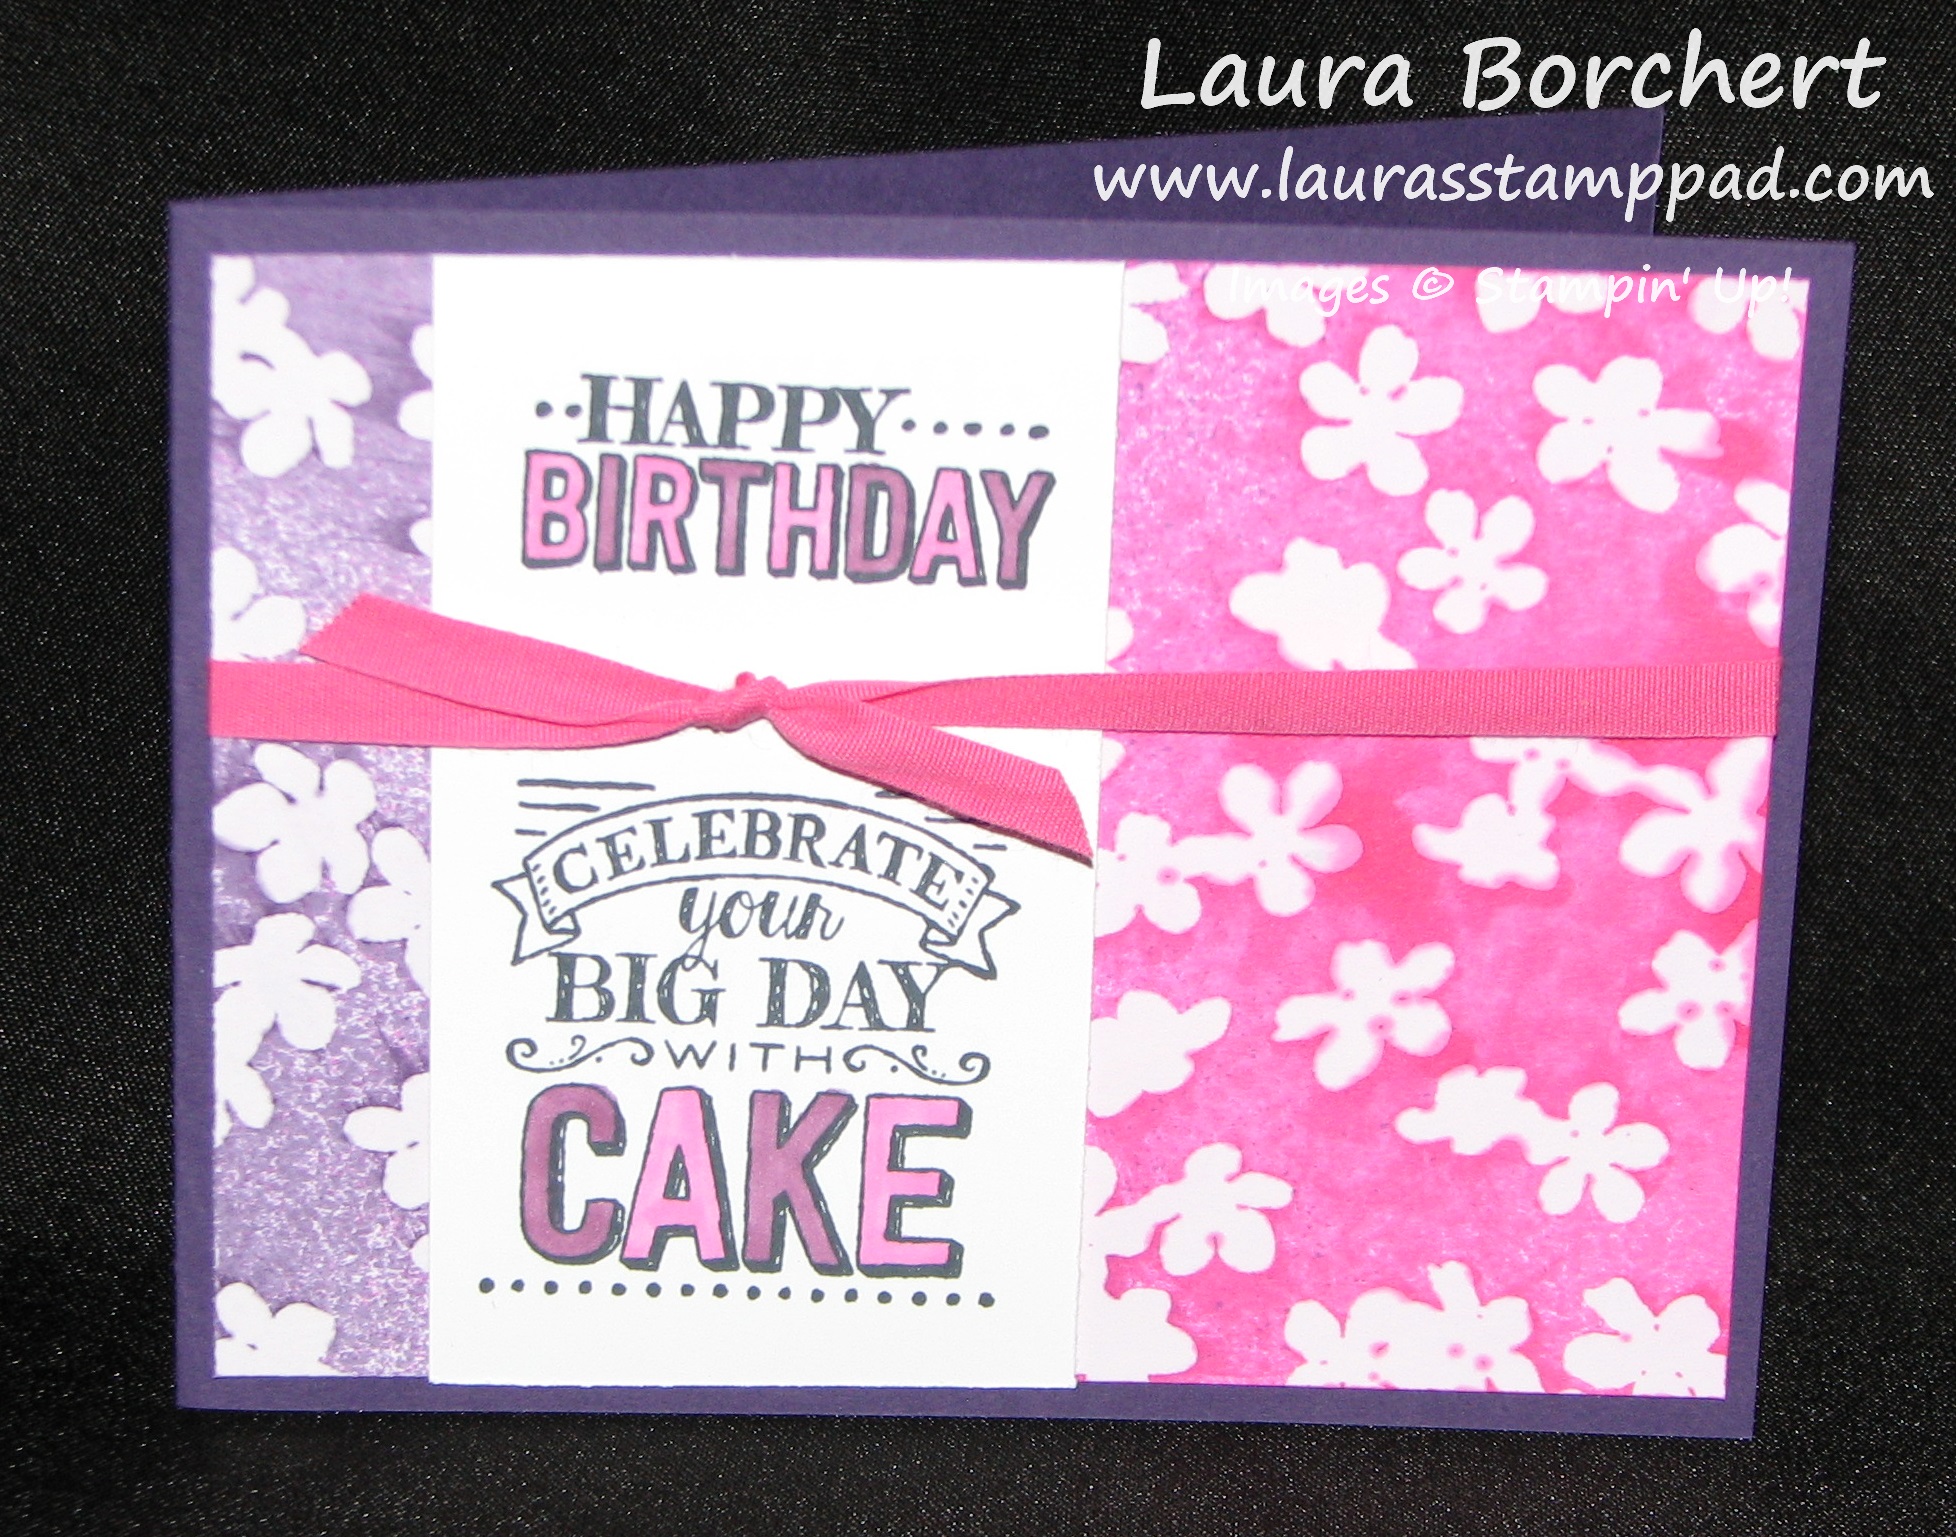
Spritz Emboss Resist, www.LaurasStampPad.com

SUPPLIES NEEDED: Irresistibly Your Designer Series Paper, Spritzers, Stamps, Embellishments

Yeah it’s that simple! You can get this emboss resist look with just this paper. If you created this yourself, you would need Cardstock, VersaMark, Heat Tool, and Embossing Powder. I cut my Irresistibly Yours paper into 4″ x 5-1/4″ and placed it into a box for spritzing. I look the look of Spritzing but it scares me every time because I tend to get messy! 😉 I spritzed the right with Melon Mambo and the left with Elegant Eggplant. (Mix re-inker and alcohol (70 Proof or less) in a Spritzer). Underneath the greeting is the overlap or dots and spritz. I wasn’t sure if I liked that look or not so I covered it with my greeting. You could always show that off and move your greeting down. My greeting is from the Big Day Stamp Set which is also a Sale-A-Bration item! I am loving this stamp set. I colored in the letters with my Rich Razzleberry & Melon Mambo Blendabilities! You can earn those for FREE with Sale-A-Bration as well! I finished off the card with some Melon Mambo Cotton Ribbon! Here is another photo of this card!

Spritz Emboss Resist, www.LaurasStampPad.com

If you would like to see this in action, check out my Video Tutorial below! Don’t forget to give it a thumbs up if you liked it and be sure to subscribe so you don’t miss out on any other videos I create!

Be sure to check back later this week to see more samples using the Irresistibly Your Designer Series Paper!

Happy Stampin’

~Laura


Chalkboard Fun!!!

Posted on

While I am not a huge fan of real chalkboards……chalk gives me the chills just to touch it or think about it, let along writing with it on a chalkboard….I so love this look! I know you are probably thinking but Laura doesn’t like rustic or dirty. It’s true, I’m more of a clean, bold stamper but I do love this chalkboard look! It mostly reminds me of a bakery like Panera (YUM!) or a little bistro restaurant and I love that! Stampin’ Up! has made getting this look easy and fun with no chills crawling up your spine!

Chalkboard Paper, www.LaurasStampPad.com

How fabulous is this card? I love the polka dots and ribbon and chalkboard and ALL OF IT! I started off with a Whisper White card base. Then I took a piece of Birthday Bash Specialty Designer Series Paper (4″ x 5-1/4″) and wrapped some Calypso Coral Seam Binding around it and tied a knot. Now you can adhere that to your card front. For the greeting, I used some of the NEW Chalkboard Paper in the Occasions Mini Catalog! I found that this image is small enough that you can stamp first or after cutting it out. I stamped the greeting from the Big Day Stamp Set which is one of the Sale-A-Bration items you can earn for FREE! I stamped it with the Aquamarine Colorbox Chalk Ink Pad and then cut it out with the Labels Collection Framelits and my Big Shot. Then I used my Chalk Marker to create the border!!! Love it!!! NOTE: The Aquamarine color comes out really light but it slowly gets darker as it dries and it is just a light look. Also, a few tips for using the Colorbox Chalkboard Ink:

~Be sure to stamp straight down and right up again because it could slide and smear if you wiggle it.

~Be sure you are stamping on the slick/sort of rubbery/textured (not sure how to describe it) side of the Chalkboard Paper. The back side feels and looks like regular paper.

~Be sure to allow it to dry for a bit as it takes longer than traditional ink. If you would like to speed up the process, you can set the ink with your Heat Tool.

~For a more bold look, you can stamp the greeting once and then using your Stamp-A-Ma-Jig to stamp again right on top.

I hope you try out this new Chalkboard Paper and Ink! It is super fun! Don’t forget that every $50.00 (US) order placed between now and March 31st earns you a FREE Sale-A-Bration item!

Happy Chalkin’

~Laura


Fabulous & Cold Friday!!!

Posted on

Happy Friday everyone! Brrr is it cold out there. This is perfect weather for staying in, cuddling, and STAMPING! The sun beams into my stamp room so it looks fabulous and warms it even more! 🙂 There are so many fabulous things to share this week!

Occasions Mini Photo

The Occasions Mini Catalog is now available!!! Woot Woot! I love the beautiful flower bouquet and thoughts of Spring!!!

SAB Photo

 It is time to SALE-A-BRATE!!!!! For every $50 you spend, you will earn 1 item from the Sale-A-Bration Brochure!!! As a Hostess you earn an additional $25.00 in FREE Product once your party/order reaches $250!!!!! You can join Stampin’ Up for $99 and get $125 in product as well as a FREE Kit from the Occasions Mini Catalog! There is so much to Sale-A-Brate right now! I love it! Let me know if you would like to have a party – email me here! If you have ever thought about joining Stampin’ Up for the fun, the discount, the creativity, or just to spend more time with ME (hehe), feel free to reach out with any questions you might have or click here for more information!

Weekly Deals 1.6

Of course the fabulous Weekly Deals are here too! Be sure to get the Note Tag Punch while it is on sale so you can use it with the One Tag Fits All Stamp Set!!!! I am loving this set and have lots of samples to share with you soon!

Well I hope you have an amazing weekend keeping warm and hopefully stamping! 🙂

Happy Stampin’

~Laura


For Someone You Love!!!

Posted on

Hello Life Love Card, www.LaurasStampPad.com

Valentine’s Day is right around the corner and it’s time to show how much you love someone! While that shouldn’t be the only time of the year you show your love, it is a very special day! Some may not like the holiday because they think it is too much or maybe you think you don’t have someone to share your love with BUT YOU DO! I love Valentine’s Day because it is my excuse to show EVERYONE how much I love them! If I gave a card like this to my Brother on a July 18th, he would think I have lost it but on Valentine’s Day (he still might roll his eyes) it is perfect! I think you should show your to everyone around you – Family, Friends, and even Strangers! Share your love!!!!

This card was created with some of the new items in the Occasions Mini Catalog! I started with a Real Red card base and then cut out a piece of Whisper White measuring 4″ x 5-1/4″. I brushed the edges with my Real Red Sponge Dauber for a little softness and color! Then I stamped the greeting from the Hello Life Stamp Set! I love this set because it has amazing greetings and I love that long beautiful font. This stamp set is great for Memory Keeping as well because you can stamp that fabulous greeting right onto the bottom of your photo! Adorable! Also, I stamped the little hearts and added in a Rhinestone near both! I love my bling! For the banners, I used the NEW Stacked with Love Designer Series Paper! Okay, listen up! This paper is AMAZING! One side is hearts and pinks and corals, and goodies for Valentine’s Day or lovely items BUT the other side is Black and White!!!!! You know how I love my Black and White. I love this because you can purchase this paper and make a few Valentine’s Day cards and use some in your scrapbook for someone you love. Then usually you think what will I do with the rest of this paper pack. You will turn it over is what you will do! 🙂 Oh I love it! (Can you tell?) I cut a few pieces into strips and added the banner tips at the bottom. Add those to your Whisper White cardstock and then add this to your card front! All done! Perfect card for someone you love!

Happy Stampin’

~Laura


Birthday Bash!!!!

Posted on

I am loving the Big Day Stamp Set in the Sale-A-Bration brochure! It is so much fun to play with and you know I make lots and lots of Birthday Cards each year. Check out this amazing card style!!!

Big Day Birthday Girl, www.LaurasStampPad.com

You know I love PINK and this is just precious!!!! I started with a Crumb Cake card base and then added a Top Note piece of Sweet Taffy Designer Series Paper! The Top Note is one of my favorite dies….I love the shape and that stitched edge! Then I took the Clear Block I and placed the Birthday Greeting on top, the Cake on the bottom, and the Cake Greeting in the middle. This way I can stamp with all at the same time. I had to stamp the candle separate because otherwise it would have been floating on top of the cake. I stamped these images with the Memento Ink because I colored them in with the Melon Mambo Blendabilities. If you are using Markers, just be sure to stamp with your Stazon Ink. This was all stamped on a piece of Whisper White cardstock measuring 2-1/4″ x 5-1/4″ and then layered on a piece of Melon Mambo measuring 2-1/2 ” x 5-1/2″. I added this to my card front with Stampin’ Dimensionals! For a little more flare, I added some Linen Thread to the left side and added a few tags. One tag has the Ice Cream Greeting stamped on it and the other is a piece of Sweet Taffy Designer Series Paper…..using up those scraps! 🙂

Big Day Birthday Boy, www.LaurasStampPad.com

Of course I did a boy version as well! I used the Sweet Taffy Designer Series Paper again and my Coastal Cabana Blendabilities! I can’t wait to try this out in many other colors and Designer Series Paper Packs! If you try out this card, be sure to send me pictures! I would love to see what you come up with! Also, I wanted to give a shout out to Julie Davison for this amazing idea!!!!

If you would like to get this Big Day Stamp Set for FREE, you can do so by placing a $50 or more order between now and March 31st! Click here to place your order and check out the items you can earn for FREE here – Sale-A-Bration!

Happy Stampin’

~Laura


Technique Tuesday – Lotus Blossom Love!

Posted on

Happy Tuesday!!! This is a fabulous Tuesday because the Occasions Mini Catalog has begun as well as the Sale-A-Bration Promotion! Now I can share all these fabulous products with you!!!! Today I am sharing the amazing Lotus Blossom Stamp Set from the Sale-A-Bration Brochure! This stamp set takes a little technique and finesse. So lets get started!!!!

Lotus Blossom, www.LaurasStampPad.com

You saw the sneak peak of this card last week! Today I’m going to show you how to create it!

SUPPLIES NEEDED: Lotus Blossom Stamp Set, Baker’s Twine, Paper Doily, Gold Foil Designer Vellum Paper

I started with a Whisper White card base and added a piece of the Gold Foil Designer Vellum (4″ x 5-1/4″). I love using Vellum when there are lots of spots covered because then you don’t have to worry about your adhesive showing through. Just add adhesive under the spot where you flower is! Now with a piece of Whisper White cardstock measuring 3-1/2″ x 4-3/4″ it is time to stamp your flower. I used the Lotus Blossom Stamp Set from the Sale-A-Bration Brochure! You will see that the flower images are labeled 1, 2, & 3. You will also notice that where that number is, there is also an arrow. This is for perfect placement when stamping! Always note where that arrow is so you can stamp the next flower with the arrow in the same spot. The #1 Stamp is your first image. Ink it up in your color choice and stamp down! I used Bermuda Bay in the sample above and I usually point the arrow to the corner of the paper but that depends on the flower placement! Now get your #2 flower image and ink it up in the same color, stamp off on a scrap piece of paper and then line it up and stamp on top of the #1 flower image. Remember your arrow placement to help with each additional image. Now for the #3 flower image, ink it up in the same color again and lightly stamp off (you can stamp off twice if you wish) and then stamp over top your two other flowers! These three images give such texture and dimension and color to your flower! I just love it! It looks so artistic and real! TIPS: You can stamp off as many times as you wish. You can use a second color for the #2 stamp image. You can even use three different ink pads if you wish! Here are some more samples using just one color!

Lotus Blossom, www.LaurasStampPad.com

I could play with this stamp set for hours! For the stem I used Old Olive and you will stamp the spotty stem first and the solid one second. Again before stamping the second one, you will want to stamp off or use a lighter color. NOTE: You can bend your stem to whatever angle you wish! Got to love photopolymer!!!! I then stamped the greeting in Basic Gray in the corner and added a piece of a Paper Doily to the left edge. I was able to get 3 “pieces” of a doily from just 1 doily….with another pie looking piece leftover. You only need a little bit! I added this piece to my card front with Stampin’ Dimensionals! Then I wrapped the Baker’s Twine around my card front twice and tied it into a bow! I got this card idea right out of the Sale-A-Bration Brochure! It was just so beautiful, I didn’t want to make any changes! If you would like to see this stamp set in action, check out my Video Tutorial here! Don’t forget to give it a thumbs up if you liked it and be sure to check out the other videos posted today showing off items from the Occasions Mini Catalog and Sale-A-Bration Brochure!

Happy Stampin’

~Laura


Occasions Mini Catalog & Sale-A-Bration!!!!

Posted on

Occasions Mini Photo

Isn’t she a beauty??? I love the cover of the Occasions Mini Catalog! It is bright and colorful flowers!!!! What’s not to love!?!?! I am planning on making these flowers to have on my table as a centerpiece…..hoping Spring will come ASAP! 🙂 I can’t wait to start sharing all the goodies in this catalog! Be sure to subscribe to my blog so you don’t miss out!!! Enter your email address in the box on the top right corner to subscribe!!!!

SAB Photo

 Sale-A-Bration has begun!!! This is the happiest time to the year!!!!!! The more you stamp, the more you get! 😉

Customers: you will earn an item from the Sale-A-Bration Brochure for every $50 you spend from January 6th to March 31st! Place a order of $150 and you will earn 3 items!!!

Hostess: when your party reaches $250 or more, you earn an additional $25 in Hostess Dollars to spend on anything on your wish list! That is on top of the current Hostess Benefits!

Join the Fun: when you join the fun with Stampin’ Up during Sale-A-Bration get you to pick $125 in product for just $99. But that’s not all, you get to pick a Simply Created Project Kit from the Occasions Mini Catalog for FREE! There are 5 to pick from!!!

You can Sale-A-Brate in one or all three ways listed above! This is by far my favorite time of year. I have the most events this time of year because everyone loves free stuff! I really enjoy sharing what I love with others! Let me know if you would like to Sale-A-Brate as a Customer, Hostess, or by Joining Me!

Happy Stampin’

~Laura


December My Paper Pumpkin!!!!

Posted on

December 2014 My Paper Pumpkin, www.LaurasStampPad.com

Eeeee! I just love these cards! I love the color combination – Melon Mambo, Pear Pizzazz, and Bermuda Bay! I love the Bermuda Bay Sequins and I love that they are shaker cards! Super fun!!!! Stampin’ Up sure wows me every month with the My Paper Pumpkin kits! The month of December was even better because of this FREE GIFT in the box!

December 2014 My Paper Pumpkin, www.LaurasStampPad.com

Who doesn’t love Free Gifts?!?!?! Click here to check out my video of when I opened this kit! I was excited!

December 2014 My Paper Pumpkin, www.LaurasStampPad.com

Now lets get started! Here are all the goodies that came in the kit! It was really easy to assemble although I do think this kit took a little longer than 30 minutes but I was watching a show while doing it so I was moving a little slow! 🙂 I love that Stampin’ Up included this little toothpick looking tool for poking out all of the little stars. It was perfect and made that tasks super easy!

December 2014 My Paper Pumpkin, www.LaurasStampPad.com

Another item that I want to point out is the Dimensionals for the back of your shaker frame. I used 2 of the short ones on the top and bottom. I used 2 of the long ones on the sides….be sure to have them touching so you don’t have any leaks on your shaker card. I would hate to have you shake it and watch it fly out and go everywhere! Although that would be like sending a card and one of those Party Poppers in one to someone! 🙂 I felt that the bottom portion needed a little bit of Dimensional or otherwise it would squish down since nothing was there. I used the border and the extras of the pieces to add some down there. You can see that in the photo below….I couldn’t use the flash because of the clear window sheets.

December 2014 My Paper Pumpkin, www.LaurasStampPad.com

I still had some of the Dimensional pieces leftover in the end! I loved making these cards and while I was taking the words off their sticky paper, I thought I could use these too! So I took the negative image, cut them apart from each other and placed them on a Note Card & Envelope!

December 2014 My Paper Pumpkin, www.LaurasStampPad.com

How cute are these little simple cards? As you can see the Thank You greeting was diagonal on the sheet in order to fit so I had to cut diagonally. I thought they came out super cute and oh so simple! So I got 18 cards from this My Paper Pumpkin Kit with just adding in 9 Note Cards & Envelopes. That is fabulous work for say an hours time…..and enjoying a show on TV! 🙂

I can’t wait to see what the January Kit is going to be! Don’t miss out on another month, sign up for My Paper Pumpkin by clicking here! Who doesn’t love FREE Gifts? During Sale-A-Bration which starts tomorrow, the 6th, get a 3-month Paper Pumpkin Prepaid Subscription for just $54.85. That is a $5 savings and that qualifies you for a Sale-A-Bration reward!!!! Woot Woot!!!! Pre-Paid Subscriptions make great gifts too!

Happy Stampin’

~Laura


Fabulous Friday!!!!

Posted on

It’s Friday! It’s a New Year!!!! Let’s kick it off right with some stamping!!!! First off the Weekly Deals include the Fun Flower Punch! LOVE flowers and punches are so quick and handy! This is a must have!

Weekly Deals 12.30

There are still lots of fabulous items on the Year End Close Out Sale too! Great time to get some Holiday items (Designer Series Paper, Embellishments, etc) to hold on til next year or to use in your scrapbook when you are doing holiday pages!!!! This sale ends on January 5th as well as the Holiday Mini Catalog!

Sale-A-Bration and the Occasions Mini Catalog begin next week (January 6th) and I am sooooo excited! Lots of fabulous new product and I will be showing it off on here, my Facebook, Pinterest, and YouTube! Don’t miss it!!!

I’m headed off to a Stamp Party this weekend with a fabulous group of stampers! I’m loving kicking off the New Year with STAMPING and meeting new people!!!! Have a fabulous weekend!

~Laura