Happy Friday!!! This has been a fabulous week of warmer weather and SUNSHINE!!! I just love the sun. It really can brighten your day….in more ways that 1. 🙂 This has been a busy and fabulous week!!! I had my Fabulous Friends Team Meeting this week and got to shower Becky B. with lots of Bling! She promoted to Silver last month so she got Silver Foil Paper, Silver Glimmer Paper, Silver Satin Ribbon and Silver Sequins. I’m so proud of her and her accomplishments!!
Don’t forget that you can join my Fabulous Friends Team this month for just $99 and you can pick out $155 worth of any product of your choice!!! Click here for more information or feel free to reach out. I’m always happy to answer any questions your might have!
Of course it wouldn’t be a Friday without the Weekly Deals!!! There is GOLD Bling in there for you. Yesterday was St. Patrick’s Day so get your pot of gold with this fabulous Gold Foil Paper!
I have another fun filled weekend of Stamping!!! I’ll be stamping with the girls in Paris on Saturday. Then on Sunday I’m headed to my Mom’s house for more stamping with her and her friends! I am loving every minute of it!!!
I hope you all have a wonderful weekend and I’ll see you back here on Monday!
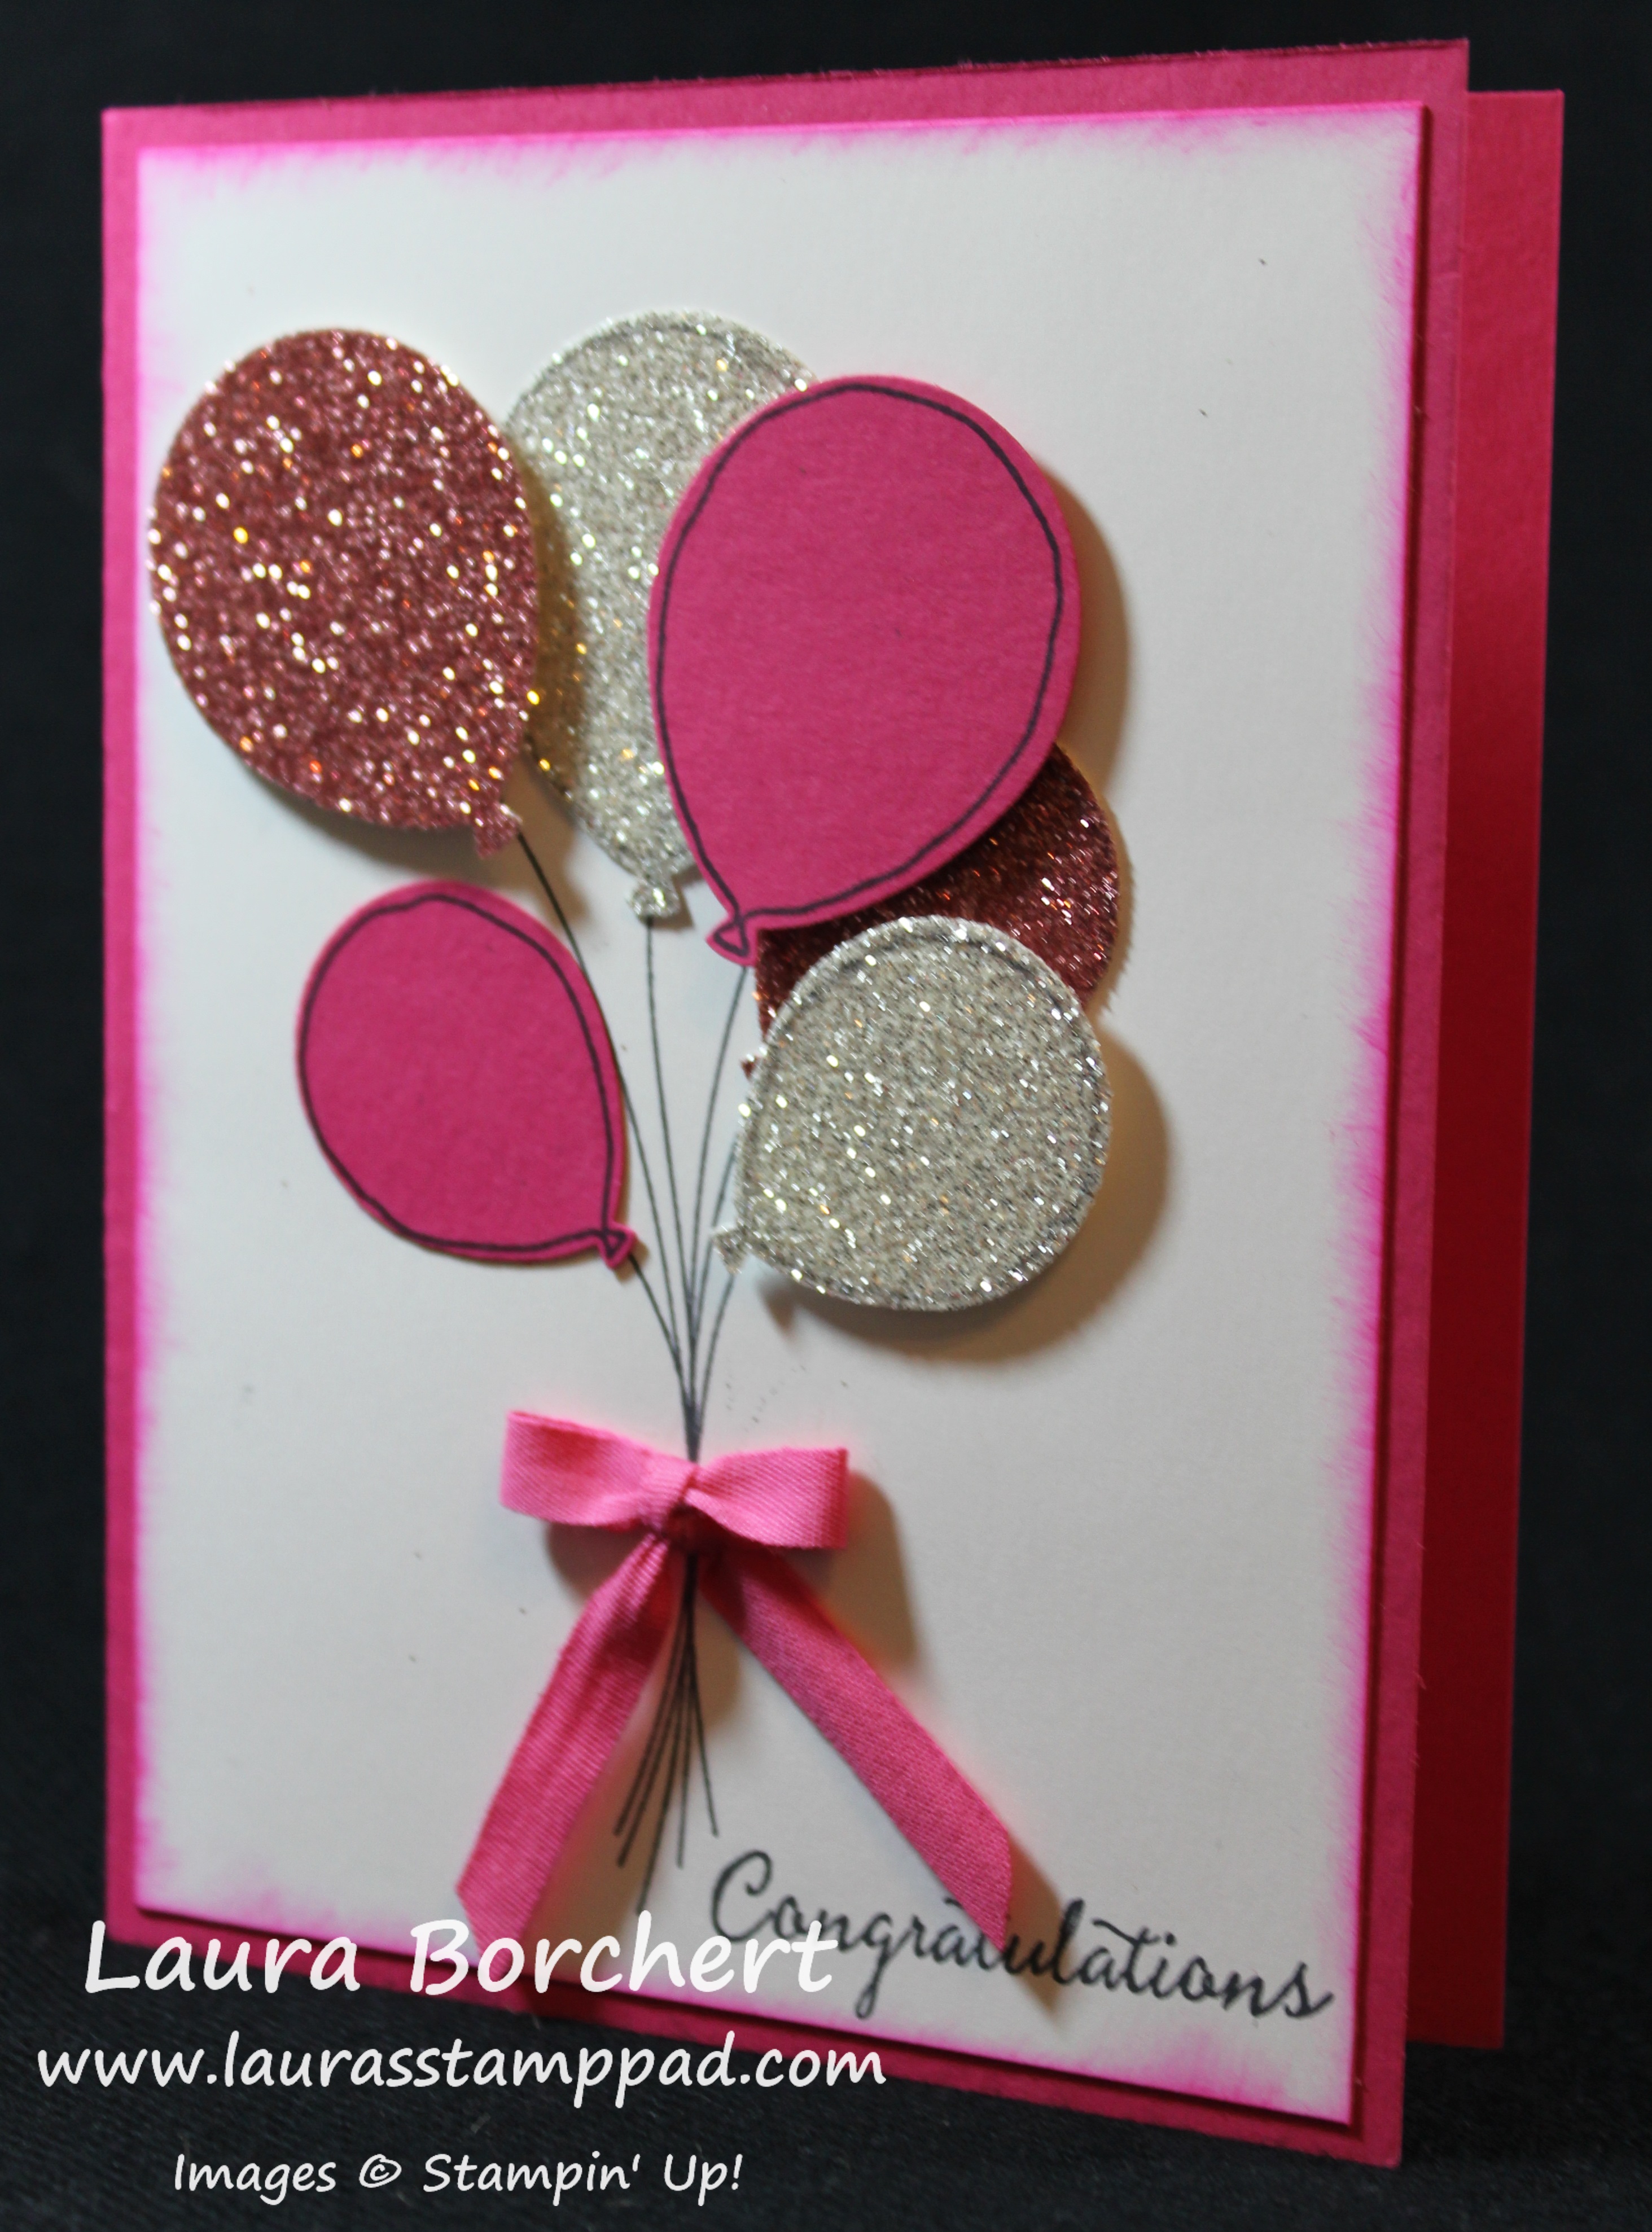
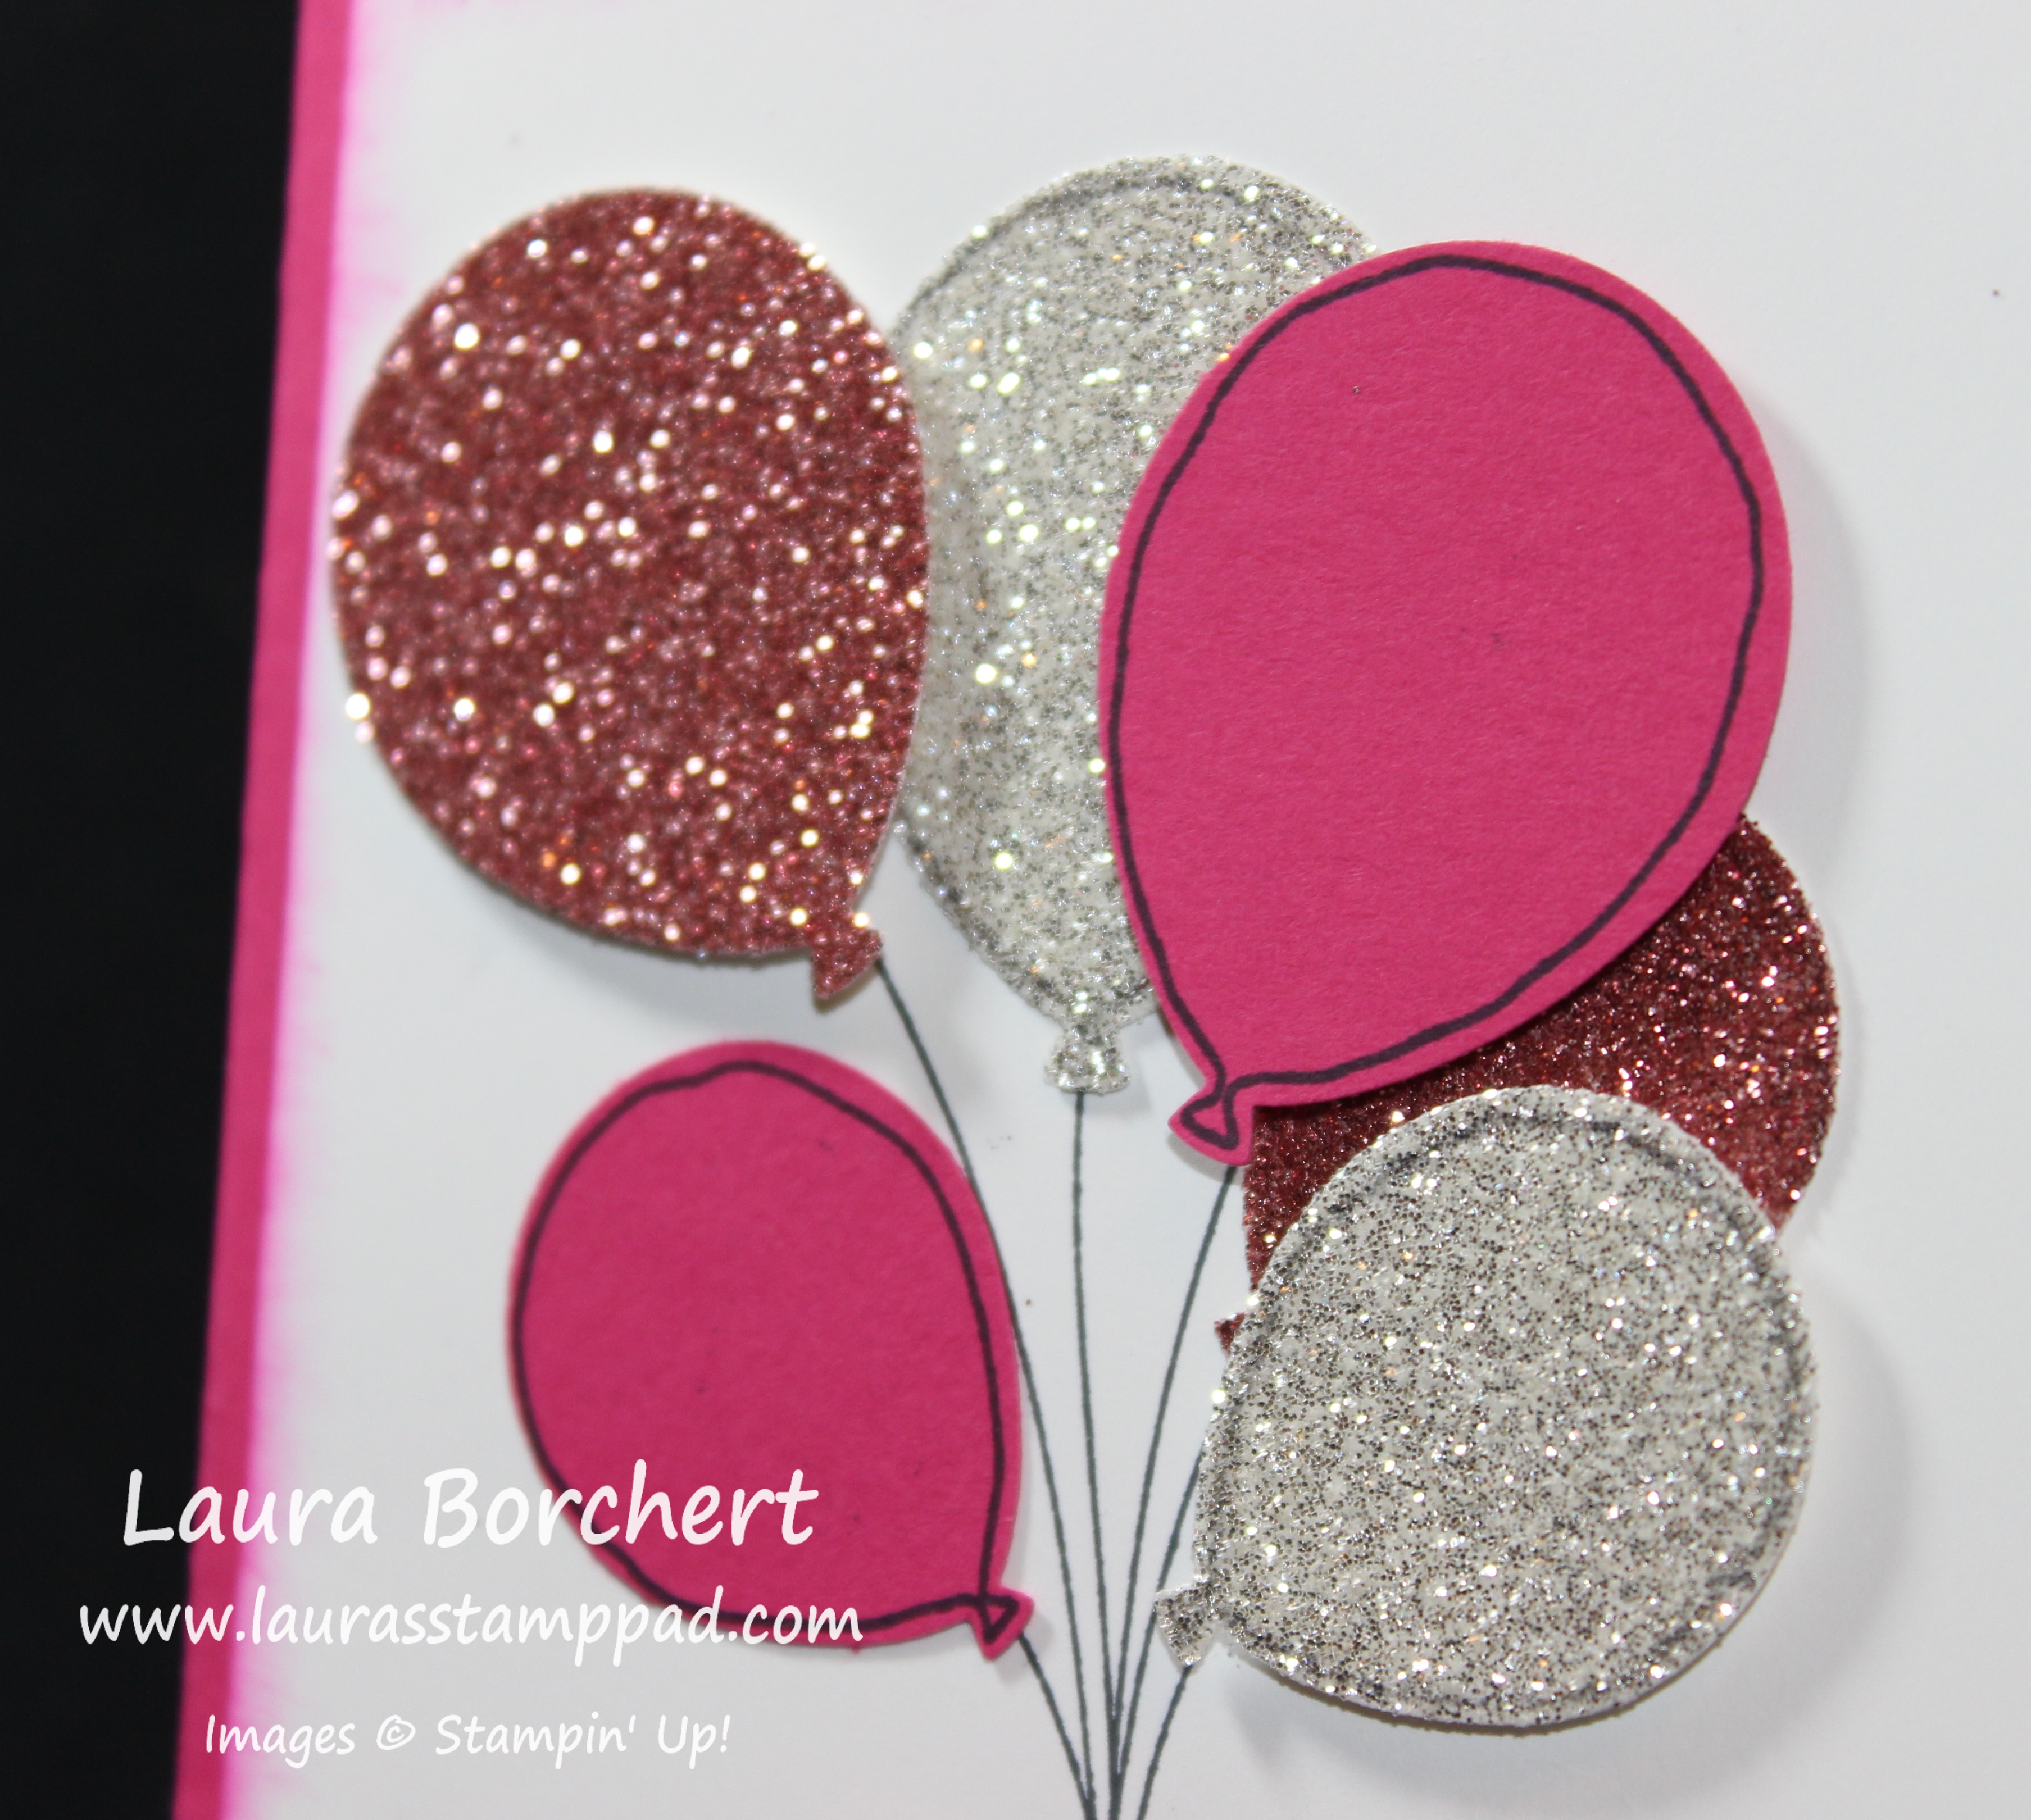
Eeeeee! This card just makes me so excited I have to scream! PINK! BLING! RIBBON! SPONGE DAUBERS!!! I love it!!! You could always change up the color to your favorite color/s or even for a more masculine card! I’m super excited about the Balloon Celebration Stamp Set and coordinating Balloon Bouquet Punch (Bundle and Save 15%)!
I started with a Melon Mambo card base. Then I took a piece of Whisper White measuring 4″ x 5-1/4″. I stamped the balloon strings and greeting in Basic Black. Then I stamped one large and one small balloon outline onto Melon Mambo cardstock and punched them out. I also punched out one large and one small balloon in Blushing Bride Glimmer Paper and Dazzling Diamonds Glimmer Paper. You will want to adhere the balloons from the bottom up (shortest strings first)! I did half of them directly to the cardstock and the other half with Stampin’ Dimensionals! Then I brushed the edges of the cardstock with Melon Mambo and a Sponge Dauber and added it to the card base. For the bow, I used Melon Mambo Cotton Ribbon and used the Fork Bow Technique! You can check out the video tutorial on that here! I adhered the bow to the card with a Mini Glue Dot! Perfect!!!
TIP: So you might notice a bit of an outline of a balloon on the glimmer paper….DON’T DO IT! I added the balloon border to the Melon Mambo balloons and I liked how it really defined the balloon so I thought I would do the same with the Glimmer Paper. It didn’t dry and then smeared and got all over my fingers/project. I guess it eventually dried but I wouldn’t recommend doing it. 🙂 That’s what I’m here for….to make the mistakes and pass along the tips!
If you would like to see more samples and some basics on the Balloon Celebration Bundle, check out my video tutorial here or by clicking below! Don’t forget to give it a thumbs up if you enjoyed it!!!
This card is very simple, quick, and could be modified for anyone!!!! I think this card screams Birthday Boy but you could change the colors to pink and yellow for a girl. Really you could do any color combination for anyone! My favorite color growing up was blue until about high school and then I went crazy over PINK!!!! A few years ago it was purple and green but still pink. Now it is Bermuda Bay and still Pink!
For this card, I used a Tip Top Taupe card base. I took a piece of Very Vanilla measuring 4″ x 3-1/2″ and used the Corner Rounder Punch on the bottom right corner. I stamped the greeting in Cucumber Crush from the Balloon Celebrations Stamp Set. For the balloons, I used Cucumber Crush and Bermuda Bay. I stamped the outline in full strength and the solid balloon fill I stamped off once. I used Basic Black for the string. I adhered this to my card front and added a little piece of Cherry on Top Washi Tape! I love how quick and simple it is and you could really use this card for lots of occasions if you switched up the greeting! I just might be making lots of these with different color combinations. Believe it or not I am low on cards right now!!! Time to bulk up!
Happy Tuesday!!! You all know that means I have a fabulous technique to share with you today! This one is super simple and yet super fabulous!!! Check this out!!!
The Botanical Blooms Stamp Set coordinates with the Designer Series Paper so you can stamp the leaf veins and centers of the flowers to add more texture and interest to the flowers. It really makes the paper POP! I love it! It goes from cute to WOWZA!!!
For the card above, I added the Designer Series Paper to a Hello Honey card base. Then I wrapped some Linen Thread around the card a few times and tied it in a knot! I like the jungle look that the thread gives! For the greeting, I used the Rose Wonder Stamp Set and stamped it in Cajun Craze. I punched out the Whisper White with the 2″ Circle Punch and layered it onto Mint Macaron punched out with the 2-3/8″ Scallop Circle Punch. I added the greeting to the card with Stampin’ Dimensionals.
If you would like to see this in action, check out my Video Tutorial below or by clicking here! Don’t forget to give it a thumbs up if you liked it and subscribe to my channel – Laura’s Stamp Pad so you don’t miss out when future videos are posted!
So if you have been following me for even a week, you know I am IN LOVE with the Rose Wonder Bundle! I love the greetings and the flowers! You might look at it and think it’s flowers and girly. While I would agree, I like to think out of the box and see if I can create some Man Cards with it as well. I DID IT!!!
I started with a card base of Pear Pizzazz and stamped the leaf from the Rose Wonder Stamp Set (Bundle & Save 15%) in Pear Pizzazz. I also die cut some of the leaves from the coordinating Rose Garden Framelits and added those to the card front. I used the Fine Tip Glue Pen to adhere them. Then I added a strip of the Corrugated Kraft Paper. This paper is super fun because it adds texture to your project but it isn’t too bumpy and it cuts super easy with the Stampin’ Trimmer! It has a very masculine look to it as well! For the greeting, I stamped the label in Pear Pizzazz and the greeting in Crumb Cake and then die cut it with the Rose Garden Framelits! I added the greeting with Stampin’ Dimensionals!
I have done lots of cards with this bundle, you can check them out by clicking here, here, and here! Let me know which one your favorite is in the comments below!
Happy Friday everyone!!! This has been a fabulous week and I haven’t known what day it is any of the days! I woke up Wednesday thinking it was Sunday and now it’s Friday and I’m like….Really? Already? Do you ever have weeks like that?
Here is a small glimpse of my weekend last week! It was busy and I had the greatest time ever! Friday night was a Ladies Night Out Event at the Library and I got to meet a lot of new people and hang out. I also ate the most amazing lemon cupcake ever. Ohhhh It was heavenly! You know how I love cupcakes! Saturday was an all day crop from 8 a.m. to 11 p.m. The latest I have stayed in the past was maybe 7 p.m. At about 7, I told my husband I was going to stay a bit longer and my friend was staying till 11 p.m. but no way could I make it that long. Well I arrived home at 10:30 p.m. and happy as ever! It was just so much fun I couldn’t leave. I got a lot done. I helped others with there scrapbooking needs. I chatted with lots of friends and the day just flew by. It was amazing! I always say Stampin’ Up is my therapy and boy is that ever true!!!
One other thing that I wanted to throw a BIG SHOUT to is UPS!!!! I just love my UPS guy! He probably thinks I’m crazy getting these Stampin’ Up boxes all the time and the fact that I usually am waiting at the door when he arrives. But this guy is so nice and cheerful. He tells me to have a good day every time. He once asked to borrow a pen which was no problem at all. We all have pens laying around, right. The very next day, he brought back my exact pen and a UPS pen! How thoughtful was that?? Then last Thursday, he was delivering my package a little later than usual but that was okay. I jokingly said that if he could bring tomorrow’s package early, that would be amazing. There were some goodies in there I wanted for the Ladies Night Out Event. He laughed and said I’ll see what I can do. He normally arrives between 3-4 p.m. and Friday morning at 10 a.m. my doorbell rang and I screamed! HOW FABULOUS!?!?! Now that is service! 🙂
Of course it isn’t a Friday without the Weekly Deals! BRING ON THE BLING! I will be stocking up on those Rhinestones! Woot Woot! Don’t forget there are only a few more weeks of Sale-A-Bration and you can stock up on Clearance Rack Items, Weekly Deals, and Catalog Items to earn your Free Sale-A-Bration goodies!
This weekend is another busy one with a Craft Fair on Saturday and a Bridal Fair on Sunday! I love my job!!!
I hope you all have a wonderful weekend and I’ll see you back here on Monday!
Punch Art is so much fun and the Owl Builder Punch is the most versatile punch I know of! Today I’m going to show you how to create the Devil, Cow, and Zebra! Let’s get started!
For the Devil, I used Real Red, Basic Black and Whisper White cardstock scraps. I punched a full Owl Body, heart, and sliver of the body for the tail in Real Red. The eyes were punched out with the two sizes of circles. I used a Basic Black Marker for the dots in the eyes and the little mouth. To assemble, I used the Fine Tip Glue Pen!
For the Cow, I used Blushing Bride, Basic Black and Whisper White cardstock scraps. I punched a two full Owl Body pieces in whisper white and a sliver of the body for the tail. I punched one owl body in Basic Black and four skinny rectangles for the legs. I used the 1″ Circle Punch to punch out the nose in Blushing Bride. First, I cut off the feet from both of the white owl bodies. I added the pink nose and used a Basic Black Marker for the dots in the eyes and the little nose holes. I cut off one of the little feet from the black owl body and added it to the cow face for a little hair. I used the Fine Tip Glue Pen for all of the little pieces. I cut off the other little black foot and added it to the white tail and connected it to the cow. I added the four legs in various lengths so it looked more 3D. I took the black owl body and cut odd shapes out of it to create the spots on the cow!
For the Zebra, I used Blushing Bride, Basic Black, Basic Gray, and Whisper White cardstock scraps. I punched a full Owl Body piece in Whisper White and Basic Gray. I took the white owl and cut off the ears and rounded off the head. I also slide the bottom portion into the 1″ Circle Punch to cut out the nose and cut off the feet. Then I attached this to the Basic Gray owl body. I cut off the gray feet as well. I punched out a 1-1/4″ Scallop Circle Punch in Basic Black and attached it to the back of the head! I punched out lots of slivers of the owl body in black to create the stripes. I used the Fine Tip Glue Pen for all of the little pieces. I used a Basic Black Marker for the nose holes and eyes. To finish it off as a girl Zebra, I punched out two hearts from the Owl Builder Punch in Blushing Bride. I overlapped the hearts to create the bow!
If you would like to see all of these in action, check out my Video Tutorial below or click here. I show you how to create those little slivers to use for the tails and zebra stripes as well! Be sure to give it a thumbs up if you liked it and check out all the other Owl Punch Art Creations!
Let me know which one your favorite is in the comments below!!!
This card seems to scream fun, flirty, and Hawaiian. Is that a Hawaiian flower?? Either way I am in love with it and it’s PINK!!! I started this card off with a Melon Mambo card base. I layered a piece of Whisper White on top measuring 4-1/8″ x 5-3/8. Then I used some of the Perfectly Artistic Designer Series Paper (no longer available). You could always create some of your own paper like this with Sponge Daubers or the Watercolor Wash Stamp Set. This piece measures 4″ x 5-1/4″. I die cut the flowers from the Rose Garden Framelits. Of course, I used the Die Brush to help pop the image out of the framelits and pop all the paper out of the holes! I love that little tool! Check it out in action here! I used the Fine Tip Glue Pen to adhere the flowers to the card front and added a Rhinestone for a little bling!! For the greeting, I used the Rose Wonder Stamp Set (Bundle & Save 15%). I stamped the label in Basic Black and the greeting in Melon Mambo and then die cut it with the Rose Garden Framelits! I am in love with the Rose Wonder Bundle. The greetings, the flowers, the leaves…..I love it all!!! If you would like to see more samples, click here, here, and here!
Happy Tuesday!!! You know what that means! I have a fabulous technique to share with you today! It is super fabulous because it combines lots of things I love – flowers, bling, and sponge daubers!!! Woot Woot!
Look at this beauty!!! You can do this technique in any color you wish for that stunning look! Let’s get started!
To get started, you will need to take a piece of scrap Whisper White cardstock and run it through the Big Shot with the rose image from the Rose Garden Framelits. Once that is die cut, you can use the Die Brush to pop it out of the framelit, pop out all the little pieces and get all the little “hairs” off. Now using the leftover outline of the image as a template, place it on a piece of Whisper White measuring 4″ x 5-1/4″. You can place it on there half off or in any corner. It is all up to you. Then with a Sponge Dauber and your color choice, POUNCE the ink onto your card. You won’t want to rub or brush because it could make your template move. For this sample, I used Wild Wasabi for the leaves and Rose Red for the flower. Just add the color all around and stop at the breaking point of the leaves and flower. It is okay if some spots look darker than others. The variation in color really looks fabulous once it is all complete. Now that you are done adding color to the cardstock, I then took the Wink of Stella Brush and added glitter to the entire rose.
Then you can add the die cut rose. I used the Fine Tip Glue Pen to adhere the rose on. This is the perfect glue!! Now you can add any greeting that you would like. I really think this card is perfect for all occasions! I used the Rose Wonder Stamp Set (Bundle & Save 15%). I stamped the frame and greeting in Basic Black and die cut it with the Rose Garden Framelits! I added it to the card front with Stampin’ Dimensionals. Love it!!!
If you would like to see this in action, check out my Video Tutorial below or click here! Don’t forget to give it a thumbs up if you liked it!!!
What color would you make your rose??? I think I want to do a Melon Mambo one next or maybe Elegant Eggplant!!!
This wedding invitation is all about elegance and shine! It is just stunning in person when you can see the beauty of the Silver Foil Paper and Silver Glimmer Paper!
This invitation was very basic to create. I did all of the printing on Smoky Slate Cardstock – Invitation, RSVP, Reception Card and Belly Band. I layered the Invitation, Reception Card and Belly Band onto Silver Foil Paper! For the Belly Band, I cut Silver Glimmer Paper into 1-1/2 strips. I actually cut one strip of 1-1/2″ x 12″ and then rotated 90 degrees and cut the rest of the 1-1/2″ strips. Those strips measure 1-1/2″ x 10-1/2″. This way you are using every little piece of the Glimmer Paper! TIP: the glimmer paper goes together best with a hot glue gun!
Unfortunately I don’t have any tips for containing the glittery mess. I did use the Simply Score Tool to score the belly band and make the folds easier. After I was all finished, I rinsed this off with water to clean it up.
Here is a small glimpse of my craziness when I am creating wedding invitations. I probably count each piece of the Invitation 10 times before it is all boxed up. I count as I cut, adhere, finish, double check it’s perfect, and final time. There are many times in between each of those steps as well. I love it though. Weddings make me so happy! Share the love!!!