Making a Full Bow!!!

Posted on

Happy Tuesday!!! You all know that means I have a fun technique to share with you!!! Today, I’m making a full bow and showing you exactly how I did it!!! Check it out!!!

Koala Cutie, www.LaurasStampPad.com

For this card, I started with a Smoky Slate card base and stamped the little confetti stamp all over the background. By stamping it in Smoky Slate Ink, it just gives that perfect subtle background. All of the images on this card are from the Bonanza Buddies Stamp Set!! Next, I layered a piece of the Birthday Bonanza Designer Series Paper (3-1/2″ x 4-1/2″) onto So Saffron cardstock (3-3/4″ x 4-3/4″). I added these layers to the card front a little diagonal for some fun!

Making a Full Bow, www.LaurasStampPad.com

For the tag, I die cut it from the coordinating Bonanza Dies and stamped the greeting on the bottom in Terracotta Tile. I also stamped the balloon in the same color and added a little string in Momento Black. Then on scrap white, I stamped the koala in Smoky Slate and Memento Black ink. Again, I used the coordinating framelits die cut him out. Then, I added him to the card front with Stampin’ Dimensional for some texture making sure his hand was near the balloon string! Then I added the tag to the card base!

To finish it off, I created a fun little full bow to add to the top of the tag and added some sequins all around. Check out the video below to see how I tied the ribbon. The ribbon and sequins are from the Sale-A-Bration brochure but they are no longer available. I still wanted to share this card for those of you who do have this beautiful ribbon. You could always use any style of ribbon/twine.

Party Surprise,  www.LaurasStampPad.com

For the inside of the card, I added some balloons and confetti in Terracotta Tile. For the balloons, I inked it up once and stamped all 3 balloons to get that variation in color. It’s the perfect coordination!

To this this all in action on making a full bow, check out the video tutorial here. Be sure to give the video a thumbs up if you liked it and don’t forget to subscribe if you are new. If you would like a notification when I post a new video, be sure to click the bell right next to the subscribe!!!

To see more samples using the Birthday Bonanza Suite, click here, here, and here!

Happy Stampin’

~Laura

Product List


Thoughtful Blooms!!!

Posted on

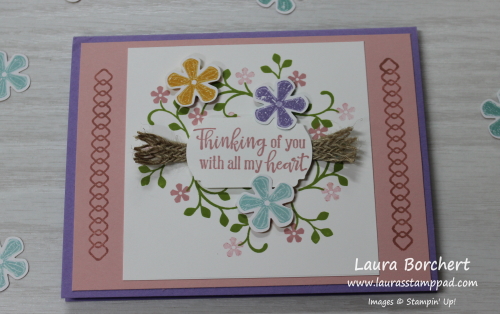
Happy Tuesday, everyone!!! We are going to make this beautiful thoughtful blooms card using Sale-A-Bration products! The Thoughtful Blooms Stamp Set ($50 level) and coordinating punch ($100 level) as well as the Pleased As Punch Designer Series Paper in the Sale-A-Bration Coordination.

Thoughtful Blooms, www.LaurasStampPad.com

I’m loving these spring pastels! They are the perfect pop of color I need during these cloudy cold winter months! 🙂 The texture and dimension on this card really brings it to life too! It’s so fabulous!

I used the Stamparatus for the lines on either side which I also did on the inside to match! The Stamparatus took all the guess work and hoping and praying out of it for me. I knew that each one would be lined up perfectly!

Spring Pastels, www.LaurasStampPad.com

I love how the Pleased As Punch Designer Series Paper coordinates with these products too. It just makes everything more versatile!

Check out the supply list below to recreate this amazing card. I would love to stamp with you…..in person or virtually!

Join in and stamp with me while watching this video below or click here! Let’s make this thoughtful blooms card together! Be sure to give the video a thumbs up if you liked it and don’t forget to subscribe if you are new. If you would like a notification when I post a new video, be sure to click the bell right next to the subscribe!!!

Happy Stampin

~Laura

Product List

Kiss the Ink Pad!!!

Posted on

Today’s Technique Tuesday is all about inking up a stamp! This has come up a lot lately in my classes and I thought of a fabulous way to explain it so here it goes! Kiss the Ink Pad….don’t give it CPR!

Kiss the ink pad, www.LaurasStampPad.com

You will notice in the ink pad above that there are lighter spots all over. This happens when you press too hard with the stamp into the ink pad. Pressing harder does not give you more ink. In fact, it’s the exact opposite. It presses all the ink to the side and leaves you with very little ink on the stamp. So next time you are stamping, remember to lightly kiss the ink pad for nice full coverage ink color! No need to press on it like you are doing CPR!

Check out the full tutorial to just kiss the ink pad in the video below or click here! Be sure to give the video a thumbs up if you liked it and don’t forget to subscribe if you are new. If you would like a notification when I post a new video, be sure to click the bell right next to the subscribe!!!

Happy Stampin’

~Laura

Product List

Golden Honey One Sheet Wonder!!!

Posted on

Happy Tuesday!!! Today’s Technique Tuesday is the Golden Honey One Sheet Wonder!!! I know how much you all love One Sheet Wonders so I hope you enjoy this one too!!!

All 9 of these cards were created with 1 sheet of 12″ x 12″ Golden Honey Designer Series Paper!!! I used both sides of the paper so no struggle for which side to use!

The first cut was at 4″ creating a 4″ x 12″ strip which I then cut into 4″ x 4″ squares! This is the first 3 cards! I used the Peaceful Moments Stamp Set for all of the greetings!

Next, I cut a 2″ strip off. This creates a 2″ x 12″ piece that I then cut into 2″ x 4″ pieces. That first card was created by cutting the 2″ x 4″ into 2″ squares. I used Stampin’ Blends to color in the designer paper for even more variability. Coastal Cabana, Highland Heather, Whisper White, and Daffodil Delight were the colors I used on all of these cards!

Then, I cut a 5-1/4″ piece off which created a 5-1/4″ x 12″ piece. I cut this one into 4″ x 5-1/4″ and used it as backgrounds for my cards. Again, I colored in the flowers with Stampin’ Blends for some added flare!

The leftover strip is 3/4″ x 12″ and I cut it into 2 pieces to decorate the inside of the 2 cards! One strip is 4″ x 3/4″ and the other is 5-1/4″ x 3/4″. Perfect way to use up every bit of the paper!

Check out the full Golden Honey One Sheet Wonder tutorial in the video below or click here! Be sure to give the video a thumbs up if you liked it and don’t forget to subscribe if you are new. If you would like a notification when I post a new video, be sure to click the bell right next to the subscribe!!!

Happy Stampin’

~Laura

Product List
Up & Down Z Fold Card!!!

Posted on

Happy Tuesday!!! That means I have a fabulous technique to share with you today!!! Today’s Technique Tuesday is this fun Up & Down Z Fold Card. I have shown horizontal Z folds before like this one! Check out this fun one!

Up & Down Z Fold Card, www.LaurasStampPad.com

You may think this is the cutest card ever by this first picture but check it out when you open it up!

Double Z Fold Birthday Card, www.LaurasStampPad.com

I just love all the bright colors and the adorable animals! It’s the perfect kid’s card…..or the kid at heart because I would LOVE to get this card! Don’t worry about not having a place to write your greeting because I have you covered on that as well!

Confetti Card Insert, www.LaurasStampPad.com

I added a piece of Whisper White onto the back of the card and stamped some confetti in the corners. It is inked up once and stamped all three times for that ombre look! I also have to give a major shout out to Margo Richardson for this card idea! I just loved it so much and had to recreate it!

Lion, Koala, & Toucan, www.LaurasStampPad.com

Check out the full tutorial of this up and down z fold card in the video below or click here! Be sure to give the video a thumbs up if you liked it and don’t forget to subscribe if you are new. If you would like a notification when I post a new video, be sure to click the bell right next to the subscribe!!!

Happy Stampin’

~Laura

Product List

Straight Shooting Arrows!!!

Posted on

Happy Tuesday!!! That means I have another technique to share with you!!! This Straight Shooting Arrows card is perfect for Valentine’s Day or an Anniversary!

Straight Shooting Arrows, www.LaurasStampPad.com

The soft Flirty Flamingo and White in this card make it super sweet! I love it. The pretty hearts and arrows would even make it a fun baby card too!!!

Thanks to the Stamparatus this card is a breeze to create those perfectly spaced shooting arrows. That takes all of the stress out of the card which is awesome!

Happy Valentine's Day, www.LaurasStampPad.com

Using the Take Your Pick Tool to work with the Faceted Gems makes this super easy too!!! I love having crafting tools to make creating fun and simple! Check out the supply list below to get these fabulous items in your craft room! Don’t forget that it is Sale-A-Bration time. Every $50 in product, earns you a FREE Sale-A-Bration item. Who doesn’t love free stuff?!?!?!

Check out the full tutorial of this straight shooting arrows card in the video below or click here! Be sure to give the video a thumbs up if you liked it and don’t forget to subscribe if you are new. If you would like a notification when I post a new video, be sure to click the bell right next to the subscribe!!!

Happy Stampin’

~Laura

Product List

Love This Fun Fold???

Posted on

Happy Tuesday!!! Technique Tuesday is back!!!! I’m sharing this Fun Fold Valentine’s Day card for you to recreate in time to give out this Valentine’s Day!

Fun Fold Valentine's Day Card, www.LaurasStampPad.com

I am loving these colors together – Flirty Flamingo and Real Red. They are soft and sweet! All of these products are in the From My Heart Suite in the new Mini 2020 Catalog!

From My Heart to Yours, www.LaurasStampPad.com

Opening the card from the left and the right makes it super fun and creates a major WOW effect!!! You can always use any greeting you would like on the inside – Valentine’s Day, Anniversary, Love, Just Because!

Heart Doilies, www.LaurasStampPad.com

I used red doilies on this card and the pack comes with pink ones too. Check out this project to use those!

Check out the full tutorial for this Fun Fold Valentine’s Day Card in the video below or click here! Be sure to give the video a thumbs up if you liked it and don’t forget to subscribe if you are new. If you would like a notification when I post a new video, be sure to click the bell right next to the subscribe!!!

Happy Stampin’

~Laura

Product List

White Washing!!!

Posted on

Happy Wednesday…..but sort of like a Tuesday! Since the launch of the Year End Closeout was yesterday, I posted about all of that so you didn’t miss out! So that means today I’m sharing the fun Technique “Tuesday”. It is all about White Washing!!!

White Washing, www.LaurasStampPad.com

How fabulous is this magnolia from the Good Morning Magnolia Stamp Set?!?!?! Beautiful! I am loving it so much! I had fun with different color combinations and variations of the White Washing Technique. Simply White Washing like the one above….or adding color like this one!!

Adding Color to White Washing, www.LaurasStampPad.com

Simply adding a little color with a Sponge Dauber takes this technique to a whole new level! I love it so much! Then I thought I would try it on green so that the leaves are already green and I would just do the flower! Here’s that look!

Good Morning Magnolia, www.LaurasStampPad.com

Which one is your favorite?? Let me know in the comments below! Also, if you would like to recreate these fun cards, check out the supply list below!

Check out the full tutorial of this White Washing Technique in the video below or click here! Be sure to give the video a thumbs up if you liked it and don’t forget to subscribe if you are new. If you would like a notification when I post a new video, be sure to click the bell right next to the subscribe!!!

Happy Stampin’

~Laura

Product List

Technique Tuesday: Simple & Snowy!!!

Posted on

Happy Tuesday!!! You know that means I have a fabulous technique to share with you!!! These gift card holders are simple and snowy and just perfect to spruce up any gift card!!! They are so simple to create that you will want to give gift cards to everyone this year. PS: You can give a Stampin’ Up Gift Card too! Ask me how!

simple & snowy, www.LaurasStampPad.com

Aren’t these adorable?? I got the idea for these from the amazing Terri Gaines!!! I love swapping ideas with fellow stampers. This little gift card idea was shared at the event I attended over the summer!

Snowman Gift Card Holder, www.LaurasStampPad.com

Decorate the front all simple & snowy as well as the side card for the perfect look! You could always write on the inside too since it is all hidden down in the sleeve!

Cup of Cheer, www.LaurasStampPad.com

All of the details for making these is in the Video Tutorial below but I will share the dimensions here as well.
The Designer Series Paper (or Navy piece) measures 2″ x 8-1/2″ and is scored at 4-1/4″.
Then the belly band measures 2-3/4″ x 5-3/8″ and is scored at 1-1/2″ from both ends.
The card insert measures 2-1/8″ x 3-1/8″.

The ribbon is 12″ long!

Check out the full tutorial of this simple & snowy gift card holders in the video below or click here! Be sure to give the video a thumbs up if you liked it and don’t forget to subscribe if you are new. If you would like a notification when I post a new video, be sure to click the bell right next to the subscribe!!!

Happy Stampin’

~Laura

Product List

Layering Label Dies!!!

Posted on

Happy Tuesday!!! You all know what that means!!! I have a fabulous technique to share with you today! I’m going to show you how Layering Label Dies really takes a greeting or focal point up a notch! Check this out!

Layering Label Dies, www.LaurasStampPad.com

This card is fairly quick and simple and yet still has that wonderful WOW factor! I used the Christmastime is Here Suite!!! So fun and less time consuming than coloring the giant roses like this card!

Check out these entire tutorial of this card and the layering label dies technique in the video below or click here! Be sure to give the video a thumbs up if you liked it and don’t forget to subscribe if you are new. If you would like a notification when I post a new video, be sure to click the bell right next to the subscribe!!!

To recreate this card, click on the supplies listed below! Also, don’t forget that when you spend $75 or more in the month of November you will earn the To Every Season Stamp Set for FREE!!! This offer is exclusive through me! No code necessary, just enjoy shopping!

Happy Stampin’

~Laura

Product List