More Birthday Basics Designer Series Paper!!!

Posted on

So yesterday I was telling you how amazing the Birthday Basics DSP is because it is bright and cheery on one side and elegant and beautiful on there other! Check out the samples from yesterday here! And here are some more amazing ones….

Ribbon Ripple on Birthday Basics DSP, www.LaurasStampPad.com

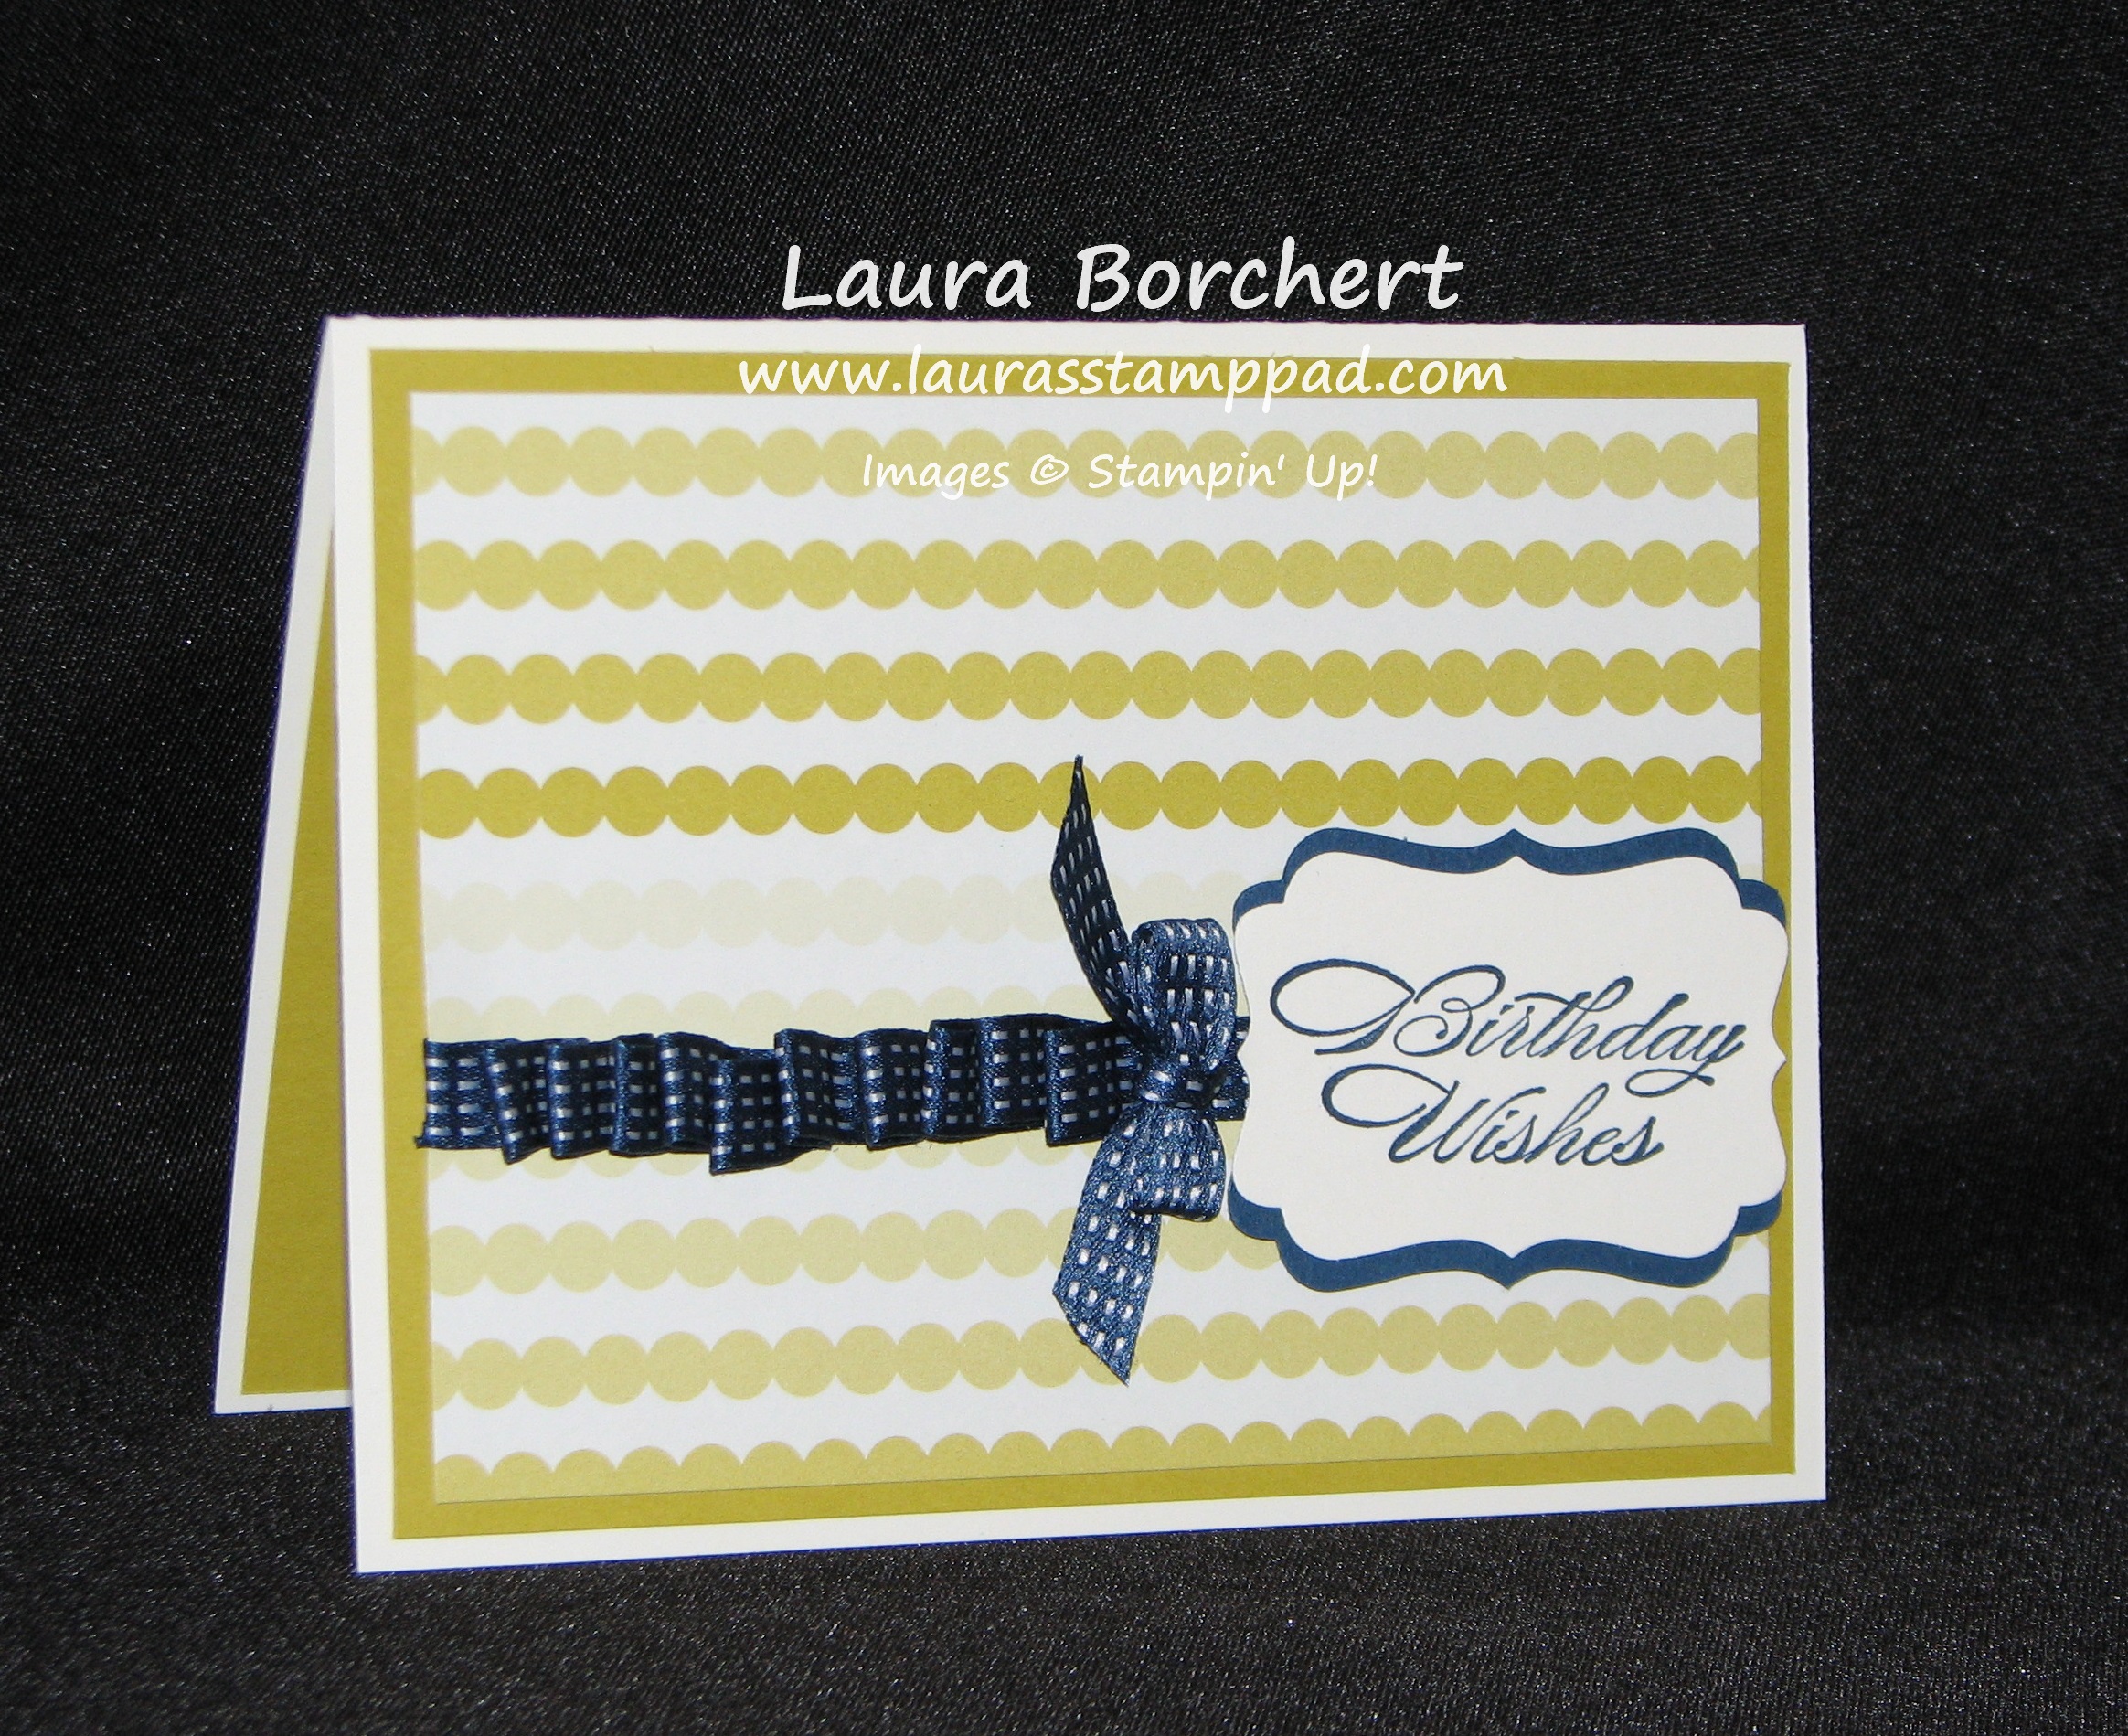
This piece of the Birthday Basics DSP is Summer Starfruit in this amazing ombre look! I then added some Midnight Muse Stitched Satin Ribbon to it by adding a line of Sticky Strip and then sticking the ribbon to it (just a little bit), loop it, then press into the sticky, loop, press, loop press until you are at the end! Don’t worry if you don’t get it the first time, you can always pull it off and start again! While sticky strip is amazing for the strong hold, since the ribbon is kind of slick it comes off without ripping like paper!!! I then used my Decorative Label Punch and Bring on the Cake Stamp Set for the ribbon. Super simple card but a wonderful look!

Ruffled Ribbon Edge, www.LaurasStampPad.com

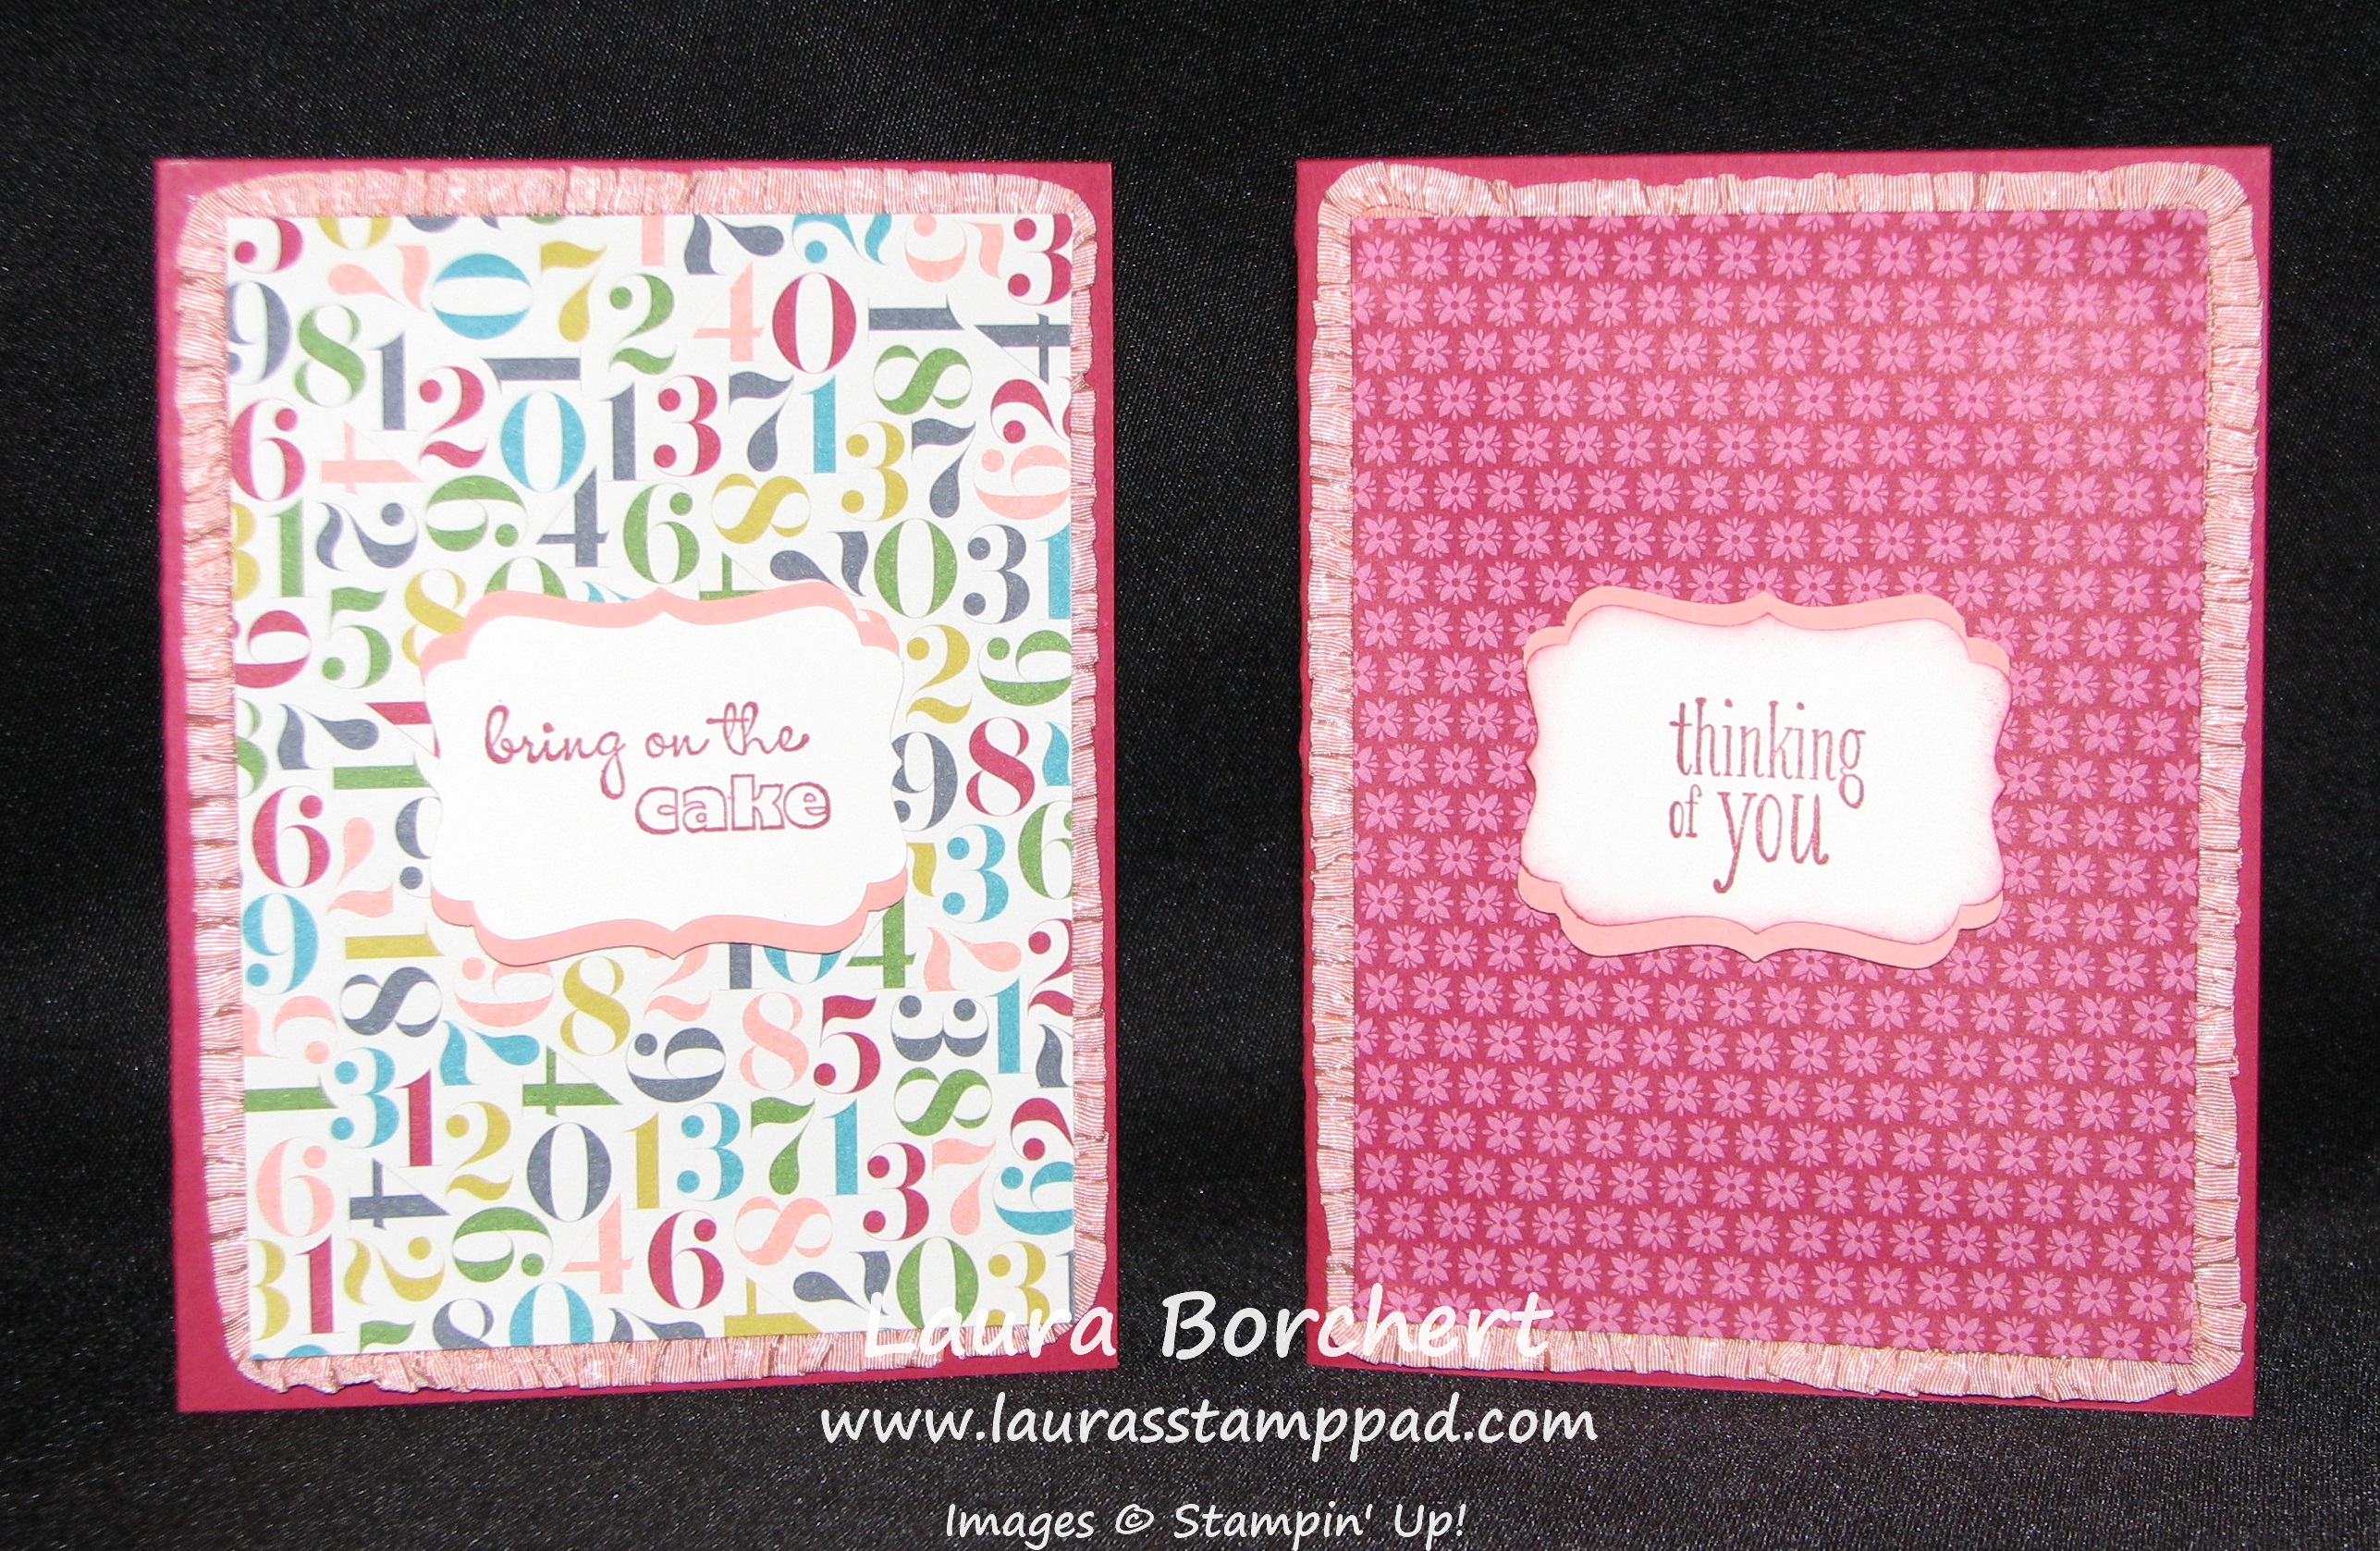
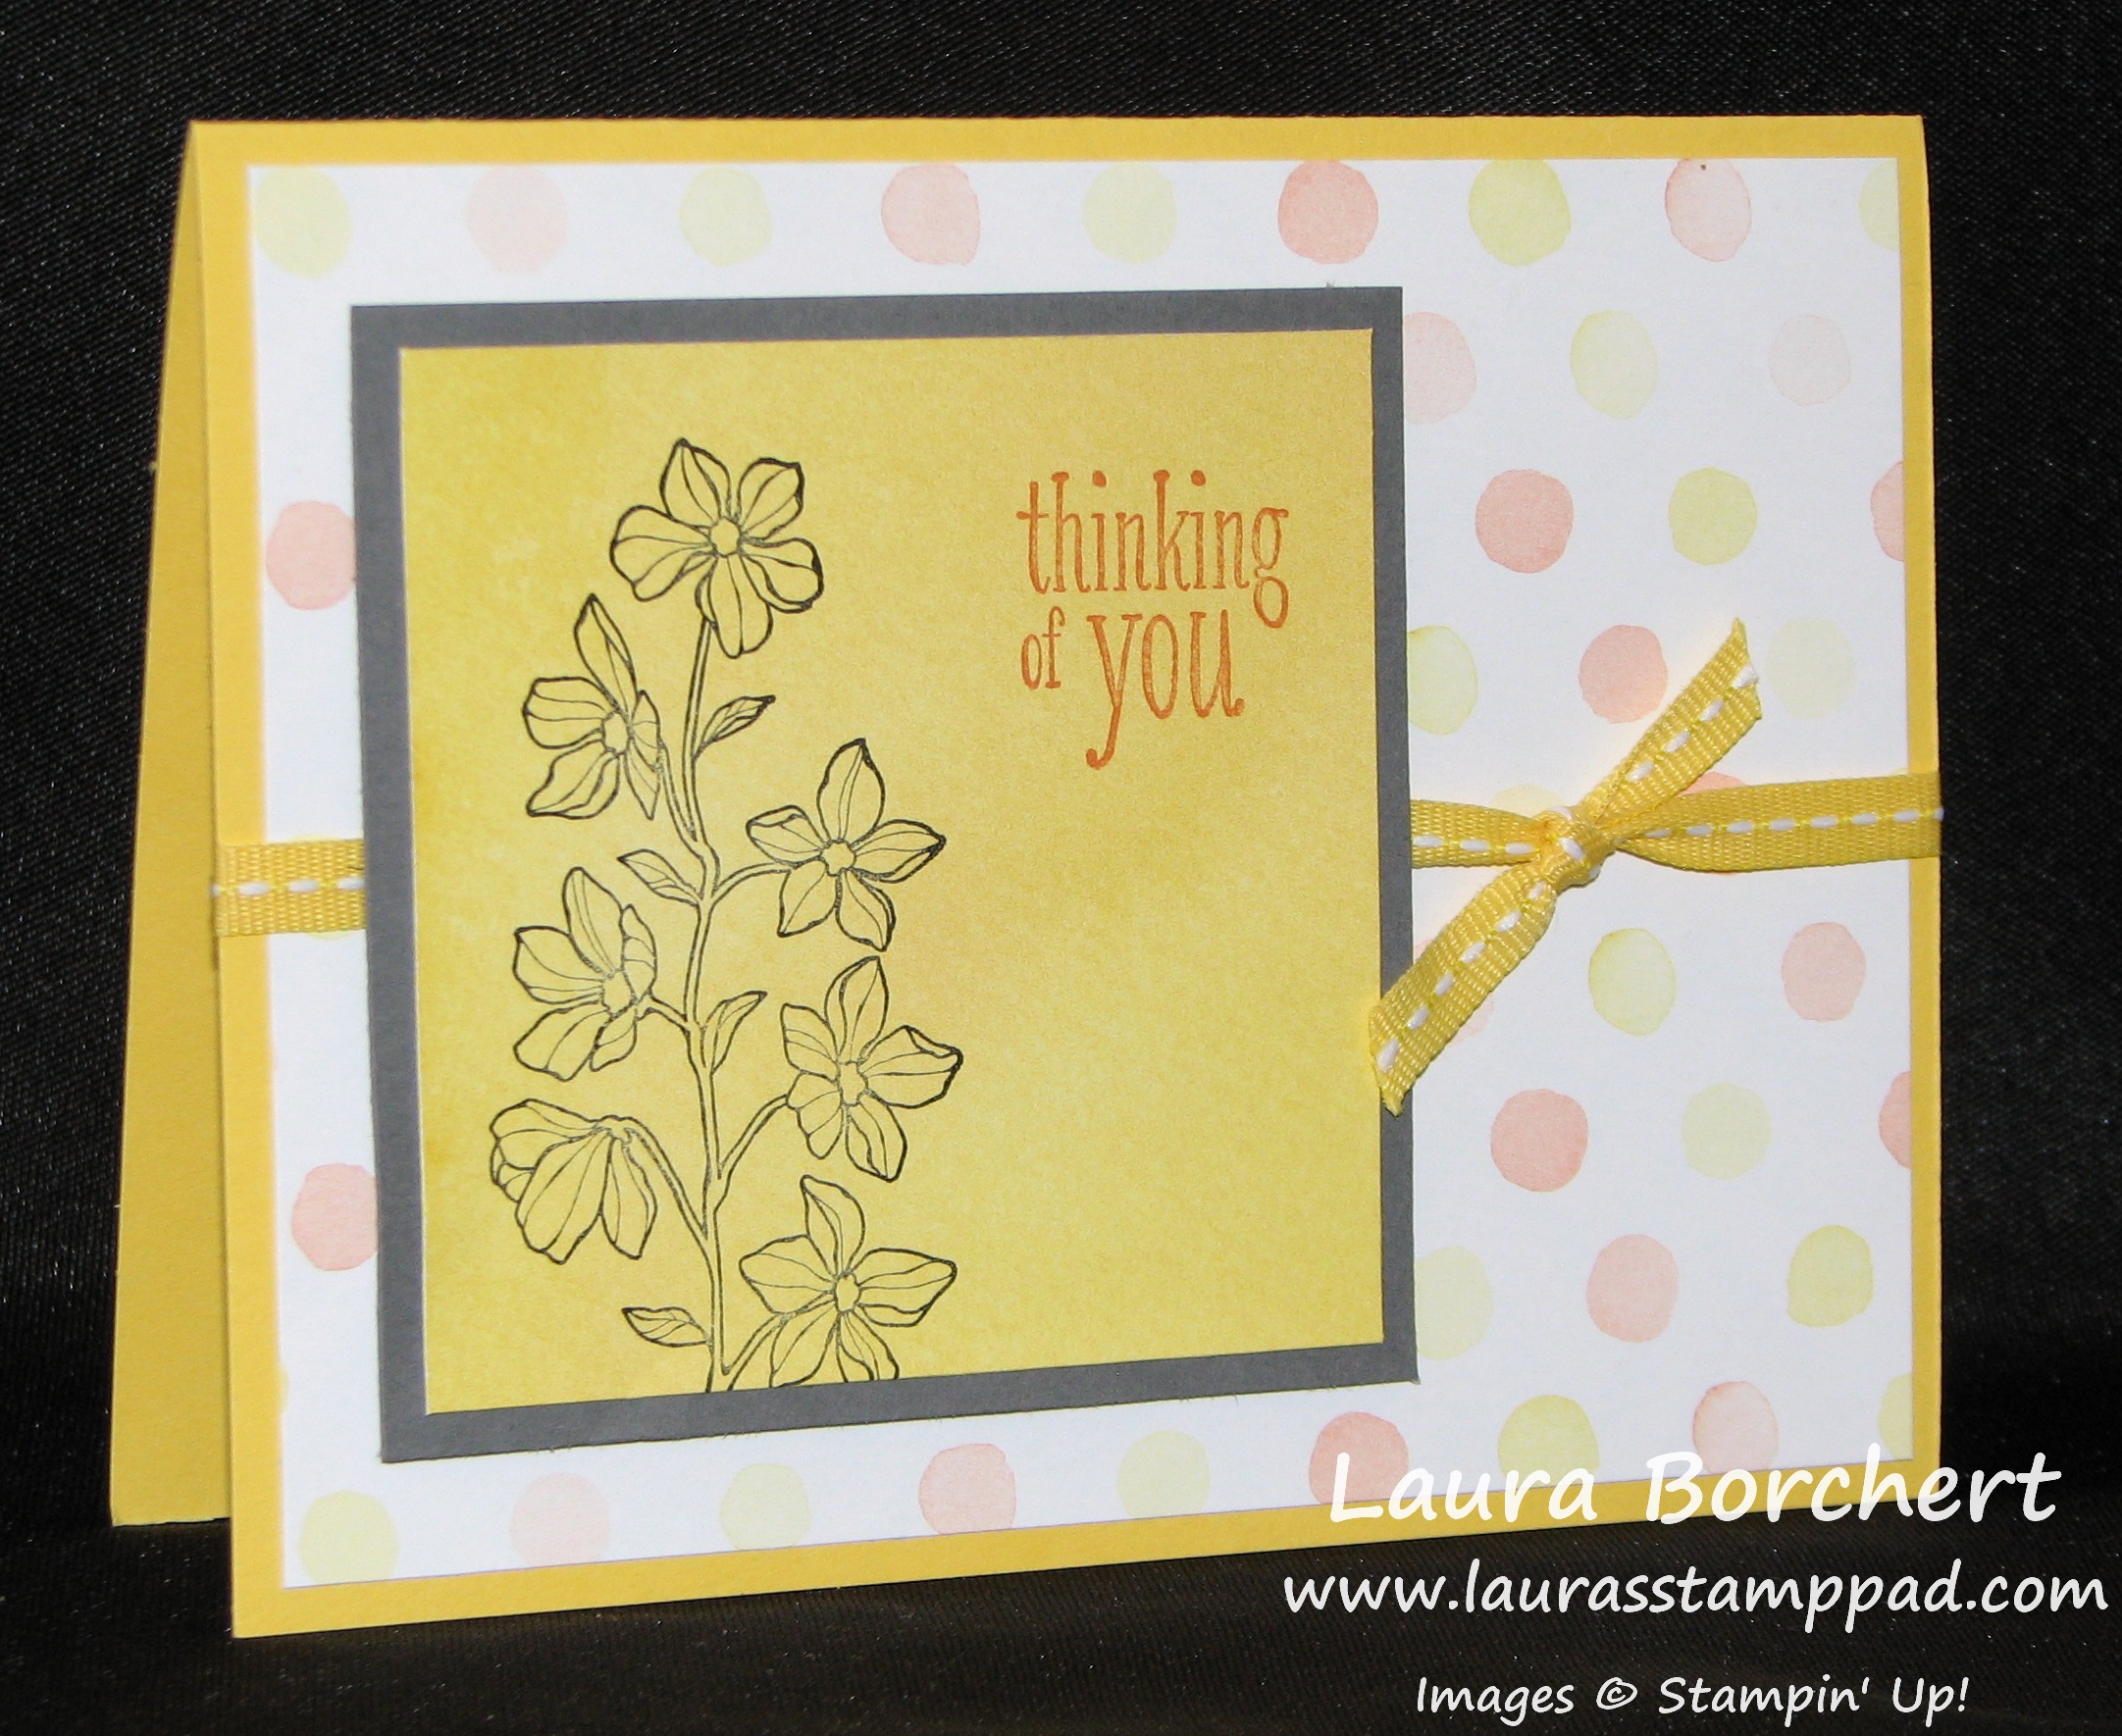
Here I used both a fun side and elegant side to make this style of card! See how amazing it is for a Birthday card but also as a Thinking of You card! I added the Ruffled Ribbon all along the edges of the DSP for a layered ruffly look! Again, I used my Decorative Label Punch for both greetings and Bring on the Cake (left side) and Peaceful Petals (right side).

I hope you have enjoyed all of these samples using your ribbon and Birthday Basics Designer Series Paper! You could always use the style of these cards with any type of DSP! Also, don’t forget that many of the items used for these samples are retiring so get them before they are gone – Bring on the Cake :(, Birthday Basics DSP, Ruffled Ribbon, 2012-2014 In-Colors, Stitched Satin Ribbon!

Happy Stampin’

~Laura


Peaceful Petals and Watercolor!!!

Posted on

Peaceful Petals Watercolor, www.LaurasStampPad.com

I LOVE this stamp set….I mean it has flowers in it so of course I do! Peaceful Petals is lots of fun for stamping, coloring in, watercoloring, and so much more! For this amazing card, I stamped the image on Watercolor Paper and then using my Blender Pens, I added Coastal Cabana and Bermuda Bay ink to make that gorgeous flower! I love the color scheme too so this card is filed in the fabulous card file for sure! Another favorite technique I like to do is layer a bright color with black and white. The contrast really makes it POP and I love it! For the ribbon, I tried something new. I laid the Daffodil Delight Seam Binding on my cardstock and layered Bermuda Bay 1/8″ Taffeta Ribbon on top of it (adhering the ends to the back). Then I took 2 pieces (one of each) about 5 inches long and tied them together around the layered pieces. I haven’t tried mixing my ribbons like that but I’m liking the look! What do you think? Leave me a comment below!

For more tips and tricks on watercolor and blender pens check out this post and this post and this one too!

Happy Stampin’

~Laura


How to Watercolor with Your Spritzers!!!

Posted on

Hello Hello!!! I hope everyone is having a wonderful week! It is Wednesday so we are half way to the weekend! 🙂 I wanted to share with you this fabulous way to get a watercolor look without a cup of water and a paintbrush! Some may call this faux watercoloring but most of the watercolor projects I do are faux!

Watercolor with Spritzers, www.LaurasStampPad.com

How beautiful is that? I think it is amazing! This is one of the flower stamps from Peaceful Petals in the Occasions Mini Catalog! Love it!!!! What you will do is color the stamp with your markers using the thicker tip (that way you get pink flowers and green stems). Then you will take one of your Spritzers filled with water and spritz it.

Watercolor with Spritzers, www.LaurasStampPad.com

Now here is the tricky part where each one comes out different. I recommend spritzing 1 or 2 times and not real close to the stamp so that only the little mist of the spritz hits the stamp. When you spritz more or less, close or far away, each time you will get a different look. Then I stamp the image down onto Watercolor Paper! Again you can either hold it for a mini second and then lift or you can hold it for 10 seconds and let the color run into the watercolor paper more. Another fun tip…..have 2 pieces of Watercolor Paper available and after you stamp the first time, stamp again. Sometimes it comes out better than the first one or lighter but still amazing, either way you just got 2 amazing images out of one coloring!!! WOOT WOOT!  In the photo above, I held it for a mini second and got that amazing image. Then I took lighter colors (Pink Pirouette & Pistachio Pudding) than the original colors (Melon Mambo and Garden Green) and colored in the flowers and stem. That one is my favorite!

Watercolor with Spritzers, www.LaurasStampPad.com

This one here was stamped and I held it for 10 seconds, letting the colors run more into the paper. As you can see the flowers are more solid (filled in) and I didn’t color those in. Some may like that look, other may not! It is all about the art of watercolor!!!

Did you notice that pink and green ribbon on these 2 cards? Where did that come from??? I COLORED IT!!! Check out this post on how to create amazing colored ribbon! I hope you enjoyed this watercolor idea and try it out yourself! For more tricks on watercoloring check out this post and this post! Let me know what you think in the comment down below!!!!

Don’t forget about the Stampin’ Up Retiring Products, My Anniversary Special and FREE SHIPPING going on this week!

Happy Stampin’

~Laura


Watercolor Wonder Designer Series Paper!!!

Posted on

Do you ever have a product that you just reach for EVERY SINGLE time you sit down to stamp??? It may be a ribbon or stamp set or Designer Series Paper (DSP). For me, right now, it is the amazing Watercolor Wonder DSP!!!! Oh my, I am loving this paper and I think I have gone through at least 3 packs of it and it’s only been out since January! You can find it in the Occasions Mini Catalog which will ends on June 1st so be sure to stock up now!!!

Peaceful Petals Watercolor Wonder DSP, www.LaurasStampPad.com

Isn’t that just amazing? Although I should have stamped the greeting in Basic Gray as well rather than Calypso Coral. I used my Peaceful Petals Stamp Set which has amazing flower images (Love) and two greetings – Thank You and Thinking of You – two super useful ones!!! The best part about this card is you can make multiples very quickly. First, you will take the sheet of paper that is Calypso Coral and Daffodil Delight and cut that into 3″ x 3″ squares. You get 16 from just one sheet! Then you will layer that onto a 3-1/4″ square of Basic Gray. I then took various other sheets for the DSP pack and cut 4″ x 5-1/4″ rectangles to layer onto Calypso Coral & Daffodil Delight card bases (5-1/2″ x 8-1/2″)

Peaceful Petals Watercolor Wonder DSP, www.LaurasStampPad.com

This one uses a different flower image from the Peaceful Petals Stamp Set and the Calypso Coral greeting shows up better on the yellow! Also, I added a little Daffodil Delight Stitched Ribbon!!!

Peaceful Petals Watercolor Wonder DSP, www.LaurasStampPad.com

This one uses yet another flower from the Peaceful Petals Stamp Set and I went for some Daffodil Delight Seam Binding. I love all of the different ways you can make this card out of the same supplies!!!! LOVE IT! Be sure to get your Watercolor Wonder Designer Series Paper TODAY by clicking here!!! Also, it will qualify for my Anniversary Special that I’m running this week! Check it out here!

Happy Stampin’

~Laura


Scallop Tag Topper Punch!!!

Posted on

The NEW Tag Topper Punches that are in the Occasions Mini Catalog are super cute and fun to use! There is the Scallop Tag Topper Punch and then Angled Tag Topper Punch!!! Here are a few samples using them to make tags….the obvious use! Check back tomorrow to see some super cool ways to use these AMAZING punches!

Tag Topper Bookmark, www.LaurasStampPad.com

Look how cute and simple this bookmark is! All you need is a 2″ wide piece of cardstock (it can be as long as you wish) and punch the top and decorate! I used the Corner Rounder Punch for my layers so it would match the rounded corners of the tag. I added some of my favorite Designer Series Paper – Watercolor Wonder!!!! (LOVE!) For the Ribbon top, I used some Calypso Coral Chevron Ribbon and rather than making a knot, I just took some Baker’s Twine and tied the ends! Super cute and knot (hehe) as bulky! This is super simple that you could make tons of them for Teacher Gifts, Bible Study Groups, as a gift with a Cookbook or together with a child or group of children!

Flower Tag Topper Punch, www.LaurasStampPad.com

Here is another fabulous project – this card has a stamped tag on the the front. I used more Watercolor Wonder DSP and my Peaceful Petals Stamp Set! I stamped the image in Calypso Coral and then added a little color on some petals with my Blender Pens. I cut out one of the flowers, added some leaves, and used Stampin’ Dimensionals to make it pop out!!! Love love love the colors of this one! Be sure to check back tomorrow for another fabulous way to use this punch! And remember this adorable card using this punch? I LOVE when one punch can do so many different things! It really gives you more bang for you buck!!!

Happy Stampin’

~Laura