The Retiring List is Out!!!

Posted on

Happy Monday!!! Let’s add some excitement to this Monday because the Stampin’ Up Retiring List is out!!! Each year in June, Stampin’ Up releases the new Annual Catalog. In order to make room for new stuff to keep current and fresh, they have to retire some products. Some of these may be your favorites and you are sad to see them go. Some of the products you might not even know it existed and now is your chance to snag some at a discount and others you might think…okay bye! Just remember that while we are sad to see some go, that just means more fabulous products are coming!!!

The Retiring List is Out, www.LaurasStampPad.com

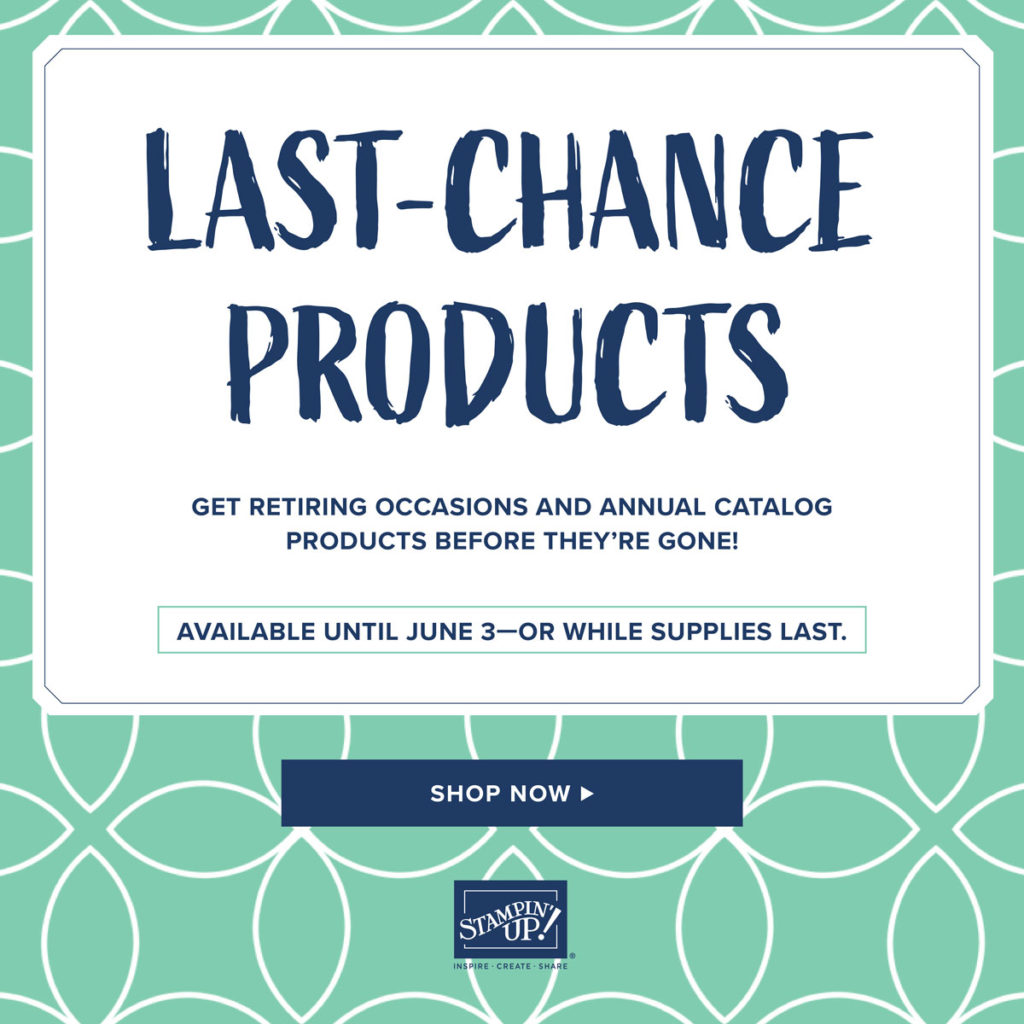
These items are while supplies last so don’t delay in ordering that item you have been eyeing or stocking up on those items you love. Click here to start shopping!!! Remember that if you order is over $75, you will earn Laura’s Free Stamp Set of the Month which is the Vibrant Vases Stamp Set!

If you would like to print the list, click the links below:

Annual Catalog Retiring List
Occasions Mini Catalog Retiring List

While it is sad to see some things go, just know that means there are even more fabulous new products coming out!!!

Happy Stampin’

~Laura


My Amazing Card!!!

Posted on

Have you ever created a card and thought oh my goodness this is AMAZING?? I sure hope you have because all card are amazing and made with love. I will admit I don’t have that OMG feeling with all cards though. This feeling comes about once a year or sometimes longer. My last most amazing card was this one in November 2016! I still have that card and admire it randomly. Well today I’m sharing another one of my amazing cards! This one just screams beauty at me and I LOVE IT!

My Amazing Card, www.LaurasStampPad.com

I hope you love it as much as I do but if not that’s okay too! The colors, the pattern and that little hint of bling do it for me!!!

I started with a Highland Heather card base and layered on a piece of Coastal Cabana measuring 4″ x 5-1/4″. Next, I took a piece of Whisper White (3-7/8″ x 5-1/8) and placed it in the Stamparatus. Using the Florentine Filigree Stamp Set and a Spectrum Pad, I created that amazing background! The colors for the Spectrum Pad are Gorgeous Grape, Highland Heather, Pool Party, Coastal Cabana, and Bermuda Bay. It is super easy to create because the Stamparatus does all of the work with spacing and stamping. Simply notch down the plate after each row.

Layering Circles, www.LaurasStampPad.com

TIP: The hardest part is probably making sure the ink pad is always stamping the correct color on the same end. Place the ink pad above the Stamparatus Plate after inking each time with the flat side of the ink pad on the left side.

Now for the focal point of those layered circles!!! Using the same Florentine Filigree Stamp Set, I stamped the circle image in Bermuda Bay and in Gorgeous Grape. I used the Layering Circles Framelits for the Bermuda Bay Circle and the 2″ Circle Punch for the Gorgeous Grape one. Next, I stamped the greeting in Bermuda Bay and slide the long skinny piece of Whisper White into the 1-1/4″ Circle Punch. That is how I got those slightly rounded ends. Then I added some of the Pool Party and Silver Baker’s Twine to the back securing with Stampin’ Dimensionals for texture. I finished off the card with a few Gingham Gala Adhesive Backed Sequins for some bling!

Isn’t it just fabulous??? What color combination would you use for your Spectrum Pad?? Let me know in the comments below because I have 2 left to ink up and I just can’t decide on the colors.

If you would like to see this all in action, check out the video below or click here! Be sure to give the video a thumbs up if you liked it and don’t forget to subscribe if you are new. If you would like a notification when I post a new video, be sure to click the bell right next to the subscribe!!!

Happy Stampin’

~Laura

Product List

Country Floral!!!

Posted on

This Country Floral Embossing Folder was one of the Sale-A-Bration items and that ended last week. If you earned it, try out this amazing card!!! If you didn’t earn it, don’t worry as it is coming back! Woot Woot!

Country Floral, www.LaurasStampPad.com

I went very basic as I feel like the embossing folder is just so stunning. Adding a little gold bling and some navy makes it POP! You could use silver and any other color as well. What colors would you use? Let me know in the comments below!

I started with a Very Vanilla card base. Next, I took another piece measuring 4-1/8″ x 5-3/8″ and embossed it with the Country Floral Embossing Folder. I went a tiny border from the embossed piece and the card base so it looked like it filled out the card front more. I don’t like actually embossing the card front of the card base because then it makes the inside all bumpy and the card base less secure in my opinion. After adding this piece to the card base, I tied some Gold Metallic Edge Ribbon around the card.

Welcome Baby, www.LaurasStampPad.com

For the greeting, I used Circle Punches and the Well Said Stamp Set from the Occasions Mini Catalog. I love this stamp set because it has lots of greetings for any occasion and it has a greeting for the inside of the card as well! Perfect! I stamped the greeting in Night of Navy Ink. To finish off the card, I added a few pearls for bling and texture!

This quick and simple card can be created with any style of embossing folder! It is great to have a few on hand and add a greeting as you need a card!

Happy Stampin’

~Laura

Product List

April 2019 Free Stamp Set of the Month!!!

Posted on

Happy Friday!!! It’s a new month so that means a new free stamp set!!! The April 2019 Free Stamp Set of the Month is….

April 2019 Free Stamp Set of the Month, www.LaurasStampPad.com

You all know how much I love flowers and of course this set has them! The other fabulous thing about this set is that it coordinates with the Vase Builder Punch that I know so many of you love and have!!!

The vases and flowers can be stamped alone or with the 2-step stamped image for a filled in color. If you notice in the images above, there is a solid image as well as a gray/shadow looking image. That gray image is the second stamp which can be used to stamp the same shade but perhaps stamped off once for a lighter look. It can also be stamped in a completely different color too! Coloring in the image with Stampin’ Blends, Watercolor Pencils, or Markers is another option too! I love it!!!

This offer is exclusively through me for any orders during the month of $75 or more before shipping and tax. This could be 1 order or 3 orders totaling that amount! The stamp set will come separate from your order if ordered online. Click here to start shopping!!!

Have a wonderful weekend and I’ll see you back here on Monday! Happy Stampin’

~Laura


It’s a Piece of Cake!!!

Posted on

Happy Tuesday!!! You know that means I have a fabulous technique to share with you! This one is a Piece of Cake….lol! It uses the Piece of Cake Stamp Set and coordinating Cake Builder Punch too! 🙂

Piece of Cake, www.LaurasStampPad.com

Look how fabulous this card is in each of the colors. It can be masculine or feminine!!! All you need is the card base and 2 pieces of Whisper White measuring 4″ x 5-1/4″. One is for the front of the card and the other is for the inside.

Wink of Stella Cake, www.LaurasStampPad.com

For the front, I stamped the greeting from the Piece of Cake Stamp Set all over the center of the cardstock. After inking up the image, I stamped 3 times before going back to the ink for that fun variation of color. It is super cool to get 3 different shades from 1 ink pad! Next, using the same color, I stamped the cake stand in the same ink onto the same cardstock color. For the sample above, that was Melon Mambo. The cake was then stamped in Melon Mambo Ink onto Powder Pink cardstock. Using the Cake Builder Punch, I punched out the images.

Purple Birthday Card, www.LaurasStampPad.com

One of the best ways to save paper with the dual punch is to cut long skinny strips. Using the Fine Tip Glue Pen, I added the cake stand to the card front. Before adding the cake, be sure to stamp the lollipops. Simply place the cake down on the plate, move it down a 1/4-1/2″ and then stamp the lollipops. Then I added the cake with Stampin’ Dimensionals. Using the cake as a guide really helps get the spacing correct.

Using the Fine Tip Glue Pen again, I added glue all over the drips of the cake and then poured Dazzling Diamonds over the top for a fun glittered look (Gorgeous Grape card). For the Melon Mambo card, I went the safe glitter route and used Wink of Stella!

Masculine Birthday Cake Card, www.LaurasStampPad.com

For a more masculine look, on the Bermuda Bay card, I just colored in the drips with the Fine Tip Glue Pen and let it dry for a nice glossy look! Which one is your favorite???

Cake Is the Answer, www.LaurasStampPad.com

A little decoration and fun on the inside of the card too!!!

If you would like to see this all in action, check out the video below or click here! Be sure to give the video a thumbs up if you liked it and don’t forget to subscribe if you are new. If you would like a notification when I post a new video, be sure to click the bell right next to the subscribe!!!

Happy Stampin’

~Laura

Product List

All NEW Laura’s Quick Kits!!!

Posted on

Happy Friday, everyone!!! Today, I’m super excited to roll out something new!!!! I am now offering Laura’s Quick Kits! These kits have all of the pre-cut cardstock and embellishments needed to create 6 total cards (2 each of 3 designs). The kits use current stamps and ink from the Occasions/Annual Catalog. Use the same stamps I used or substitute stamps for images you prefer!! Now those stamps and ink you have in your craft stash! So let’s get stamping!

All New Laura's Quick Kits, www.LaurasStampPad.com

You all know how much I am loving the Happiness Blooms Suite so of course my first Quick Kit is called Bloom By Bloom and features these 3 cards!!! BONUS: The Bloom By Bloom Stamp Set is the Free Stamp Set of the Month for orders of $75 or more (before tax and shipping). That means you can earn the stamp set for free and enjoy this kit!!!

What Are Laura’s Quick Kits? This kit comes with all of the pre-cut cardstock and embellishments to create the 3 cards shown above. The kit includes supplies for 6 total cards (2 each of the 3 designs). Envelopes are included! Also, everyone who purchases the kit will get access to a Private Quick Kits Video that shares the details for creating these cards! So it is like attending one of my classes but in the comfort of your home.

What supplies will I need for this kit? The main stamp set used was the Bloom By Bloom Stamp Set and a greeting stamp set of your choice. I used the Well Said & Incredible Like You Stamp Sets for my greetings. Next, you will need the following ink colors: Night of Navy, Lovely Lipstick, Call Me Clover, Grapefruit Grove, and Calypso Coral.

How Much is the Kit?  The Kit is $25, free shipping! All payments will be processed via Paypal! 

How Do I Order My Kit? Click here and it will take you to a Paypal Invoice for you to submit payment. You can purchase more than 1 of the kits too! Then after payment is received, your kit will go in the mail!

More kits will be coming soon! Leave me a comment below if you have a suggestion for the next stamp set I should use! Have a wonderful weekend and see you next Monday! Happy Stampin’

~Laura


Laura’s Quick Tips: Assemble Cling Stamps!!!

Posted on

Hello stampers!!! Today, I’m sharing another one of Laura’s Quick Tips!!! I had some customers the other day at class watch me assemble a stamp set and they were in awe. They said to do that again because it wasn’t how they did it and this was much easier. If they are asking, I’m sure all of you are wondering as well! Here we go…

Assemble Cling Stamps, www.LaurasStampPad.com

Time to get those stamp sets and assemble them so they are ready to go when you need a card quickly or when you want to just sit and play. In fact, put on a movie or your favorite show and work on a few stamp sets tonight! This quick and simple trick makes it go fast!

Peel off the sticker from the back of the rubber stamp. Next, peel off the sticker back from the sticker sheet. DO NOT PULL THE STICKER OFF. Leave the sticker on the sheet. Then starting with a detailed side of the stamp, place it down on the sticker, guiding it around to make sure it lines up perfectly. Be sure not to bend, squish, or force the stamp so that it lands on the sticker nice and smooth and flat! Now just pick up the stamp and you are golden!

For some stamps, especially small ones, the sticker wants to come off the sheet once you pull off one side. Try your best to keep the sticker on the sheet. As long as 1 side of the backing is removed, place the stamp down like I mentioned above. It will stick to one side and the label is on the other side. That is okay and at least we know that it is secure and correct one half of the stamp. Now simply hold the sticker back and peel off the other side of the sticker. Now lay the stamp down and press over the top to secure that second half. This may sound confusing so I did a video tutorial below!

I hope you find this useful and enjoy getting all of your stamps ready to go for your next project. Let me know in the comments below if you liked this tip and if you are enjoying Laura’s Quick Tips. If you have a question that you would like answered, just ask and I will do my best to share the answer in the next episode of Laura’s Quick Tips!

To see this all in action, check out the video below or click here! Be sure to give the video a thumbs up if you liked it and don’t forget to subscribe if you are new. If you would like a notification when I post a new video, be sure to click the bell right next to the subscribe!!!

Happy Stampin’

~Laura


Celebrating Happiness!!!

Posted on

Today, we shall be celebrating happiness! It is Wednesday after all and the week is half over. That is not all though, there are so many things to celebrate that make us happy! Remember all the good things in life and don’t dwell on the things we can’t change or the tough things you are going through. Celebrate Happiness!!!

Celebrating Happiness, www.LaurasStampPad.com

I am loving this card and not just because it has a flower on it. I love the bright colors and all of the textures!! This card also uses the Free Stamp Set of the Month for March – Bloom By Bloom!!! All orders of $75 or more (before tax and shipping) earn this set for FREE! Click here to start shopping!

I started with a Lovely Lipstick card base and stamped the flower from the Bloom By Bloom Stamp Set all over. Using Lovely Lipstick Ink, it gives a nice watermark or tone on tone look. Be sure to fall off the cardstock so the pattern looks continuous. Next, I took a piece of the Happiness Blooms Designer Series Paper (2″ x 4″) and punched it with the Banner Triple Punch. I added it to the card front flush with the left side.

Next, I took a piece of Whisper White cardstock and stamped the flower on it. Be sure to stamp the flower first and then the stem. This will ensure that the stem isn’t too high or too far over for the bloom to fit. The bloom was stamped in Lovely Lipstick and the stem in Call Me Clover. I added the greeting in the lower right corner from the Well Said Stamp Set. It was stamped in Night of Navy.

Well Said, www.LaurasStampPad.com

I love the Well Said Stamp Set because it has perfect inside and outside greetings! I added a message on the inside as well as a little flower!

Back to the front focal point! After stamping, I layered this onto another piece of the Happiness Blooms Designer Series Paper. Taking a piece of the Calypso Coral Satin Ribbon folded in half, I laid it across the banner on the card front. The Stampin’ Dimensionals on the stamped flower layer secure this ribbon loop in place just perfectly!! To finish off the card, I added some Enamel Shapes to the flower for texture! Just perfect!

If you would like to recreate this card, click on the supply list below! Don’t forget that if your order is over $75 (before shipping and tax), you will get the Bloom By Bloom Stamp Set for FREE from me!

Another fabulous offer…..I am starting Laura’s Quick Kits which are card kits with all the pre-cut cardstock and embellishments provided. All you need to do is stamp and assemble. The stamps, ink, and adhesive are not provided. Click here to get your first Laura’s Quick Kits – Bloom By Bloom!

Happy Stampin’

~Laura

Product List

Double Z Fold Candy Card!!!

Posted on

Happy Tuesday!! You all know that means I have a fabulous technique for you! With Easter around the corner, let’s bring on ALL THE CANDY!!! Easter is my favorite holiday and Easter candy is AMAZING! Jelly Beans, Peeps, and Reese’s Eggs are just a few of my favorites. What is your favorite! Okay back to this fabulous technique of a Double Z Fold Candy Card!!!

Double Z Fold Candy Card, www.LaurasStampPad.com

Isn’t it beautiful???? I am loving the fun colors. Hello, Lisa Frank! Am I right? Eeee It just makes me so happy. This card uses all the goodies in the How Sweet It Is Suite!

First, I started with a Coastal Cabana card base measuring 4-1/4″ x 11. That is right, this is a regular card size! Simply fold in half like you normally would for a card and then fold that front piece back (in half) to create your first Z. You can also score it if you wish at 2-3/4″ and 5-1/2″. I added a piece of the How Sweet It Is Designer Series Paper the the inside of the card (stripes ~ 4″ x 5-1/4″) and another piece to the left side front flap (polka dots ~ 4″ x 2-1/2″).

Birthday Treats, www.LaurasStampPad.com

Now for that second Z on our card, I used Gorgeous Grape (3″ x 9″) and scored it at 3″ and 6″. This creates three 3″ squares. Fold it to create a Z and add adhesive to the back square making sure the next square is on the left side. Place it down on the striped paper. Next, place the top Z on the polka dotted paper with the card all folded and laying flat. Place your fingers at the edge of the purple 3″ square as a guide to know how much adhesive you will need for that flap (video explains better). Lift the 3″ purple square and add adhesive to the polka dots. It is typically 2 lines of Snail Adhesive. Once your adhesive is down, place the Z over it by pressing flat. Don’t hold the card up to connect it or it might not close flat.

Candy Jar Die Cuts, www.LaurasStampPad.com

Now it is time to decorate!!! Using the Jar of Sweets Framelits, I die cut out the candy jars from the How Sweet It Is Stamp Set. I love that these coordinate and line up perfectly. I also die cut the candy pieces with the framelits. Using the Sweetest Thing Stamp Set, I stamped the greetings to coordinate. Don’t forget you can bundle and save 10% when you get the stamps and framelits together! The Whisper White layers measure 2-3/4″ x 2-3/4″! Just have fun with all the possibilities!!!

Birthday Z Fold Card, www.LaurasStampPad.com

If you would like to see this all in action, check out the video below or click here! Be sure to give the video a thumbs up if you liked it and don’t forget to subscribe if you are new. If you would like a notification when I post a new video, be sure to click the bell right next to the subscribe!!!

Happy Stampin’

~Laura

Product List

A Friend Is Thinking Of You!!!

Posted on

Happy Monday!!! I hope you are ready to tackle the week. Sometimes Monday can seem like a fresh start, back on routine from the chaos of a weekend, and I’ve got a superwomen attitude! Then there are the weeks that I’m ready to crash from a busy weekend, my to-do list for the week isn’t created so I wander around wondering what to work on first. Those are the days that a simple smile from a stranger at the grocery store, a random text from a friend, or happy mail in the mailbox mean the most!!! Everything is quickly turned around and superwomen comes back! So today, I just want to say, “A friend is thinking of you and you got this!!!”

A Friend is Thinking of You, www.LaurasStampPad.com

This is a quick and simple card that can be created in any color scheme and with any designer series paper. Perfect to create and have some on hand all the time!

I started with a Highland Heather card base and added a strip of the Sale-A-Bration Botanical Butterflies Designer Series Paper (2″ x 5-1/4″). Next, I took a piece of Whisper White and stamped the adorable huggers in Gorgeous Grape Ink. This is from the Artfully Aware Stamp Set in the Occasions Mini Catalog!! I love the images and greetings in this set as they are so heartwarming and perfect!

Then I layered this piece onto a layer of Gorgeous Grape. The greeting in the corner was stamped from the Part of My Story Sale-A-Bration Stamp Set in Gorgeous Grape Ink. Before adding the focal point, I laid down a strip of the Flax Ribbon. The Stampin’ Dimensionals on the back of the focal point help to hold the ribbon in place!

Part of My Story, www.LaurasStampPad.com

Here is another similar version. I created this one portrait rather than landscape and I left off the ribbon. The card uses a different image and greeting but again using the same stamp sets! For this card, I colored in the image using Stampin’ Blends. I did use some of the Gingham Gala Sequins on both for a little extra flare.

Which one is your favorite??? If you want to recreate these cards, click the supply list below and remember there are only a few days of Sale-A-Bration left!! Every $50 in orders earns you a FREE item!

Happy Stampin’

~Laura

Product List