The Calming Camellia Stamp Set is an exclusive stamp set during Sale-A-Bration for orders of $350 or more. This can be a single order or a few orders gathered together!
This card is super simple but does require a lot of die cutting! This card uses the Scallop Contour Dies and I am LOVING those lately! The little detailed scallop for each one makes it super fun to layer. I die cut 4 scallops for this card – 3 for the front and 1 for the inside!
You could mix up the colors or go for a monochromatic look like I did! I used Melon Mambo and Blushing Bride cardstock. The ink is Melon Mambo!
On the inside, I stamped some more fun but I will say that it makes the area for the greeting rather small. When I created this card on video, I actually stamped the curly cues on the Basic White card base rather than the scalloped die cut and I LOVE that look. You can check out the video tutorial here!
You have less than 2 weeks left to get this beautiful Calming Camellia Stamp Set so you can recreate this card! Click the supplies used below to get started! What color would you use?!?!?
February is the 3rd month of my New Online Class option for those of you to stamp with me near and far! I LOVE IT!!! It’s been so much fun thus far and I am giddy excited about what I have planned for the upcoming months! For February, I have the Heart & Home Online Class and here is a sneak peak!
This is my favorite card in the February Class! There is just something about that blue and white pattern that I LOVE!!!! I also love those antique blue and white dishes. It’s just classic and stunning! My other favorite part about this card is the greeting! I inked up the flower image and then stamped off twice and then stamped it over the greeting! It’s subtle and amazing! I love it!
The inside greeting for this card from the Blessings of Home Stamp Set melts my heart! I LOVE LOVE LOVE IT!!! This year I have really tried to make a point in telling people I love their shirt or I enjoyed our visit or you really mean a lot to me. This card is perfect!!! I urge you all to do the same. It makes other smile as well as makes you feel warm and fuzzy! (And right now with a winter storm coming for us, I need warm and fuzzy!)
I still have kits available for the February Heart & Home Online Class so sign up for your kit now so you can stamp along with me!!! You can also purchase the PDF Tutorial so you can cut all the pieces and stamp these SIX cards! That’s the other exciting thing about the February Class….I just couldn’t stop at 5 so there is a 6th bonus card!!! 🙂
Not sure you are into the kit this month, you can still join in the fun and watch me create these cards LIVE on Facebook (and then posted to YouTube) on Friday, February 11th at 7:30 p.m. CT!!! It’s free for anyone to join in and chat with me while I stamp and offer techniques and a fun evening!
I love all flowers of all colors! The more bright and vibrant the better. When it comes to stamping I try to mix it up and use different color or use a color I haven’t used in a while or one that I have an abundance of cardstock for! Here I used the Blossoms in Bloom Stamp Set to create some quick and fabulous floral cards for any occasion!
I went with a simple Gorgeous Grape card base and then cut 2 pieces of Basic White (4″ x 5-1/4″). One is for the front of the card and the other is for the inside of the card! Using the Stamparatus for the large floral image, I stamped it in Gorgeous Grape. It was super simple to do and any time I missed a spot with the ink pad, I could easily ink it back up and stamp it again. Gotta love the Stamparatus for the ability to do that!!!
Next, I filled in with all of the other colors and images. The center of the flowers were stamped in Mango Melody and the leaves in Pear Pizzazz Ink. Then the small flowers in between and all around are stamped in Highland Heather! Of course I wanted to coordinate the inside of the card so I stamped a few extra small flowers in there as well!
I think that this card is perfect for so many different occasions – Birthday, Thank You, Thinking of You, Wedding, etc. What occasion would you use this card for? Let me know in the comments below!
If you would like to recreate this card with flowers of all colors, click on the supplies listed below! Remember that all orders of $50 will earn a FREE Sale-A-Bration item!!! Woot Woot!
I’m all about the quick and simple cards lately. I just don’t have the time to craft and create like I did in the past. It makes me kind of sad but I also keep telling myself it’s just a season and soak up all the baby/toddler time I can. This Absolutely Amazing card is super uplifting and beautiful!
I created this card with the Color & Contour Stamp Set which I am super loving lately! Polished Pink & Basic Gray are the ink colors I used so it was minimal supplies that I had to get out! This card was also created on a Note Card & Envelope set! No cardstock cutting or anything! Ribbon is my go-to embellishment so of course I had to add some of that. You could also add some bling too! There are lots of ways to add to this card for a more detailed look or a simple one!
This card is a perfect one to send as #happymail any time. It could simply be to brighten someone’s day or you could even send it as a birthday card! I love sending #happymail! The impact of a handstamped card is amazing! With all the bills and junk mail that arrive daily, seeing that little envelope with your name on it and maybe even a decorated envelope is sure to brighten your day!
I wish I could send you all some happy mail because you are truly amazing and mean so much to me. You all fill my heart and soul with happiness and gratitude! Thank you for following me here on my blog, watching my Facebook Lives or YouTube videos, and interacting with me! I love the community I have built and feel like we are all family! THANK YOU!!!
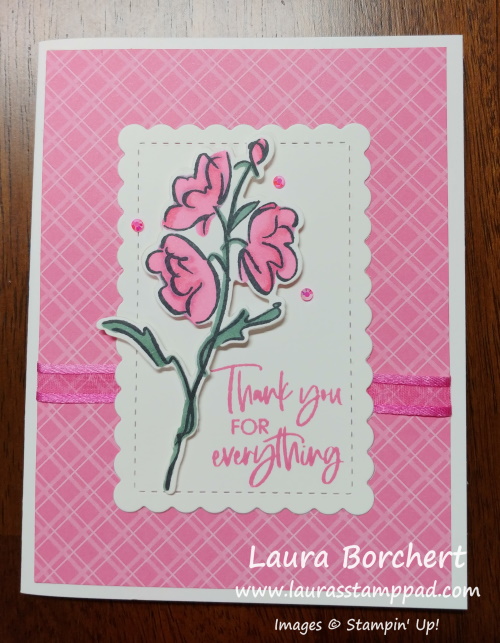
Pink is my favorite color and I just love flowers so this card makes me super happy! The Color & Contour Stamp Set has been on my desk a lot lately. This card could be made in every In Color with the supplies I used!!! Check out the list of items below so you can make some too!
I started with a Basic White thick cardstock base! When I create a card with the base of white or vanilla, I like to use the Thick Cardstock! Next, I took a piece of the In Color Designer Series Paper (4″ x 5-1/4″) and wrapped some Polished Pink Open Weave Ribbon around it. This ribbon comes in all 5 of the in colors! Adding just a small piece across the card front adds a little texture and fun to the card but no need for a bow and only uses a small amount!
For the focal point, I die cut one of the scallop rectangles from the coordinating Scalloped Contour Dies. LOVE THESE!!! The greeting was stamped in Polished Pink and then I added it to the card front!! The flower image was stamped in Memento Black Ink and colored with Stampin’ Blends! Then I die cut it out with the same Scalloped Contour Dies and added it to the label with Mini Stampin’ Dimensionals!
For the inside of the card, I added a little leftover strip of the designer paper to the left hand side. Then using the little dots of the Color & Contour Stamp Stamp Set, I stamped them in the right hand corner. To get a little variation of color, I inked it up and stamped 3 times, moving the stamp around a bit.
I love this Color & Contour Bundle so much because it’s super versatile. This card could be created in any color you like too! Check out the supplies listed below to see what I used! If you want them all, click ADD ALL TO CART for quick and simple shopping!
Sometimes I just get bored with a regular card. It’s like I need something new to mix it up and make it fun. This pocket style card is just that. Super cute and different from the traditional card. I love it and plan to make a lot more with this style!
The Smoky Slate card base measures 8-1/2 x 5-1/2 and I scored it at 2″ from one side and 2-1/2″ from the other side. So this is actually a 4″ x 5-1/2″ card which is just 1/4″ smaller than usual but it creates that nice overlap for the pocket! On the bottom portion, I used Tear And Tape along the sides to secure the pocket. I just like that stronger adhesive to ensure the pocket will stay together as a piece of paper slides in and out of it. Then I added a piece of the Simply Elegant Designer Series Paper to the bottom piece (5-1/4″ x 1-3/4″).
Next, I used the Elegantly Said Stamp Set for all of the images. The corner image was stamped in Basic Gray and the flower stamped in Cherry Cobbler. For the inside card, I stamped the flower image off twice and then onto the cardstock for that super subtle look. You don’t want it to overpower your greeting! I love getting images and greetings out of one stamp set!!
The front focal point was stamped on Basic White (2-1/4″ x 2-1/4″) and layered onto Cherry Cobbler cardstock (2-1/2″ x 2-1/2″). The inside card measures 3″ x 4-1/4″ layered onto Cherry Cobbler measuring 3-1/4″ x 4-1/2″.
If you would like to recreate this pocket style card, check out the supplies listed below that you need or select ADD ALL TO CART and then you can always delete the items you don’t need. Easy, quick ordering!
I am always in need of Thank You cards because I am a firm believer in sending them out for every gift we receive. Lately with Alex being born, his baptism and Claire’s birthday, I’ve been sending out a ton. I also send them out each month to everyone who orders from me that month! This strawberry card is perfect and I love the coordinating inside greeting – So Sweet Of You!!!
This card I created uses Poppy Parade and Whisper White cardstock. The Poppy Parade card base measures 5-1/2″ x 8-1/2″ and the 2 pieces of Whisper White are 4″ x 5-1/4″. One of the pieces of white is for the front and one for the inside of the card!
Using the Sweet Strawberry Stamp Set, I stamped 2 of the leaves and flowers in Memento Black Ink and colored them with Stampin’ Blends. I used Daffodil Delight for the flower centers and Granny Apple Green for the leaves. You can stamp these images as close together or far apart as you wish. It all depends on your greeting panel in the center or preference on how much of the white you want covered!
Next, I stamped some strawberries onto Whisper White in Poppy Parade Ink. The outline image was stamped full strength ink and the solid background stamp was stamped off once (or twice if you want an even lighter look or a variation in color)! Using the coordinating punch, I punched them out! Then I took Granny Apple Green cardstock and stamped some leaves in Granny Apple Green. I used 2 leaves on the front and 2 leaves on the inside of the card!
For the greeting, I just used some scraps of Whisper White and Basic Black cardstock to stamp the greeting. The Thank You greeting is thinner but the Happy Birthday greeting is wider. I love how you can easily adjust this piece of cardstock to create either card. When I went to assemble, I added the strawberries first and held the greeting over the top to help with placement. The strawberries and greeting all have Stampin’ Dimensionals!
On the inside I used the greeting That Was So Sweet Of You and I love it! I also stamped the strawberries onto the cardstock but added punched out leaves. This was a bit of an accident to have my strawberries “standing up” or upside down or however you want to see that. Apparently I kept thinking of a pear. I did actually stamp another card with them the other way and it really looks just the same so I think I like this mistake one better! See no mistake in stamping is bad, just an alternative! 🙂
If you would like to recreate this strawberry card, check out the supplies listed below! Purchase just the ones you need or click Add All To Cart!!! Either way, have fun and enjoy!
You all know how much I love flowers, scrolly fonts, and ribbon as my go-to embellishment!!! Check out this card that just screams LAURA!!!! The greeting – Here For You Now And In Better Days Ahead is just amazing too!!!
I created this card with the NEW Hand Penned Designer Series Paper measuring 3″ x 3-3/4″ which is a perfect size to use up an entire sheet of 12″ x 12″ Designer Series Paper! BONUS! I layered it onto Misty Moonlight and a Pale Papaya card base! This color combination is just fabulous!!!
The stamp set I used is the Color & Contour Stamp Set which has this fabulous greeting, flower, and those fun little dots that I used in the corner. I thought it added a little extra fun rather than just have solid cardstock! The greeting was stamped on a die cut which is in the Color & Contour Bundle – Scalloped Contour Dies. These are AMAZING!!!! Such fun scallop edged images with so much fun texture and look! MUST HAVE!
On the inside of the card, I stamped a flower and the coordinating greeting. It really pulls the card together I think. You could also stamp the flower onto the envelope too.
Here I created 2 more cards using different prints from the same Hand Penned Designer Series Paper Pack. Because the colors were a bit different, I went with Pale Papaya and Pool Party! Which color combination is your favorite – Misty Moonlight or Pool Party??? Let me know in the comment below! I love how you can use different patterns in the same pack for a fabulous card in the same style!
If you would like to recreate this “Here For You Now” card, check out the supplies listed below! You can purchase them individually or click Add All To Cart for quick and easy shopping!!!
I love All Inclusive Kits because they are perfect for gifting to someone or for a beginner stamper to get their feet wet!! They come with everything you need to make the cards except scissors. The Hello Dear Friend Card Kit is my current favorite because of the flowers and the AMAZING GREETINGS!
I love the greetings so much for #happymail cards or even thank you notes. My favorite actual card from the bunch is the mini purple thank you card! There is just something about the flower bunch in front of what looks like a window that I love!!!
Don’t you think it looks like a church window or something??? I just love it and it’s super simple. TIP: Be sure to stamp the greeting up high so that it fits. As you can see in my sample, the Y cuts off a bit at the bottom!
This card is my 2nd favorite because that greeting makes me smile!!! TIP: Add adhesive to the middle and lower left corner of the vellum so it will be covered up with the flowers and greeting! The purple flower was adhered on the card flat but the pink and yellow one are popped up with Stampin’ Dimensionals!
This card is quick and simple. The perfect size for a little note to drop with an item on someone’s porch, desk, or even hand it to them! Just a little something to brighten your day! Who wouldn’t love that?!?!?
I created this card with the vellum diamond both up and down. Honestly, I couldn’t really tell the difference like it should be one way or the other. It looks amazing both ways and the flower and greeting sort of take away from the fact that it’s a diamond shape!
Which one is your favorite?? Let me know in the comment below! If you would like to see me create all of these cards, check out this video! I’ll be honest evenings and this pregnancy made my stamping a bit of a hot mess but not every stamping session is perfect! LOL
I love Birthdays! Everyone has one and it’s the perfect time to celebrate OURSELVES! It’s our day! So do exactly what you want and enjoy it to the fullest. Heck, sometimes I even like to call it my birthday month! It’s not my birthday month but I do have a fabulous birthday card to share with you today! I think it’s total perfection!
I just love this birthday greeting from the Sale-A-Bration Approaching Perfection Stamp Set! That set has lots of fun birthday greetings in it AND you can get it for FREE with a $50 order! Woot Woot!
This fun card is a Z fold card. I started with a Bermuda Bay card base. Fold it in half like a normal card and then fold the front panel back in half! It’s as easy as that. Then I added some Flower & Field Sale-A-Bration Designer Series Paper to the front panel. This piece measures 5-3/8″ x 2-1/8″.
For the greeting, I used the Stitched Rectangle Dies in Whisper White and Bumblebee. When I did the greeting with regular dies, it just didn’t pop. Then I did the stitching and it just POPPED! It’s crazy how such a little texture gives such a big look! The greeting was stamped in Bermuda Bay on the front and inside! Be sure when adding the rectangle greeting to the card front that you only put adhesive on the left hand side otherwise you will seal your card closed! Then I finished it off with a few Black
If you would like to create this Total Perfection card, check out the supplies below! Remember that you can select the Approaching Perfection Stamp Set and Flower & Field as FREE Sale-A-Bration items for every $50 you spend!


")


")
 Designer Series Paper")


 Denim Ribbon")


")


 Open Weave Ribbon")

")

 Designer Series Paper")


")
 Specialty Designer Series Paper")


 Designer Series Paper")

 Woven Ribbon")


")
")


 Cardstock")


