Technique Tuesday – Coloring Embossing Paste with Sponge Daubers!!!

Posted on

Happy Tuesday!!! You all know what that means!!! I have a fabulous technique to share with you today. I’m coloring Embossing Paste with Sponge Daubers. This technique is super cool because you only use the amount needed of the Embossing Paste. When I colored some with Re-Inker in the past, I ended up making millions of cards because I colored too much paste!

Coloring Embossing Paste With Sponge Daubers, www.LaurasStampPad.com

I love how that background adds texture to the card and gives it a fun variation in color. Also, I love love love my Sponge Daubers and while I have used them in awhile, I do enjoy it!

I started with a Whisper White card base measuring 4-1/4″ x 11″. Next, I took a piece of Pear Pizzazz measuring 3-3/4″ x 5″ to add the Embossing Paste to it. First, I took the Sweet Soiree Decorative Mask and added color all over by pouncing a Sponge Dauber over the top. You can always use the same color (Pear Pizzazz) or go a shade darker like Old Olive or Wild Wasabi. Mixing the colors and pouncing all over would be fabulous too. After adding color in an area big enough for the cardstock, I placed the mask over the cardstock and onto the Silicone Craft Sheet. Then I added the Embossing Paste and as it swipes across the mask it picks up the color. I love it! Peel off the mask and allow it dry!

From the Heart, www.LaurasStampPad.com

While the Embossing Paste is drying, I worked on the floral image and greeting. Using the Petal Palette Stamp Set and coordinating Petals & More Framelits (Bundle & Save 10%), I stamped the flowers and greeting Memento Black Ink. Then I colored the flowers with the Old Olive and Calypso Coral Stampin’ Blends. After coloring, I die cut the flowers out and the greeting with the frame. Now to assemble, I added some Organza Ribbon around the card and then added it to the card base. Next, I added the flowers and greeting to the card front with Stampin’ Dimensionals. This gives the card some texture but also a nice smooth look over the Embossing Paste. To finish off the card, I added some Enamel Shapes to the greeting. I love it and it’s perfect for lots of occasions!

If you would like to see this all in action, check out the Video Tutorial below or click here! Be sure to give the video a thumbs up if you liked it and don’t forget to subscribe if you are new. If you would like a notification when I post a new video, be sure to click the bell right next to the subscribe!!!

Happy Stampin’

~Laura

Product List


Technique Tuesday – Adding Snow with Embossing Paste!!!

Posted on

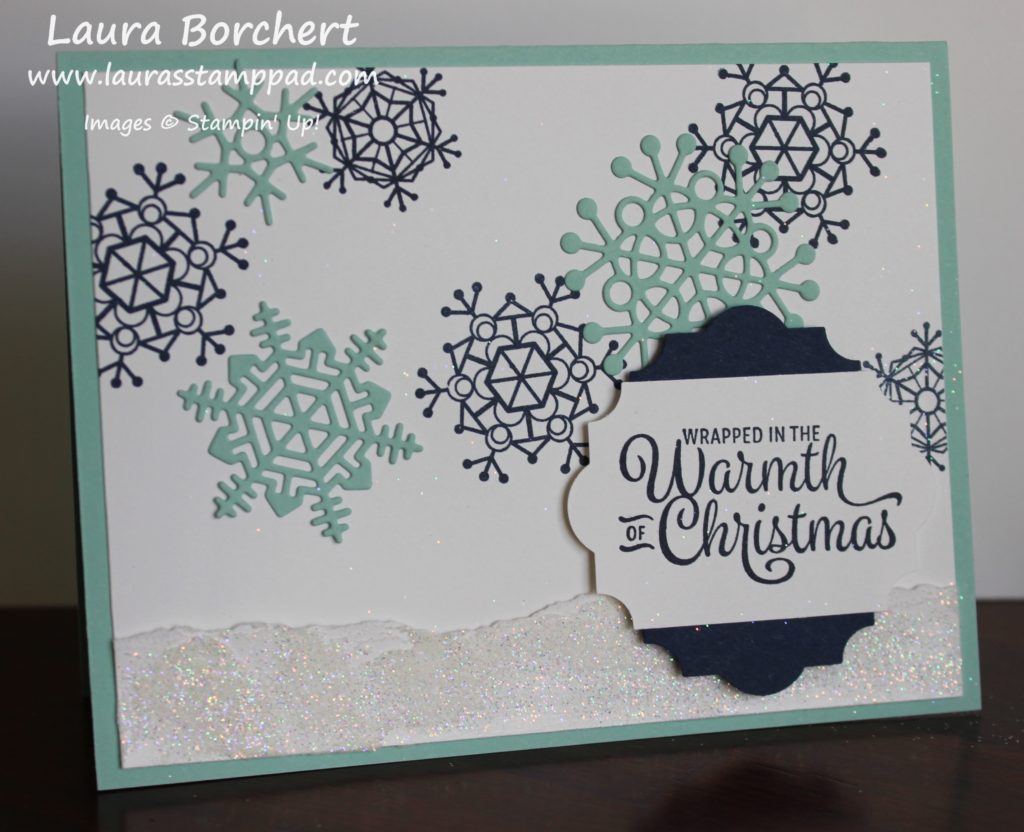
Happy Tuesday!!! That means I have a fabulous technique to share with you today! We are adding snow with Embossing Paste to create a fabulous winter scene!

Adding Snow with Embossing Paste, www.LaurasStampPad.com

I’m not a fan of winter….like at all but this card sure looks amazing. I would be just fine stamping winter and not actually having it happen! Do you like Winter? Let me know in the comments below!!!

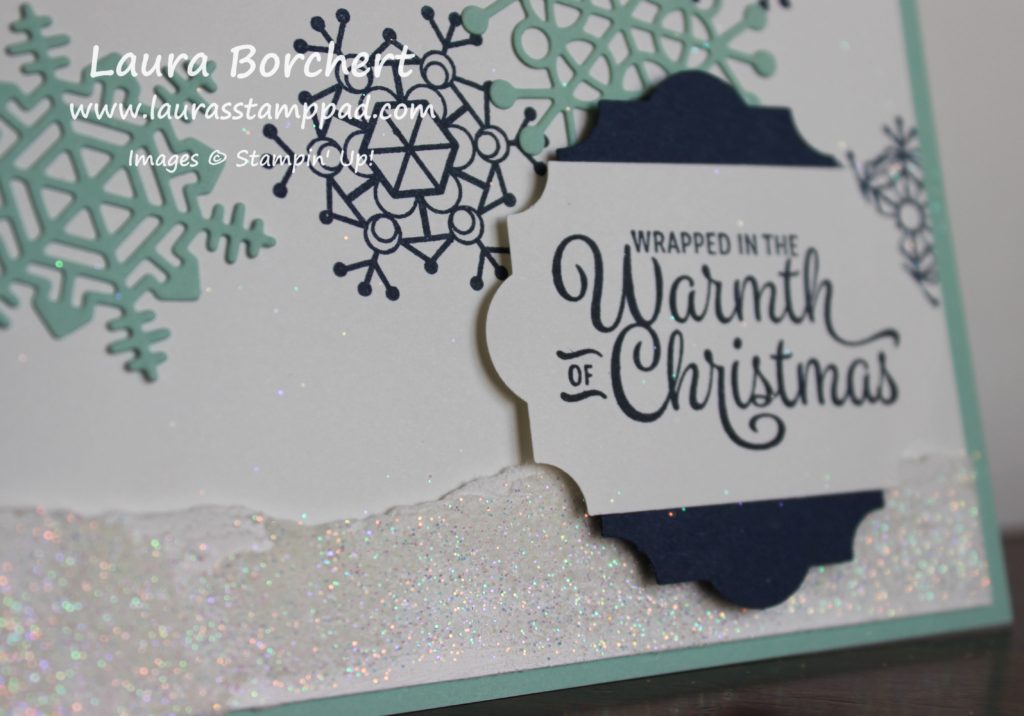
I started with a Pool Party card base. Next I took  a piece of Whisper White (4″ x 5-1/4″) and stamped snowflakes all over in Night of Navy Ink. I used the Colorful Seasons Stamp Set. Now for that amazing snow on the bottom! I simply took a scrap piece of white and tore along the top for texture. Next, I smeared a thin layer of Embossing Paste over the top. Then sprinkle some Dazzling Diamonds glitter all over the top. Right after that, I added Snail adhesive along the bottom of the snowflake stamped white piece and pressed the glitter strip onto it.

Snow on the Ground, www.LaurasStampPad.com

I did this while it was still wet for a few reasons. 1. I found that adding it to the base first would allow for glitter to stick and hold around the cardstock and under it. 2. If I let the Embossing Paste dry with the glitter first, sometimes it curls and when I would press it flat, it cracks. Pressing it on while still wet gets a perfect look with minimal glitter and isn’t really not that messy. Simply wash your hands to get any excess glitter off after pressing it on!

Next, I die cut some snowflakes with the coordinating Seasonal Layers Framelits (Bundle & Save 10%). I loved this bundle because there are 3 snowflakes in the set so I only had to crank through the Big Shot once for every card! I used the Fine Tip Glue Pen for adhering the snowflakes to the card. For the greeting, I stamped it with the Snowflake Sentiments Stamp Set and punched it out with the Everyday Label Punch. I punched  a second one in Night of Navy and placed that one up and down and the greeting over the top side to side. I added this to the card front with Stampin’ Dimensionals! Just stunning!

If you would like to see this in action, check out the Video Tutorial below or click here! Be sure to give the video a thumbs up if you liked it and don’t forget to subscribe if you are new. If you would like a notification when I post a new video, be sure to click the bell right next to the subscribe!!!

Happy Stampin’

~Laura

Product List


Lemon Cupcakes Are My Favorite!!!

Posted on

Lemon Cupcakes Are My Favorite!!! There is just something about that tang and the sweetness! Cupcakes are heavenly to me anyway!!! Let me know in the comments…..cake or cupcakes???

Lemon Cupcakes are my favorite, www.LaurasStampPad.com

When I decided to make cupcakes with embossing paste icing, I knew I wanted yellow for a lemon look!!! I think I nailed it! 🙂

I started with a Night of Navy card base (4-1/4″ x 11″). Next, I took a piece of Whisper White measuring 3-3/4″ x 1-3/4″ and stamped the greeting from the Sweet Cupcake Stamp Set in Night of Navy. Be sure to stamp it on the lower portion so the Designer Paper doesn’t cover it! I layered this onto the bottom of a piece of Daffodil Delight (4″ x 5-1/4″). On the top portion, I layered on a piece of Delightful Daisy Designer Series Paper (3-3/4″ x 3-3/4″). The designer paper till overlap over the top of the greeting piece. I tied some Daffodil Delight Double Stitched Ribbon around the piece, covering the overlap of papers. This piece was then added to the card front with Stampin’ Dimensionals.

For the cupcake, I used the Sweet Cupcake Stamp Set and coordinating Cupcake Cutouts Framelits. The liner is a 3 step stamping image. I stamped the largest image in Crumb Cake Ink. The next image was stamped in Soft Suede (stamped off once) and the smallest final image in Soft Suede (full strength). The icing was stamped with the largest (most solid) image in Crushed Curry. I decided on using a darker yellow so it would really pop! I added the liner to the card front with Snail Adhesive but I used Stampin’ Dimensionals for the icing! It is easier to ice the cupcake when it is adhered on already. Plus, this way you don’t have to touch it again while it dries.

Sweet Cupcake Stamp Set, www.LaurasStampPad.com

For this icing, I added a few drops of Daffodil Delight Re-inker to some Embossing Paste. Using the Palette Knives, I mixed it in and then added a fine layer to the cupcake icing. Go thin so it doesn’t take forever to dry and there is less curling and cracking of the cardstock. A few things I did to finish off the card were add some Glitter Enamel Shapes to either side of the greeting and Wink of Stella on the icing! Be sure the embossing paste is completely dry and just brush some glitter all over for a hint of shine! I just love how this turned out!!!

Product List

Happy Stampin’

~Laura

Need Mittens in Alaska, www.LaurasStampPad.com

Don’t forget you can get the Smitten Mittens Stamp Set for FREE with a $75 order placed before August 31st!!! Click here for more details!


Berry Burst Embossing Paste!!!

Posted on

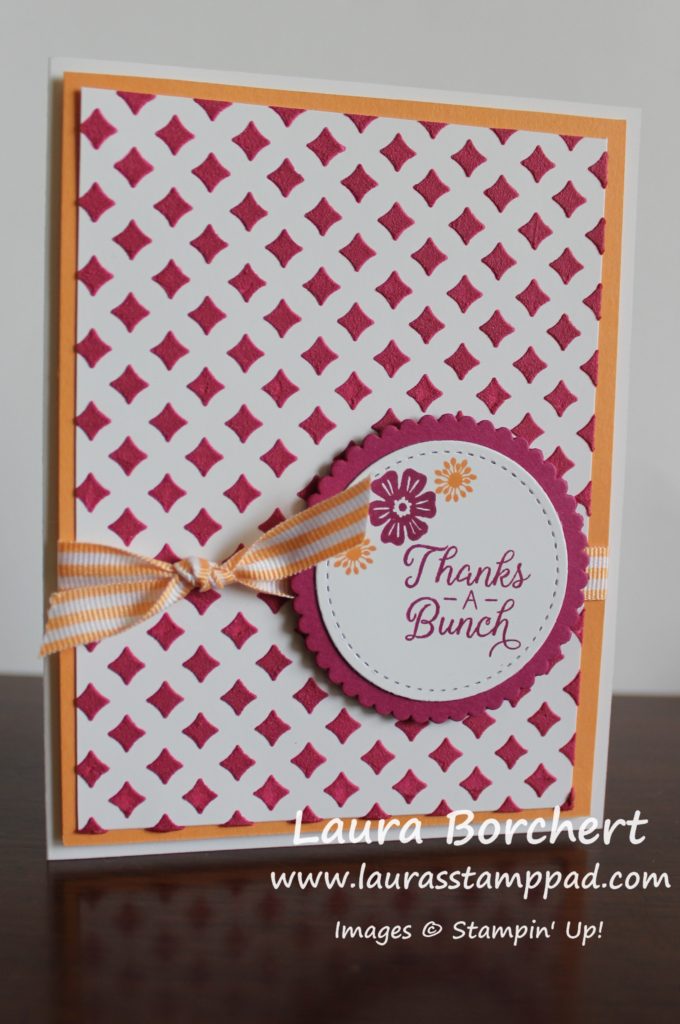
Did you know you can color Embossing Paste??? Here I made Berry Burst Embossing Paste and I love how it looks with Peek-A-Boo Peach!!!

Berry Burst Embossing Paste, www.LaurasStampPad.com

This color combination is super fabulous! You all know I love PINK but with this peach is just stunning!

I started with a Whisper White card base. Next I took another piece of Whisper White (3-3/4″ x 5″) and placed the diamond mask on top. This mask is from the Pattern Party Decorative Masks pack! Using the Silicone Mat, I scooped some Embossing Paste onto it and mixed in a few drops of Berry Burst Ink Refill. Simply fold and smear the paste around with the Palette Knives until you get the desired color. Once the color is perfect, just smear it over the top of the mask, allowing it to fall into the diamond shapes. I did a complete cover for this one but you could also just do a corner or one smear across. It’s all up to you! I set this aside and cleaned up the tools before finishing the card. It’s best to clean up the tools right away as it dries fast.

While the paste was drying, I worked on the greeting. First, I die cut the circles with the Layering Circles Framelits and Stitched Shapes Framelits. Using the Beautiful Bouquet Stamp Set, I stamped the greeting and added a few flowers in Berry Burst and Peek-A-Boo Peach!

Layering Circles with Stitched Shapes, www.LaurasStampPad.com

Now it’s time to assemble. I added the embossed piece to a layer of Peek-A-Boo Peach (4″ x 5-1/4″) and tied some Striped Ribbon around it. I added this layer to the card base with Stampin’ Dimensionals! The greeting was also added with Stampin’ Dimensionals since it goes over ribbon and embossing paste.

I love the simple look, cute greeting, and all that texture! If you want to check out more on the Embossing Paste, check out this Video Tutorial.

Happy Stampin’

~Laura

Need Mittens in Alaska, www.LaurasStampPad.com

Don’t forget you can get the Smitten Mittens Stamp Set for FREE with a $75 order placed before August 31st!!! Click here for more details!


Technique Tuesday – Creating Snowy Evergreen Trees!

Posted on

Happy Tuesday!!! You all know that means I have a fabulous technique for you! I’m showing you creating snowy evergreen trees with Embossing Paste! It’s super fabulous!

creating snowy evergreen trees, www.LaurasStampPad.com

This card is so amazing! I just love it!!! The texture and snow on those trees looks so real! Eeee! 🙂

I started with a Whisper White card base. Next, I layered on Real Red (4″x 5-1/4″) and Whisper White (3-3/4″ x 5″). Using the Card Front Builder Thinlits, I die cut the double and the single tree in Garden Green. I added these to the top half of the card and then placed the Wood Textures Designer Series Paper piece over the tree bottoms.

Now for adding snow to the trees. I used 2 of the Palette Knives; one to scoop out some and one to apply it on. Since it dries so quickly, I didn’t want to leave the tub of Embossing Paste open while working. Using the second Palette Knife, I pulled a bit of the paste off and just lightly touched the edges of the tree. Just a few light dabs all over the trees is all you need! It gives that light snowy look. Be sure to tap a little in the middle of the tree so it’s all around and not just on the sides.

Embossing Paste Snow, www.LaurasStampPad.com

For the greeting, I stamped it from the Carols of Christmas Stamp Set in Real Red Ink onto Whisper White. I die cut the greeting with the Layering Squares Framelits as well as the Gold Foil layer. I added the greeting to the card with Stampin’ Dimensionals. To finish off the card, I added a Gold Metallic Enamel Star to the top of the one tree!

Greeting Layer, www.LaurasStampPad.com

I spent a long time trying to figure out how to layer the greeting. Here are some of the ideas I was playing with – Garden Green, Silver Foil, Gold Foil, or Crumb Cake! Which one would you pick? Let me know in the comments below!

If you would like to see this all in action, check out the Video Tutorial below or click here! Be sure to give the video a thumbs up if you liked it and don’t forget to subscribe if you are new. If you would like a notification when I post a new video, be sure to click the bell right next to the subscribe!!! If you would like to see more samples using the Carols of Christmas Bundle (Save 10%), click here and stay tuned!

Happy Stampin’

~Laura


Nothing More Truly Artistic Than To Love People!!!

Posted on

There is Nothing More Truly Artistic Than To Love People….that’s just a fabulous greeting for a card, especially a homemade one!

Truly Artistic People, www.LaurasStampPad.comI really like this card for all of the layers and texture but also that color combination. Berry Burst is my favorite color right now for sure!!!

I started with a Whisper White card base. Next, I took a piece of Berry Burst (4″ x 5-1/4″) and added some Embossing Paste. I used the Pattern Party Decorative Masks and the Palette Knives to swipe some paste diagonally across. I didn’t fill in each diamond hole, I just swept it across and that’s it. That messy, eclectic look is super cool for any style of card! I set that part aside to dry while I completed the greeting!

Scallop Square Greeting, www.LaurasStampPad.com

For the greeting, I die cut out the squares with the Layering Squares Framelits. The greeting was stamped from the Just Add Text Stamp Set in Berry Burst Ink. Now to assemble, I tied some Soft Sky Classic Weave Ribbon around the Berry Burst and added it to the card front. Next, I added the greeting with some Stampin’ Dimensionals. I like using these for dimension on my project as well as a nice tight grip over the embossing paste. The foam sinks into the embossed image and holds on tight. To finish off the card, I added a few Soft Sky Enamel Shapes.

If you would like to see more samples as well as video tutorials using Embossing Paste, check them out here, here, and here!

Happy Stampin’

~Laura

Want to join my Mailing List and get fabulous offers, card making tips, and more? Be sure to sign up in the upper right corner if you are on a computer or at the very bottom of the page if you are on a mobile device!


Giant Textured Medallion Using Embossing Paste!!!

Posted on

Check out this giant textured medallion using Embossing Paste that I created!!! I think this would be super cool on a gift bag or something that could really show the entire thing!

Giant Textured Medallion Using Embossing Paste, www.LaurasStampPad.com

I started with a Lemon Lime Twist card base. Then I took a piece of Melon Mambo (4″ x 5-1/4″) and placed it on some Grid Paper. Using the medallion from the Pattern Party Decorative Masks, I placed it on top and smeared the Embossing Paste all over. There are 3 different styles of Palette Knives to use for smearing the paste on your project. I just pick the one available or my favorite one. I haven’t really found that one is better than another. Once you are done applying the paste, be sure to rinse the items so it doesn’t dry on your tools.

While the image is drying, I worked on the greeting. I used the Layering Circles Framelits in Whisper White and Lemon Lime Twist. This color combination is so beautiful and makes me happy! Next, I stamped the greeting from the Just Add Text Stamp Set in Melon Mambo Ink. After layering the circles together, I added some loops of Copper Metallic Thread to the backside. Simply wrap it around your fingers, slide the loops off and twist in the center creating a figure 8. Place this on the back of the greeting and secure with Stampin’ Dimensionals. That twist is what really makes the loops fan out so nicely.

Life Is Better With Friends, www.LaurasStampPad.com

Now to assemble it all together. I added the Melon Mambo medallion piece to the card base. If you find your cardstock curled a lot, be sure to use a strong adhesive like Tear & Tape or Fast Fuse. Next, I added the greeting with the Stampin’ Dimensionals securing the loops! I love it!

If you would like to see more samples and a video using Embossing Paste, click here and here!

Happy Stampin’

~Laura


Rainbow Hot Air Balloon in the Clouds!!!

Posted on

I think this card is perfect for a child……or the child in all of us!!! The Rainbow Hot Air Balloon in the Clouds is so bright and colorful it will lift anyone’s spirits and make them smile!

Rainbow Hot Air Balloon in the Clouds, www.LaurasStampPad.com

I started with a Whisper White card base. Next I took a piece of Pool Party cardstock (4″ x 5-1/4″) and added the clouds with Embossing Paste. This stuff is super fun and easy to use. Simply place the cloud mask from the Pattern Party Decorative Masks down and using the Palette Knives smear the paste over the top. I set this aside to dry while I created the hot air balloons. Don’t worry, it dries really quickly so be sure to clean off  the mask before moving on!

Hot Air Balloons, www.LaurasStampPad.com

For the big balloon, I die cut out the pieces using the Up & Away Framelits. The colors used were Pumpkin Pie, Daffodil Delight, Emerald Envy, Pacific Point, and Real Red. Next, I assembled the pieces together by pouncing some Multi-Purpose Glue on the back with a sponge and placing the pieces down. The small balloon was stamped in Emerald Envy using the Lift Me Up Stamp Set!

Now the clouds should be all dry and ready to assemble. I added the clouds to the card base and then added the balloons with Stampin’ Dimensionals for a little more texture and 3D look! For the inside of the card, I added a little greeting from the Lift Me Up Stamp Set!

Cloud Nine, www.LaurasStampPad.com

If you would like to see this all in action, check out the Video Tutorial below or click here! Be sure to give the video a thumbs up if you liked it and don’t forget to subscribe if you are new. If you would like a notification when I post a new video, be sure to click the bell right next to the subscribe!!!

Happy Stampin’

~Laura