Sunrise or Sunset?!?

Posted on

Which do you prefer – Sunrise or Sunset?!?!? Honestly I am a bit torn but if I had to pick just 1, it would be sunrise. I love that early morning crispness, the birds chirping, and that feeling of newness. It’s a brand new day to be amazing! I love that! Although I will say right now, I’m not happy to see sunrises because that means the kids woke me super early. LOL

Sunrise or Sunset with Circle Saying Stamp Set, www.LaurasStampPad.com

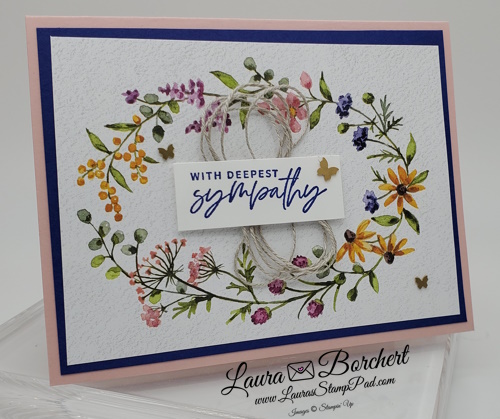
This beautiful card uses the Circle Sayings Stamp Set and coordinating Circle Punch! I am loving this bundle WAY more than I ever thought I would! It’s just super versatile and I love that birthday greeting! It is small and scrolly and fabulous!

I used Azure Afternoon for the card base as well as that color from the Brights Designer Series Paper Pack! Next, I layered this with a piece of Night of Navy cardstock! I thought about coloring all of the waves and everything but then I stopped at just the sun and I love it! What do you think?!?! For this card, I used Daffodil Delight Light Stampin’ Blends. If you want a bit brighter or more yellow/orange, go for the Daffodil Delight Dark Stampin’ Blends! Another option is to use both and really highlight the sun! 🙂

Check out the supply list below if you wish to recreate this card! It can be a sunrise or sunset….it’s all up to you!

Happy Stampin’

~Laura

Product List

Gone Fishing!

Posted on

Summertime calls for relaxing and enjoying the outdoors, right?!?! I love the outdoors but allergies and mosquitoes also love me so we try to find a balance! This month I am creating with the Gone Fishing Bundle and having lots of fun! These cards are fabulous, masculine, and perfect for lots of different man occasions!!! Join in the fun with the Online Card Class!

Let's Go Fishing Online Card Class, www.LaurasStampPad.com

I really struggle with masculine cards so I like to create and entire class dedicated to that. This time I went with the Let’s Go Fishing Suite from the NEW Annual Stampin’ Up! Catalog! The outdoorsy feel and rich color combinations are just perfect! This class will be offered in person (June 29th) and online (June 19th). If you wish to participate in the Online Class, check out all the details and ways you can stamp along here!

Gone Fishing Stampin' Up Stamp Set, www.LaurasStampPad.com

Here is one of the samples we will be creating in the card class! You will notice some New In-Colors like Pebbled Path and Wild Wheat as well as some classics of Mossy Meadow and Basic Vanilla! I have to admit I haven’t stamped with Basic Vanilla in what feels like ages. It seems all of the designer papers have used Basic White! It was nice to switch it up for a change!

I hope to see you online or in person to stamp these fabulous fishy cards using the Gone Fishing Bundle later this month! Click here for all the details!

Happy Stampin’

~Laura

Product List

Little Monkey!!!

Posted on

Hi! I’m Laura and I LOVE monkeys. I like REALLY love them! When I was a kid, I said that was what I wanted to be when I grow up! The kids have lots of monkey toys because I’m trying to push it on them as well! LOL When I saw the Little Monkey Stamp Set and coordinating Punch, I knew I had to have it!!!

Little Monkey Stampin' Up Stamp Set, www.LaurasStampPad.com

Here is a quick and simple note card that I created! The hardest part of this card is the coloring and that’s not even hard! I would call it more like time consuming than hard. In the photo above, I stamped directly onto the Note Card. After coloring this one, I did see a bit of bleeding from the markers to the inside of the card. So for my event, I had everyone stamp onto a layer of Basic White and then add that to the Note Card either flat or with Stampin’ Dimensionals! The colors I used were Memento Black Ink, Early Espresso Ink, and Granny Apple Green Ink and Blends! Super cute and fun!

Stepped Up Little Monkey Card!

Monkey Builder Punch, www.LaurasStampPad.com

Here is another card I created! This one is stepped up a bit! I used Tahitian Tide as my card base and stamped the leaves all over in Granny Apple Green! Then I stamped the branch onto Granny Apple Green and ripped the top and bottom for a little bit of texture! Next, I stamped the greeting in Night of Navy and layered it onto Night of Navy cardstock for a little more POP! The monkey was stamped in Early Espresso onto Pecan Pie and then punched out!

Which card to you like more – the simple note card or the stepped up version?!? Let me know in the comments below!

If you love monkeys too, check out the supplies listed below!

Happy Stampin’

~Laura

Product List

Moody Mauve Monochromatic!

Posted on

Do you like to create with all the colors or stick with just 1?!? What do you think of my Moody Mauve monochromatic card?!? I’m a little bit of both! I love all the colors but sometimes I enjoy creating with just 1.

Moody Mauve Monochromatic Card, www.LaurasStampPad.com

Here I started with a Basic White card base! Then I took a piece of Moody Mauve cardstock (4″ x 5-1/4″) and added a layer of In Color Designer Paper to the lower half (3-3/4″ x 3″). There are so many fun prints in this designer paper pack that you can use for this card or even mix and match to add more color to your card! Next, I added a strip of Moody Mauve Textured Ribbon across the card where the designer paper ends. This sort of smooths out the line from designer paper to cardstock! Simply adhere the ends of the ribbon behind the cardstock and then add this layer to the card base.

For the focal point, I used the Circle Sayings Stamp Set and coordinating Circle Punch! Bundle & Save 10% when you purchase these together! Normally I stamp first and then punch it out but in this case I do the opposite. I punched out the Basic White cardstock first and then stamped the floral image near the bottom edge. Next, I stamped the greeting above that. I was afraid that if I stamped the 2 images and then punched it out they would be too far apart and not fit in the punch. Finally I added this to the card front with Stamping Dimensionals and finished it off with a Moody Mauve Dot! This completes my Moody Mauve monochromatic card!

What color would you use to create this card? Let me know in the comments below!

Happy Stampin’

~Laura

Product List

This Little Piggy!

Posted on

It’s always sad to see stamp sets retire and this little piggy set is one of them! It’s also on SUPER sale too!!! This Birthday Piggy Stamp Set is under $10 and the coordinating dies are under $15. WOOT WOOT for an amazing bundle! Click here to shop them!

This Little Piggy Stampin Up, www.LaurasStampPad.com

I used a lot of retiring products in this card actually so snatch them up before they are gone at the end of the month! The black and white polka dot paper is from the Perfectly Penciled Designer Series Paper Pack (sold out already). The Balmy Blue Textured Shimmer Paper (not retiring) is super fun to add to a card or any project. It has just a hint of shimmer to it so nothing majorly bling-y. It’s the texture that is super fun though. I love it!

For the focal point, I used the Scallop Contour Dies and stamped the piggy in Basic Gray Ink! I went for gray because it’s a bit softer than Memento Black. I really struggled with color options for my piggy. After coloring it I thought oh no, that’s awful but after it sat for a bit and the colors blended, I loved the look! For the piggy above, I used Petal Pink and Flirty Flamingo for the accents! For the piggy below, I used just Flirty Flamingo and while he’s PINK its super cute! So my advice for you is to just color and have fun and give it a bit to really blend and dry and then decide whether you like it or not.

Happy Birthday Piggy, www.LaurasStampPad.com

Here I created the same card but in landscape to fit this adorable piggy on a scooter! These adorable cards would be fun for any age really! I know I would giggle if I got this little piggy birthday card! What about you?!?

Be sure to snatch these retiring items before they are gone! Click here to shop all retiring products!

Happy Stampin’

~Laura

Product List

All The Layers!

Posted on

You all know I love bright colors and flowers! Here I created a card that is just that and I just want to make a million of them! It’s actually really easy and a fun way to use Designer Paper! Check it out with all the layers!

All the Layers Hues of Happiness, www.LaurasStampPad.com

Isn’t it just stunning?!?! Are you ready for all the measurements to layer together?!?!

Daffodil Delight – 4-1/4″ x 5-1/2″, Melon Mambo – 4″ x 5-1/4″, Daffodil Delight – 10″ x 3-3/4″, scored at 3″ and 8″. All of these pieces are layered onto each other! Then the Hues of Happiness Designer Series Paper measures 1-3/4″ x 3-1/2″ for the top piece and 2-3/4″ x 3-1/2″ for the bottom piece! You could use the same pattern for these 2 pieces or use coordinating pieces.

For the greeting, I used the amazing Something Fancy Stamp Set and coordinating dies. I love how the dies have layering labels! There is nothing better than a good label set and even better when they layer for a fabulous look like this!

Fun Fold Hues of Happiness, www.LaurasStampPad.com

This inside greeting is like the best ever. I love it so much because it’s so perfect to send to someone to brighten there day! This greeting could be stamped inside every card in my opinion!

I hope you enjoyed this card with all the layers! It’s so beautiful and easy to create! Try it out!

Happy Stampin’

~Laura


Gold Foil One Sheet Wonder!

Posted on

There is something about Gold and Navy that just looks stunning!!! Check out this fun Gold Foil One Sheet Wonder card that I created! It uses the NEW Naturally Gilded Specialty Designer Paper that came out this month!!!

Gold Foil One Sheet Wonder, www.LaurasStampPad.com

The Naturally Gilded Paper has sheets of Gold, Copper, and Silver! These prints are basic nature images which is perfect for any occasion! I paired it with the Something Fancy Stamp Set and Dies for a quick and simple card!

One Sheet Wonder

Now for the amazing One Sheet Wonder part where you can create 6 cards! Let me share the measurements so you can use every inch of the 12″ x 12″ Designer Paper. After all this paper is gorgeous and you don’t want to waste any. First, cut at 5-1/4″ creating a 5-1/4″ x 12″ strip. Then cut another strip at 5-1/4″. Now you should have 2 strips measuring 5-1/4″ x 12″ and 1 strip measuring 1-1/2″ x 12″. With both 5-1/4″ x 12″ strips, cut across every 4″ creating 6 pieces measuring 5-1/4″ x 4″. These will be used on the card fronts of 6 cards! Now with the 1-1/2″ x 12″, simply cut that in half at 3/4″ creating 2 strips of 3/4″ x 12″. Then cut across every 4″ creating 6 pieces measuring 3/4″ x 4″ which will be used inside the card!

One Sheet Wonder Something Fancy, www.LaurasStampPad.com

For the inside of this card, I brushed some Night of Navy Ink on the bottom of the Very Vanilla just to make the Designer Paper POP some more! I really love how it turned out!!! Of course, then I stamped the greeting crooked but it’s all good! 🙂 Check out all of the supplies below so you can recreate these gold foil one sheet wonder cards!

Happy Stampin’

~Laura

Product List

Thanks A Bunch!

Posted on

I DO NOT HAVE A GREEN THUMB! I am the youngest of 3 kids. My Mom is a major gardener in both flowers and vegetables and my oldest sister is the same! My brother does have a vegetable and then there is me with nothing. Thanks a bunch, apparently it all ran out by the time I came along! I can barely keep a house plant alive. I either over water it or forget about it. What I do enjoy doing is stamping with flowers and vegetables though if that counts?! 🙂

Thanks A Bunch Stampin' Up Sale-A-Bration Stamp Set - Laura's Stamp Pad

The Thanks A Bunch Sale-A-Bration Stamp Set has these adorable carrots and some super fun SPRING greetings! You all know how much I love Spring so I’m overjoyed. If you are new here, Welcome! My name is Laura and I LOVE SPRING!

For this card, I used Pumpkin Pie and Pear Pizzazz Ink! When stamping the carrots, I stamped off once with the full solid carrot piece in Pumpkin Pie Ink and then stamped it on the scalloped rectangle. Then I stamped full strength Pumpkin Pie for that detailed right side image. NOTE: I always find it easier to stamp the lighter image second because it is easier to line up an image through a lighter ink (stamped off ink). That would mean stamping the right side detailed image first in this case. The problem here is that spacing would be difficult! It is doable if you start with the center one and work your way out.

I have another tip for the carrot tops too! The solid leaf was stamped in Pear Pizzazz and stamped off. As for the other greenery piece, that one is stamped in full strength. I also felt that the stem was super long so I simply curved it around the clear block to shorten the image!

Check out the supplies listed below to recreate this fabulous card using the the Thanks A Bunch Stamp Set that you can get for FREE through Sale-A-Bration!

Happy Stampin’

~Laura

Product List

Dainty Flowers!!!

Posted on

Have you seen the Dainty Flowers Designer Paper that is one of the $50 Level Sale-A-Bration items?!?!? It is so beautiful! I know I am a flower girl already but this paper is just amazing! It is also perfect for making quick and simple cards too!

Dainty Flowers Designer Paper Sale-A-Bration, www.LaurasStampPad.com

The colors of this card (Blushing Bride & Starry Sky) are a beautiful combination. Add the layer of Dainty Flowers Designer Paper for a quick and simple card. All I did next was add a greeting with some Linen Thread for texture and then some Brass Butterflies. This card could be used for many different occasions! Which occasion would you use it for?!?!?

Linen Thread Loops for Texture on A Card, www.LaurasStampPad.com

For those Linen Thread Loops, I simply added a dab of adhesive to the middle of my card. Then I wrapped some Linen Thread around 4 fingers. I try to end my loop around the same spot as where the starting end is. Then slide the loops off your fingers and twist into a figure 8. This makes the ribbon fan out a bit. Then place this down with the center of your figure 8 on that dab of adhesive in the center of your card. Add the greeting over the top of the loops with Stampin’ Dimensionals! Feel free to pull the loops a bit to fan them out for more texture! This can be done with Baker’s Twine and other thin threads and ribbon! I hope you will try it out too!

Sale-A-Bration ends on February 28th so don’t wait to place your order and earn lots of Free Sale-A-Bration goodies. The Dainty Flowers Designer Paper has been a popular one so I could see it running out perhaps!

Happy Stampin’

~Laura

Product List

Evergreen Trees!!!

Posted on

Evergreen Trees come in all shapes and sizes which is why this card is super fun! I used the 3 different sizes of trees from the Trees For Sale Stamp Set and 3 different color combinations! Check it out!

Evergreen Trees Trees For Sale Stampin Up, www.LaurasStampPad.com

You might look at this card and think WHOA with the colors but there are some trees out there that are rather blue looking instead of green! I also love the color variations with this card! It does get rather tricking having 5 ink pads out on your craft table though. Be very careful which ink pad you are tapping the stamp into! LOL

Evergreen Trees Color Options:

Shades of Blues & Greens, www.LaurasStampPad.com

For the largest tree, I used Soft Sea Foam for the base and Pear Pizzazz for the detailed image. Next, I used Pool Party for the base of the medium tree and Coastal Cabana for the detailed image. On the small tree, I used Soft Succulent stamped off once for the base and full strength for the detailed image. You could also pair Soft Succulent with Evening Evergreen! TIP: Start with the largest tree first and work your way down. This way you have plenty of room for the big tree and can fill in with the smaller ones.

Christmas Evergreen Tree Greeting Card, www.LaurasStampPad.com

Here is another sample of the card but I didn’t stamp the background of the card base with the little snowflakes. In a way, I like it because the other card seems very busy but then I also kind of think this one looks a little plain. Which one do you prefer – snowflake background or not?!? Let me know in the comments below!

If you would like to make this Evergreen Trees card, check out the supplies listed below! Want to see this in action? Check out this video!

Happy Stampin’

~Laura

Product List